
This is the project that I prepared for my “shoebox” at the CNY gathering yesterday. I bought these mini keychain clipboards at ACMoore a year ago and never used them. I thought this would be a great time to dig them out. The basic directions I gave the ladies who I shared a table with are below. I forgot, though, to add that I sanded the edges of the clipboard after the paper was applied. I thought that the clipboard would be great to place small photos or other items inside. The photo turn and top clip hold the “card” closed.
We had so much fun! It is great meeting up with old friends and making new ones!
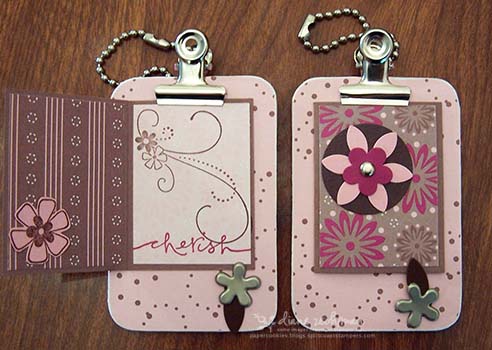
1. Attach the pink patterned paper with dotted circles to the front of the clipboard with desired tape or glue.
2. Trim corners with scissors.
3. Fold the Cocoa cardstock “card” on scored line.
4. Stamp the swirl with Choc. Chip ink and “cherish” with Pomegranate ink onto one of the light pink sides of the small patterned paper.
5. Attach the 3 small pieces of patterned paper to the Cocoa “card”. See example.
6. Stamp the middle of the 3 flowers onto the small scrap of pink cardstock with Choc. Chip ink. Cut out and attach as shown.
7. Attach the Cocoa “card” to the clipboard *just under* the top clip.
8. Punch a small hole in the bottom of the clipboard with the Crop-A-Dile about midway between the card and the bottom.
9. Attach the photo turn with the flower brad through the hole.
10. Punch the large flower from the scrap of Pretty in Pink cardstock.
11. Punch the small flower from the scrap of Pomegranate cardstock.
12. Layer and attach the flowers onto the Choc. Chip circle. Pierce a hole with the thumbtack and insert brad. Attach to the front of the “card”.
 cookiestamper ♥


Pingback: » some answers