Category Archives: dmz designs

prim anniversary blessings

Hope you are enjoying your weekend!  Tomorrow is our daughter and son-in-law’s first anniversary.  I wanted to make a card and I turned to today’s SCS Inspiration Challenge for some inspiration!  The photos to choose from are beautiful cakes and I picked this one to create my card.

prim blessings anniversary diane zechman

I was planning to go with the blue colors of the cake but I decided to use a pool color instead since that was the color of the wedding.

I used my Prim Blessings stamp set and the NEW matching dies

prim blessings anniversary close diane zechman

…and I used the SNSS Anniversary Innies for the words.  Here’s the inside.

prim blessings anniversary inside diane zechman

Have a great evening!

stamps- Sweet ‘n Sassy- Prim Blessings and Anniversary Innies; paper- white, SU! Pool Party; ink- Memento Tuxedo Black, Versafine Black, SU! Coastal Cabana; accessories- Copics, Sweet ‘n Sassy Prim Blessings dies, Cuttlebug Swiss Dots embossing folder, SU! ribbon, Scor-Tape, foam dots.

remember when…

Last weekend I attended a shoebox swap in Ilion, NY with about 25 stamping friends.  We designed and prepared the supplies for a card that everyone in attendance could make.  I grabbed a Sizzix card die that I hadn’t used yet and my Sweet ‘n Sassy- Sassy Cindy stamp set to create my card.

When the card is opened, the front stands up when placed behind the die cut notch.

remember when diane zechman

On the inside, above the notch, is one of the Sassy Cindy sentiments.

remember when inside diane zechman

The cupcake is a Martha Stewart punch popped up with foam tape.

Hope you have a great weekend!

stamps- Sweet ‘n Sassy- Sassy Cindy; paper- Aqua, Cream, SU! Pixie Pink and Perfect Plum, The Paper Studio- Party Polka and Party Candles; ink- Memento Tuxedo Black; accessories- Sizzix Royal Stand Ups Card, Promarkers, Martha Stewart cupcake punch, ribbon, SU! oval punches, foam tape, rhinestones.


not old

Hello and happy St. Patrick’s Day!  My card today isn’t green…but I do have a fun one to share using my Sassy Cindy stamp set by Sweet ‘n Sassy Stamps.

sassy cindy 2 diane zechman

The inside sentiment reads (plus shipping & handling).  😉

Here’s a closer pic of Sassy Cindy… she was popped with dimensionals, along with the speech bubble.

sassy cindy 2 close diane zechman

There’s plenty of fun sentiments in the stamp set to pair with her to make for all your gal friends.  She was quite perfect for a birthday card I needed to make!

Have a great week~

stamps- Sweet ‘n Sassy- Sassy Cindy; paper- SU! Pool Party, white, black, Pebbles- Garden Party; ink- Memento Tuxedo Black; accessories- Sweet ‘n Sassy Scallop Borders dies, Speech Bubbles dies, and Bookmarks & More dies, Copics, foam dots, rhinestones.


spring bling

I’m a bit late… yesterday was the first Sunday of the month…which means…it’s time for another Challenge Chicks Challenge!

We’re a small group of friends who post a new challenge on the first Sunday of each month…no stress, no deadlines…just for fun.  And we’d love to have you join us!  This month it is Jeanne’s turn and her challenge is Spring Bling… make a spring card with glitter, rhinestones or anything blingy!  I used a few clear rhinestones on my CAS springy hello card.

spring bling diane zechman

The sentiment is from my Sweet Sarah stamp set.  And the clouds are from the Sweet ‘n Sassy Clouds & Raindrops die set.

The background is a cute piece of patterned paper attached to a dark brown base.  Then I simply die cut the large cloud from the card front and stamped my sentiment on additional patterned paper that was adhered to the inside.  A smaller cloud was diecut and popped with foam dimensionals.  Then I added the bling to finish it off.

Please join us and create a spring card with bling… then share it on our Facebook page!  Also, you can upload it to the Splitcoast gallery…and use the keyword CHXMAR15.  Now be sure to click on the links below to check out what the other Chicks created!

challenge chicks logo small


stamps- Sweet ‘n Sassy’s Sweet Sarah set (sentiment); paper- SU! Early Espresso, MME- fine and dandy boy; ink- Versafine Black; accessories- Sweet ‘n Sassy Clouds & Raindrops dies, tracing wheel, foam dots, gemstones.

floating elephant- Pull Tab Slider Card

It’s my turn to share a tutorial today on the Sweet ‘n Sassy blog.  With Valentine’s Day approaching, I created a fun Pull Tab Slider Card using the elephant and a sentiment from my Valentine Critters stamp set and the matching set of dies.

valentine critters pull tab slider diane zechman

When you pull the tab, the elephant and balloons “float” through the air and reveal the sentiment!

valentine critters pull tab slider open diane zechman

You can make the pull tab vertical or horizontal, according to how you orient your card and which direction you want your image to move.  Let’s get started!

You will begin with a card base, a cardstock or patterned paper layer, a cardstock piece for the sliding panel, and 3 punched circles. See measurements in the photo below.  Note: I made my cardstock base slightly shorter than a normal A2 card to allow for the pull tab to extend beyond the base a bit, and still fit into an A2 envelope.  So, start with 4 1/4 x 10 and score at 5″.

valentine critters pull tab slider 2 diane zechman

Besides the papers shown above, you will need an additional scrap of white cardstock for your image.  Stamp and diecut your image.

valentine critters pull tab slider 3 diane zechman

Color your image and set it aside.

valentine critters pull tab slider 4 diane zechman

Next, create a slot in the layer by sliding the punch in from the right side as far as it will go and punching twice.  You can also cut a slot with a ruler and craft knife.  My slot is 3/8″ wide.

valentine critters pull tab slider 5 diane zechman

Adhere the first circle to the short side of the sliding panel to create a pull tab.  Next I applied a strip of 1/8″ wide Scor-Tape down the center of the second circle and adhered the third circle on top of it.

valentine critters pull tab slider 6 diane zechman

Slightly bend the sides of the two circles that were joined.  The adhesive strip holds them together in the center.

valentine critters pull tab slider 7 diane zechman

Slip each side of the joined circles into the slot in the punched layer.

valentine critters pull tab slider 8 diane zechman

Turn the layer over and slide the circles all the way to the left (this will be the bottom of the card).  Apply adhesive to the circle shown.

valentine critters pull tab slider 9 diane zechman

Center the sliding panel with three sides, keeping the side with the tab in line with the fourth side (this will be the top).  Lay the sliding panel in place, adhering it to the cardstock circle underneath.  See photo below for placement.

Add foam tape to the three exposed sides as shown.  Remove backing from the foam tape to expose sticky surface.

valentine critters pull tab slider 10 diane zechman

Turn the layers over and adhere to the card base with the pull tab and card fold on the top.  Attach your image to the circle shown.

valentine critters pull tab slider 11 diane zechman

Pull the tab up and stamp your sentiment.  Note: Keep the sentiment to the left so it does not show through the slot when the sliding panel is down.

valentine critters pull tab slider 12 diane zechman

Then decorate your card as desired.

valentine critters pull tab slider diane zechman

valentine critters pull tab slider open diane zechman

Thanks for visiting… I hope you enjoyed this tutorial!  Have a great week!

stamps- Sweet ‘n Sassy Valentine Critters; paper- white, SU! Basic Gray, MME- Love Me; ink- Memento Tuxedo Black, Versafine Black; accessories- Sweet ‘n Sassy Valentine Critters dies, circle punch, SU! Word Window punch, foam tape, 1/8″ Scor-Tape, Copics, clear Wink of Stella.

caught a bug

Sweet ‘n Sassy Stamps is releasing their SPC (Sweet Perks Club) bundles a bit early this month and one of those bundles is my Get Well Critters stamp set and matching dies!  There are 2 other fun bundles so be sure to go and check out what’s new!

Here’s a quick & simple card with one of my Get Well Critters.

caught a bug diane zechman

And here’s a pic of the whole set…plus matching dies…

gwc

Now go check out all that’s new on the Sweet ‘n Sassy blog and in the store!

stamps- Sweet ‘n Sassy Get Well Critters; paper- white, MME- Dolled Up; ink- Memento Tuxedo Black, Versafine Black; accessories- Copics, corner rounder, tracing wheel, baker’s twine, foam dots, rhinestone.

good friends…

I made a quick card last night for this week’s SCS Sketch Challenge using my new Sweet Sarah stamp set…

SC523 sweet sarah diane zechman

SC523 sweet sarah close diane zechman

The front says “They say that good friends are hard to find” and on the inside I stamped “That’s because the BEST ones are already mine!”  So true, isn’t it?

Have a great day…stay warm!

stamps- Sweet ‘n Sassy- Sweet Sarah; paper- black, white, SU! Blushing Bride, MME- In Bloom; ink- Memento Tuxedo Black, Versafine Black; accessories- Copics, adhesive pearls.

new release… Sassy & Sweet!

I am a bit excited about this month’s Sweet ‘n Sassy release!  I love every release but this month I have 2 new stamps sets available…Sweet Sarah and Sassy Cindy.  Plus we have a new stamp designer with a fabulous new set, Parisian Postcard.  AND…Korin has a fun set of Speech Bubbles dies.

I have 2 cards to share today with my 2 new stamp sets and I’ll pop in the blog next week with a fun card I made with Parisian Postcard (this one is great for collage!).  Here’s the first card I made with Sassy Cindy…

sassy cindy 1 diane zechman

sassy cindy 1 close diane zechman

She is fun and quirky and I hope you enjoy her as much as I do!

sassy cindy

Here’s the whole set!

sassy c

Next, I made a card with Sweet Sarah… her sentiments are just as fun but more on the sweeter side…

sweet sarah 1 diane zechman

sweet sarah 1 close diane zechman

sweet sarah

sweet s

And take a look at the rest of this fabulous release!

parisian postcard

parisian p

speech bubbles

speech b

Release Giveaway!

As part of our release day fun, one random commenter from one of the DT blogs will be selected to win a $10 Gift Code for  the Sweet ‘n Sassy Stamps Store.  You have until Thursday, January 15th at midnight EST to leave your comments.  The winner will be posted on the Sweet ‘n Sassy Stamps Blog on Friday, January 16th!

We can’t forget our fun Release Day Challenge!

Since it’s a NEW YEAR, we want you to Use something NEW”   

Just a few guidelines to remember as you play:

– You don’t have to use a Sweet ‘n Sassy Stamps image to enter (although we sure love when you do!)

– Please create a NEW card (no back linking)

We ask that you enter your card in no more than 3 challenges  – You’ll have until Thursday, January 15th at midnight EST to enter

– We’ll draw 1 winner from this week’s challenge to receive a $10 credit to the Sweet ‘n Sassy Stamps Store!

If there are 25 participants, (not including the DT), we’ll draw 2 winners!

– Please use code SNSJAN2015RC when uploading to Splitcoaststampers or other galleries

To enter simply share a link to your creation with the linky tool on the SNSS blog!

Thanks for joining us today!  Be sure to join us again on Friday, January 16th to see if you’ve won!

Now it’s time to see what the DT has created with these fabulous products! The DT blog links can be found in the Linky Tool on the SNSS blog…HAPPY HOPPING!

Sassy Cindy card: stamps- Sweet ‘n Sassy’s Sassy Cindy; paper- SU! Crumb Cake, Pool Party, white, Pebbles- Garden Party; ink- Memento Tuxedo Black, Versafine Black; accessories- Copics, button, rhinestones.

Sweet Sarah card: stamps- Sweet ‘n Sassy’s Sweet Sarah; paper- SU! Crumb Cake, Pool Party, white, Pebbles- Garden Party; ink- Memento Tuxedo Black, Versafine Black; accessories- Copics, corner rounder, Heart Nestabilities, adhesive pearls.


winter ATC frame

Hello friends!  I have a special project to share today that I made for a Christmas gift.  I wanted the recipient to be able to enjoy it all winter long, though, so I went with a snowy/winter theme.  Each little card in my frame is ATC size (2 1/2 x 3 1/2 inches) and I used lots of my favorite Sweet ‘n Sassy stamps and dies.

I also made this for our Challenge Chicks Challenge…this month Anna wants us to create winter scenes!

SNSS ATC frame diane zechman

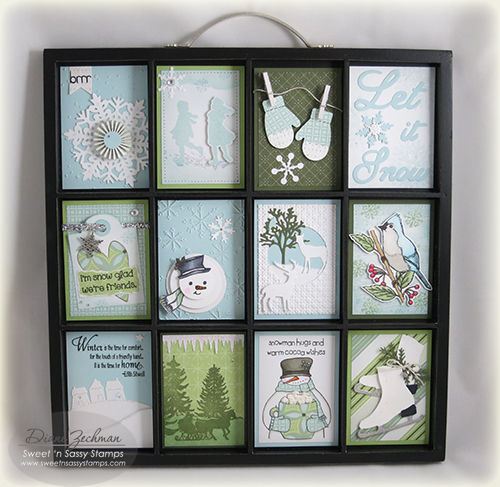
I wanted to be able to switch out the ATC’s for each season/holiday or whatever theme I want…so they were attached in the frame with Removable Glue Dots.  I found these to work perfectly for the right amount of adhesion needed, yet still be able to be easily removed.

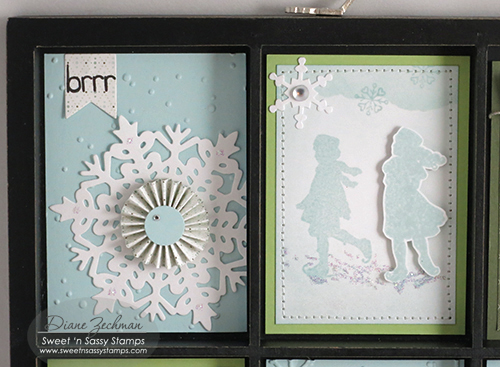
Here’s some close-ups of each ATC.  For the first one I made a rosette with my Scor-Pal and centered it onto a Sweet ‘n Sassy Large Snowflake diecut.  The “brrr” is from my Snowman Soup stamp set and the background was embossed with the Cuttlebug Kars Snowflake embossing folder.

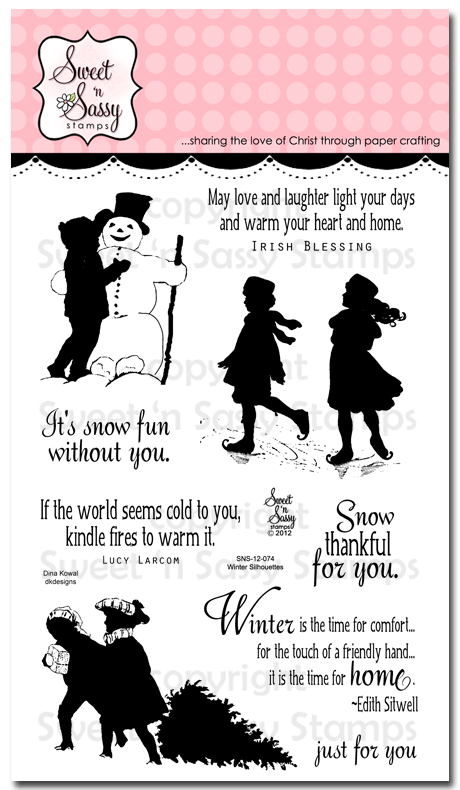
The second one has some stamped skating friends from the SNSS Winter Silhouettes stamp set, with one popped up for dimension.  There’s a few tiny snowflakes from my Snowy Hello stamp set lightly added to the top.  The edges of this one were stitched on my sewing machine.

SNSS ATC frame 2 diane zechman

The mittens were made with a SU! punch and the white tiny clothespins came from Michael’s.  They were attached with 1/8″ Scor-TapeCrochet thread was perfect for the string.

The Let it Snow words are a Sizzix die and I faintly stamped snowflakes in the background from the Spectacular Snowflakes.

SNSS ATC frame 3 diane zechman

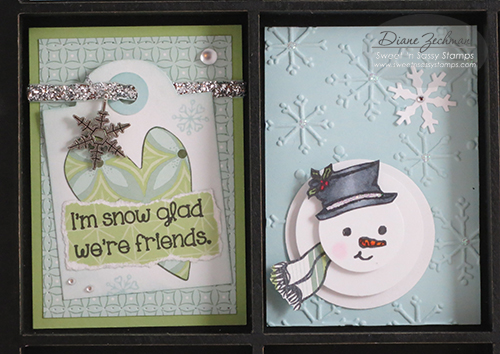
On the left, below, I used one of the Bookmarks & More dies to create a tag. The heart was cut from the Heart dies and the tiny snowflakes and words are from my Snowy Hello set.  The snowflake charm is SU!

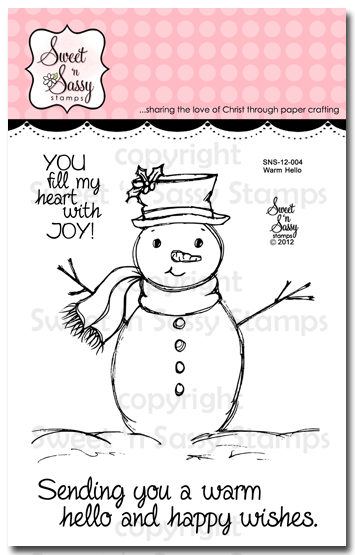
On the right the background was embossed with the Sizzix Snowflakes #3 folder.  3 circles were punched and popped for dimension.  The snowman’s face, hat and scarf are from the Warm Hello stamps.

SNSS ATC frame 4 diane zechman

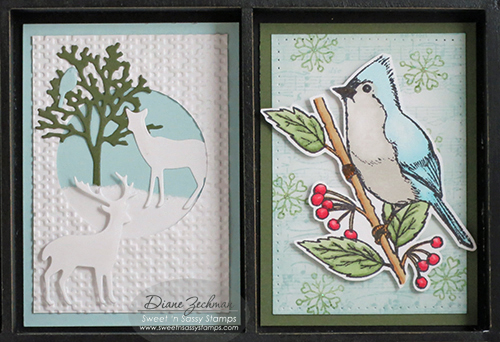
The tree, deer, and bird, below are from Forest Silhouettes dies. On the right, I lightly stamped the Music Background.  More Snowy Hello flakes were stamped (this time in green) and the bird from Peace of God was popped up.

SNSS ATC frame 5 diane zechman

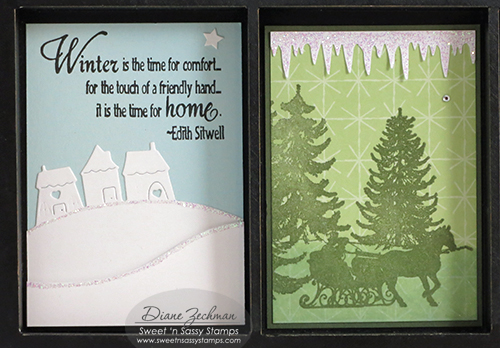
The Hillside Edges dies made a cute snowy scene and the words from Winter Silhouettes went with it perfectly.  Then I stamped the sleigh ride image from one of my fave Christmas sets, Old Fashioned Christmas.  The top border was punched with the Martha Stewart Icicles punch.

SNSS ATC frame 6 diane zechman

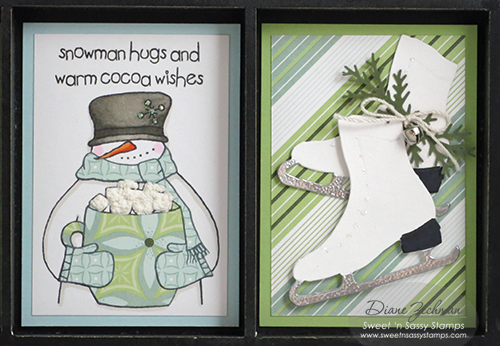
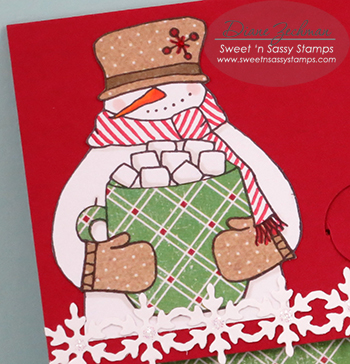
The words and snowy fella below, drinking hot cocoa, is from my Snowman Soup set.  The mug, scarf, and mittens were paper pieced.  Then I applied a Puffy Velvet Fabric marker (like Liquid Applique) to the marshmallows and heat them with a heat tool to puff them up.

The skates are a Sizzix Movers & Shapers die.  The blades were heat embossed with silver e.p. and the Martha Stewart branch punch, along with a tiny jingle bell, finished them off.  You can’t see in the pic but the skates were painted with Picket Fence Crackle Paint.

SNSS ATC frame 7 diane zechman

Lots of glitter and bling were added to each one to make this frame sparkle!  My ATC memory tray was purchased at Hobby Lobby.

Please join us and create a card with a winter scene… then share it on our Facebook page!  Also, you can upload it to the Splitcoast gallery…and use the keyword CHXJAN15.  Now be sure to click on the links below to check out what the other Chicks created!

challenge chicks logo small

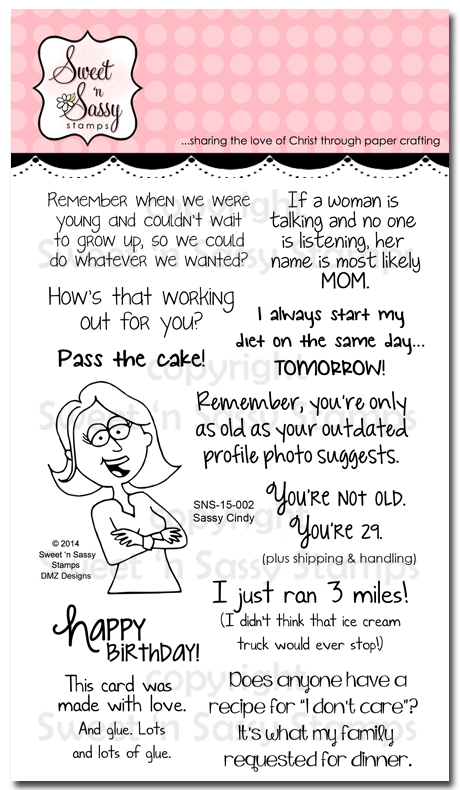
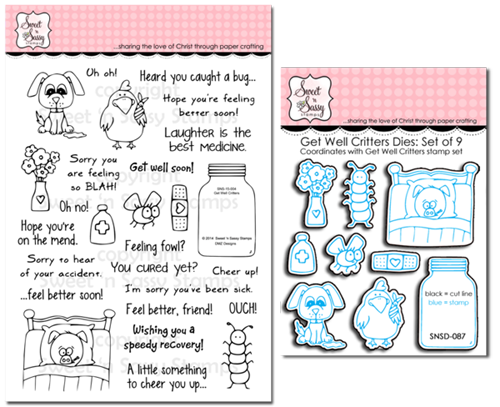
stamps- Sweet ‘n Sassy Snowman Soup, Winter Silhouettes, Old Fashioned Christmas, Warm Hello, Peace of God, Music Background, Snowy Hello, and Spectacular Snowflakes;

paper- white, SU! Soft Sky, Certainly Celery, and Always Artichoke, SU! Wintergreen dsp;

ink- Memento Tuxedo Black, Versafine Black, Versamark, SU! Soft Sky and Always Artichoke;

accessories- Sweet ‘n Sassy dies (Large Snowflakes, Forest Silhouettes, Hillside Edges, Bookmarks & More, and Hearts), Scor-Pal, Scor-Tape, Cuttlebug Kars Snowflakes emb. folder, circle punches, hot glue gun, tracing wheel, sewing machine, Stickles, rhinestones, foam dots, Wink of Stella clear, Cuttlebug Snowflakes #2 die, Martha Stewart Icicles punch, SU! Square Lattice emb. folder, SU! mitten punch, SU! snowflake charm, Copic markers, Sizzix Snowflakes #3 emb. folder, ribbon, crochet thread, mini clothespins, Sizzix Let it Snow #2, Sizzix Movers & Shapers ice skate die, Puffy Velvet Fabric marker, Ranger Picket Fence Crackle Paint, silver embossing powder, tiny jingle bell, Martha Stewart branch punch.

Here are the Sweet ‘n Sassy products that I used…


Snowman Soup pocket card (with Envelope Notcher and video!)

Brrr!  We were spoiled with a few extra days of nice temps but now it has gotten cooler.  I am not especially fond of the cold but today I have a card to help warm someone up.

I recently purchased the We R Memory Keepers Envelope Notcher which compliments their Envelope Punch Board.  And I wanted to use it for a Make & Take for some dear friends who came to visit at my friends Lisa & Lou Ann’s store.  But I thought it would be fun to notch something else besides an envelope… because we can all read & follow the directions on the package, right?  lol.  But when I did a quick search, I soon realized that there aren’t any tutorials using this tool for projects other than making a notched envelope…or maybe I’m not looking in the right place??

Anyway, I first decided to create a tri-fold card so I figured out the measurements for cutting and scoring.  Then I changed it up a bit and turned my tri-fold into a pocket card… so you can tuck in whatever you wish.  Mine has a hot cocoa packet.  And I used my Snowman Soup stamp set by Sweet ‘n Sassy Stamps.  🙂

IMG_3515

And here it is open…with hot cocoa inside…

IMG_3519

My snowman was paper pieced (still one of my fave techniques!).  A marker was used on his scarf though.

IMG_3516

To create the Tri-fold card base, I started with a 5 1/2″ x 10 1/4″ piece of cardstock.  Using my Scor-Pal, I scored the length at 3″ and 7 1/4″.  (Or you can just score each end at 3″)  Crease scored lines.

Next, centering the Envelope Notcher in the middle section both horizontally and vertically, fold and punch each end (the top and the bottom).

Then staple, tape or glue each side of the pocket and decorate your card as desired.  The snowflake border was diecut from white cardstock using the Sizzix Decorative Strip Die – Holly, Beaded & Snowflake Garland.  I dotted this with a little Stickles.

Here’s a quick video with a few hints on using the envelope notcher and making this project…


[youtube]https://youtu.be/x6JXLHWLJzE[/youtube]

Hope this helps you have a little more fun with this cool tool!

stamps- Sweet ‘n Sassy Snowman Soup; paper- white, red, ?dsp; ink- Memento Tuxedo Black; accessories- Scor-Pal, Copics, Sizzix Decorative Strip Die – Holly, Beaded & Snowflake Garland, We R Memory Keepers Envelope Notcher.
snowman soupsizzix holly beaded snowflake
envelope notcher