Category Archives: tags

a tweet tag

Happy Earth Day!  Today it’s my turn to post on the Stampavie blog and I’ve made a tag for a birthday gift for a dear friend using Bird on Dogwood Branch.

I drew the colors for my tag from the pretty bag.  It was colored with markers and I used a bit of blue chalk on the background.

You may not tell but the bag is very sparkly so I added a bit of Stickles to the butterfly and flower centers.  The sentiment is popped up on dimensionals.

Have a “tweet” day!

stamps- Tina Wenke’s Bird on Dogwood Branch and With Love by Stampavie; paper- white, kraft; ink- Memento Tuxedo Black, Crumb Cake; accessories- Copics, SU! Tag punch and Horizontal Slot punch, blue chalk, Sizzix Sizzlits Lots of Tags Label 1, ribbon, lace, pin, button, dimensionals, Stickles.

Scor-Pal hops with American Crafts!

Happy St. Patrick’s Day!  Are you wearing green?  We hope you’re excited for this fun little adventure we have planned today where you have lots of chances to win goodies on lots of different designer’s blogs.  The Scor-Pal team has joined with the American Crafts gals to show you how you can enhance your scrapbooking layouts, cards, and projects with the Scor-Pal tool and the wonderful American Crafts products.

Just in case you get a little lost or simply want a list of all the blogs up front, here is the order of the hop:

Corrie Jones
Amy Heller
Katie Tate
Leah Farquharson
Diane Zechman (me)
Mandy Koeppen
Melissa Mann
Paige Evans
Pamella Brown
Rahel Menig
Tami Mayberry
Suzy Plantamura
Virginia Nebel
Lilith Eeckels
Shimelle Laine
Julie Koerber
Jamie Harper
Leslie Ashe
Lisa Andrews
Piradee Talvanna
Heidi Sonboul
Steph Ackerman
Jenny Chesnick
Scor-Pal

Make sure to stop by each designer’s blog (and the company blogs too) and leave a comment to enter to win American Crafts products as well as a Scor-Pal!

For today I used the ADORABLE Garden Cafe line of paper and some coordinating accessories to create an apron card (Anna Wight’s template) and a matching little teacup with a Keurig tea pod (K-cup) inside.

On the pocket of the apron card, I scored some diagonal lines in both directions and then sponged over them to highlight the embossing.  The pocket was attached with Scor-Tape.  I added American Crafts buttons and a coordinating dimensional sticker.

To make the teacup, I followed the directions for the coffee cup, except I made it shorter in height.  I started with a 9 x 3 1/2″ strip instead of 9 x 4 1/2″.  The handle was made with circle punches and I inserted the ends in the side seam instead of attaching them to the outside.  The Scor-Pal and Scor-Tape are AWESOME for projects like this!

To decorate the teacup a bit, I used my initial from the American Crafts Thickers (glitter foam stickers).  I also placed a little flower from the Accents & Phrases Sticker Book onto a scrap of the paper, cut it out, and inserted a medium jewel brad before attaching it to the cup.

Here I removed the Keurig pod so you can see the cute dotted design on the inside.  The tag on the Keurig pod is also from American Crafts.  I altered it a bit with a thin strip of the Garden Cafe paper and punched the bottom edge.  The “doily” underneath  the cup is a diecut.

I had a lot of fun creating this…I hope you enjoyed it too!  I have to say…the American Crafts paper is a nice thickness…not flimsy at all…and was perfect to use for my projects!  The accessories are delightful too!  ♥  They make a great combination with the Scor-Pal products!  

Next up on the hop is Mandy Koeppen!  Go check out her wonderful project.  Thanks for hopping with us!

paper- American Crafts Garden Cafe, cream cardstock; ink- Memento Rich Cocoa; accessories- Scor-Pal, Scor-Tape, American Crafts: Garden Cafe buttons, Meringue dimensional sticker, decorative tag, Thickers, Accents & Phrases Sticker Book, and medium jewel brad, ribbon, crochet thread, circle punches, Martha Stewart Flourish punch, Spellbinders Floral Doily Motifs.

Scor-Pal hops with Skipping Stones!

Today the Scor-Pal gals have teamed up with the Skipping Stones designers in a fun (and hopefully inspirational!) blog hop.  You should be coming to my blog from Lindsay Amrhein‘s blog.  If you missed the beginning, be sure to go to the Scor-Pal Blog where the hop starts.  Prize info will be posted there.  Also, you’ll want to go the Scor-pal Fan Page for a chance to win!

I chose to use the Skipping Stones stamp set Heartsong to create a waterfall card.  A friend recently mentioned this card style and it prompted me to check it out again…this time in the SCS tutorials.  I was soooo glad I did!  Do you remember the old way to create this card?  It was a bit of a pain, to say the least!  lol.  The tutorial linked above, combined with the use of the Scor-Pal tool, is SO MUCH easier!  Seriously…try it!  Here’s my card…

The only change I made was to make mine a flat card (it does not open like a regular card).  I don’t see the need for it, honestly.  You can write your personal message on the tab that pulls down if you like. 

Here’s what the waterfall card looks like as the tab is pulled, and the images consequently are flipped one by one.

Some quick measurements:  The navy base is 4 1/4 x 5 1/2.  The glossy white layer is 4 x 5 1/4.  The navy strip across is 3/4 x 4.  The 4 orchid squares are 2 x 2.  The 4 glossy white layers are 1 7/8 x 1 7/8.  And the long tab/mechanism  is 9 x 2 (scored at 2, 2 3/4, 3 1/2, and 4 1/4).

Here’s a closer look at each of the 4 squares that flip as the tab is pulled…

Now… I mentioned that a message could be written on the tab, but since I used Navy cardstock (and I don’t prefer to write with a white gel pen) I decided to create a pocket on the back and insert a tag to be written on.  The pocket was  adhered with Scor-Tape.

The top of the pocket was punched and folded down.  But before it was adhered (also with Scor-Tape!), I scored some diagonal lines with the Scor-Pal.

I hope you liked my project.  Next up on the hop is Katie Gehring!  Go check out what she has created!

stamps- Skipping Stones Heartsong; paper- Glossy White, SU! Night of Navy, Orchid Opulance, Certainly Celery and So Saffron; ink- Orchid, Navy, Turquoise, Celery; accessories- Scor-Pal, Scor-Tape, brads, Primas, Stickles, ribbon, Martha Stewart leaf and flourish egde punches, SU! Beautiful Wings die.

paper bag & tag book

At a recent stamping gathering I attended, our friend who organized it put together a goodie bag for everyone.  Among the contents were some small paper bags and manilla tags to create a tag book with.  This past weekend I was inspired to use them to make a small gift and I decided that Penny Johnson’s Vintage Collection would be the perfect stamps to use.  

To begin, 5 small paper bags were glued together, stacked on top of each other.  Then 2 holes were punched with a Crop-A-Dile in the side with the closed ends and fibers were added.

For the front I sponged the background layer with Distress Inks and embossed over top with a Cuttlebug folder.  Then I sponged over the raised areas again with another Distress ink.

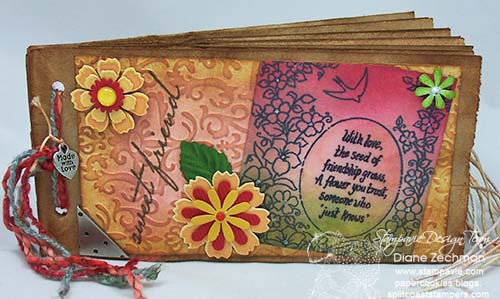
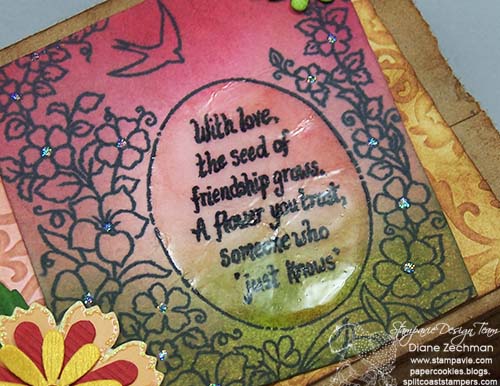
On the layered image I sponged more ink, then used the stamp Intertwined.  I added a few dots of Stickles to the flower centers and Crystal Effects was applied to the center oval only.  You can see some crinkles underneath where the paper was previously crumpled  to distress.

Here’s the open end with the tags inserted… 

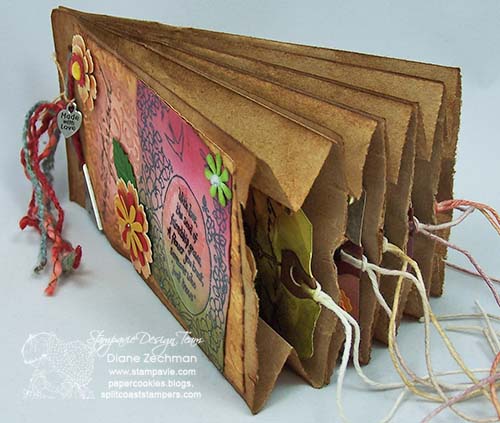
All tags were first sponged with Distress Inks.  I went kinda crazy and random with the colors and placement of the inks but it worked out well in the end. 

1. On the first tag I used the Chandelier stamp.  Added bling and applied some Stickles and Crystal Effects. 

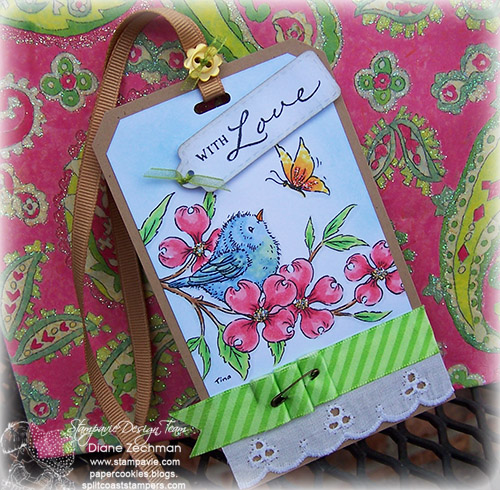
2. This stamp is Blossom Birds.  The leaves and flower centers were painted with Distress inks.  Added Liquid Pearls, brads, and a flower sticker.

3. Part of the Garden Shelf stamp was used here.  Crystal Effects on the vase and the eggs were painted.  The large keys on the bottom are embossed and sponged.  The small key & lock are brads.

4. Stamp used is A Stamp Of Friendship.  Leaves were painted and Stickles applied to flower centers.  A metal charm was attached with a brad over the area of the stamp that has a button image.

5. My last tag has The Scent Of Sweet Memories image.  Again, only a few parts were painted with Distress Inks.  Crystal Effects was applied to one bottle.  The lace was sewn into place with my sewing machine and I added a little bling.

I hope I’ve inspired you to create a tag book of your own…they’re so much fun!

stamps- Penny Johnson Vintage Collection by Stampavie (Chandelier, A Stamp of Friendship, Blossom Birds, Garden Shelf, Intertwined, and The Scent of Sweet Memories), SU! Happy Harmony, Best Yet, Delight in Life, and Hello You, Stampabilities Felt With The Heart; paper- Vanilla, Mauve Mist; ink- various Distress Inks, Memento Black; accessories- paper bags, manilla tags, adhesive rhinestones, Stickles, SU! Postage Stamp punch, paper leaves, metal charms, brads, Sandylion flower stickers, lace, Buttercup Liquid Pearls, Cuttlebug Sentimentals folder, Spare Parts Lock and Key brads, Crystal Effects, Martha Stewart Hydrangea punch, crochet thread, sewing machine, Making Memories Photo Corner Charm.

a new nametag

Today’s my turn to post on the Stampavie blog and I’m back with another 3D project.  This time I thought I’d share the new nametag I made for the last stamping gathering I went to.  But before I get to my project, I wanted to remind you all that Stampavie is having a Design Team Call…be sure to check it out!

I love getting together with friends old and new for a fun day of stamping!  I’d been wanting to update my nametag for a long time and never got around to it.  So I was happy to get this project done and kinda pleased with how it turned out.  I used the Laurence Design Spring Has Sprung image from Stampavie.  Oh how I wish Spring has sprung!  LOL.  We’re getting close here!

This image reminds me of my own pup, Riley.  Maybe that’s why I love it so much!  The image was colored with Copics and I cut it up, placing the pieces to my liking.  It was paired with some cute October Afternoon papers and the finished nametag was placed in a badge holder from Walmart.  Wouldn’t it be fun to make luggage tags too?  What have YOU created lately with your Stampavie stamps?

Have a great day!

stamps- Laurence Design Spring Has Sprung by Stampavie, unknown alphabet; paper- brown, white, October Afternoon Thrift Shop; Ink- Memento Black, SU! Saffron; accessories- badge holder, MFT Banner die, Copics, Stickles.

a Christmas tag

No time for chit chat…just popping in quick to share a Christmas tag.  I really missed making tags and decided that I needed to make a few this year.  Here I used the Darby image from this month’s release at All That Scraps.  I think she’s adorable!

And here’s a closer view…

Have a great Tuesday!

stamps- Darby by C.C. Designs; paper- green, white, pink, Baja Breeze, red, dp- SU! Candy Cane Christmas; ink- Memento Black; accessories- Copics, EK Success heart, Snowflake and border punch, scallop circle punch, Stickles, ribbon, thread, button.

out of my comfort zone

Hello!  Today is my day to post on the Stampavie DT blog and I am sharing a set of cards I made with one of the Sarah Kay images, Isabelle with Puppy Coco

Several months ago I was playing around with the shipping tags and several Distress inks….sponging, spritzing with water, crumpling, stamping, and applying ink DTP (direct to paper).  The tags have since lain in a pile of unfinished projects.  A few days ago I finally pulled them out and found some papers to coordinate and here is the results.  This was a bit out of my comfort zone and usual style but I like to work that way on occasion.  I enjoy all styles of stamping and I think it keeps the creativity flowing to work outside the box once in a while.

This is such a sweet image, isn’t it?  I love the little puppy in it and I thought the sentiment would be perfect.

Have a great Tuesday!

stamps- Sarah Kay Isabelle with Puppy Coco by Stampavie, SU! Happy Harmony and So Many Sayings, Hero Arts Long Writing Background (faintly stamped on the tags in light pink); paper- purple, dp- Cosmo Cricket; ink- Memento Black, Distress inks- Dusty Concord, Tumbled Glass, Wild Honey, Walnut Stain, Tea Dye, Barn Door, Broken China, Spun Sugar; accessories- oval punches, tags, lace, paper piercer, thread, distress tool.

Halloween M&M Stix

Over on the Splitcoast site someone had the brilliant idea to fill some 1×8 baggies with M&M’s and add a topper or tag…how cute! 

I had the baggies for a few weeks now but finally made some quick last-minute treats.  I kept it pretty simple since I know the little kids receiving these will probably just rip them apart.  LOL.  But they loved them anyway!

I filled the bags with about 24 M&M’s in each.  Someone mentioned that they rolled up a piece of copy paper to insert for a funnel and that really does work well…especially to get the first few to lay flat on the bottom.  Then they just fall into place after that.

You can find the baggies here.  They can also be filled with Skittles, Reese’s Pieces, etc.  And I think gumballs fit too.  It would also be a great way to package a beaded pen…lots of uses, I’m sure!

Here’s another cool idea that a friend shared with me…did you know that you can emboss plain napkins with your Cuttlebug folders?  COOL IDEA!!!  (The kids LOVED these!)

Have a FUN and SAFE Halloween!!!

Treat Stix:

stamps- SU! Home Is Where The Haunt Is; paper- white, black; ink- Memento Black, SU! Curry and Buckaroo; accessories- Mega Curved Rectangle Nestabilities, M&M’s, 1×8 bags (gtbag.com), ribbon.