
♥ Happy Valentine’s Day! ♥
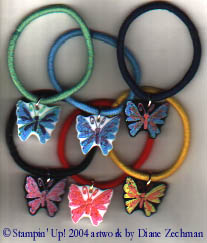
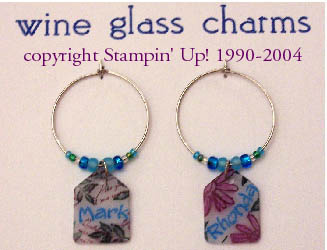
I don’t have a valentine to share today but I have something else fun. I’ve been stamping on shrink plastic again…it’s been a little while since I played with it. I wish I could find the charms I made years ago but apparently I tucked them away pretty safely because I can’t seem to locate them. lol. The first charms I made were 10 years ago and I will add the pics I found at the end. Here’s some more projects I’ve done. And this week I made a few water bottle charms…
There seemed to be a lot of interest in the charm I made last week so I typed up some tips on using the shrink plastic. I hope you try it…it’s a lot of fun! (and easy too!) Hopefully this will help:
Stamping With Shrink Plastic
Shrink plastic comes in white, almond, brown, black, clear, frosted (Rough & Ready), and Ink Jet (printable). I have had good results with the Shrinky Dink brand. Other brands may have additional colors but I have read reviews that they do not shrink as evenly/consistently. I bought my plastic at Michael’s.
For best results the side of the shrink plastic you work on should be slightly roughened or sanded. Some shrink plastic comes with one side already roughened. Use a fine sanding block or rubbing two pieces together will also lightly sand it. The rough surface gives it some “tooth” to grab color from the pencils and it is difficult to get some inks to set on the shiny side.
Die cut, punch or cut shrink plastic with scissors to desired shape. If fussy cutting the image after stamping, be careful not to smear the ink if it’s not dry.
When choosing your rubber stamp, consider the size and style of the image. Don’t choose an image too small or detailed as it may not turn out well after it is shrunk. The plastic will shrink up to about 1/3 of its original size.
Stamp the image on the shrinkable plastic. StazOn is perfect, but other inks such as Brilliance will also work if they are heat set. If you don’t plan to color the image, you can set it and shrink it at the same time! You may need to experiment with various inks. Some will not dry even if you shrink the plastic. Acrylic paints are also supposed to work well, although I’ve never tried them.
Color the image with regular colored pencils (even Crayola work fine). Keep in mind that colors become deeper and more saturated when the shrink plastic has been shrunk. Use a shade or two lighter than desired. StazOn and Copic inks or Sharpies cannot be used together. However, if you use clear shrink plastic, you can stamp on one side and color on the other. That way, your inks never touch. Keep in mind that you cannot blend Copics on the plastic like you can on paper. Trying to blend them may smear, puddle and remove the ink.
Remember to punch any desired holes before baking! Use a 1/4″ hole punch for charms.
Shrink the image in the oven according to the manufacturer’s instructions or use a heat tool to shrink the image. When the plastic shrinks, it will curl. Make sure to heat the image completely… the piece of plastic will return to a flat shape. Shrink plastic is very light so when using a heat tool, it is a good idea to shrink it inside a shallow box lined with foil or use a stylus tool inside a punched hole to keep the hot air from blowing the pieces away.
When it is completely shrunk I like to press down on the plastic with a wood block or other flat object to flatten it even more as it cools. It will cool quickly!
Attach shrink charms to an “Ouchless” elastic hair band or a wine glass charm ring (found in craft and jewelry supply stores) with a jump ring to create Water Bottle Charms or Wine Glass Charms. Write names on them with ultra fine point permanent markers before shrinking. Add beads to wine glass charm rings.
Use a Krylon pen on the edges if desired to finish your embellishments beautifully.
As I mentioned, I couldn’t find a lot of the pieces I made years ago but here’s a few pics from 2004. Sorry for the poor quality photos! The first two are water bottle charms.

Thanks for visiting and let me know if you try them!
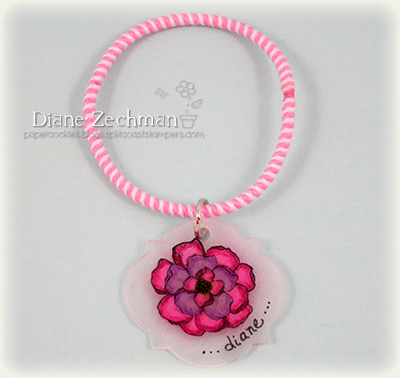
Today’s pic: stamps- SU! Secret Garden; ink- Stazon black, ultra fine point Sharpie; accessories- SU! Window Frames dies, hole punch, colored pencils, jump ring, pliers, “ouchless” hair band.
 cookiestamper ♥


Pingback: live charm |
Pingback: Wine Divas card and wine glass charm |