Category Archives: 3D and altered art

shower card and pleated gift wrap

I have a second post for today…here’s a bridal shower card that I needed for this past weekend. The bride’s color is purple, and she loves sunflowers. Here I used a dark, textured purple cardstock for the base and SU! Perfect Plum for the layer. The white layer was die cut with a Penny Black rectangle die and the sunflowers are from a PinkFresh Studio washi tape and coordinating dies. The dress is from the Creative Worship Stamps (Sweet ‘n Sassy Stamps) Mr. & Mrs. stamp & die bundle. I also used a sentiment on the inside from the Engagement & Wedding Innies set. Her name was printed on the computer; this is one of the things that I love about this hobby…being able to personalize projects!

I also wanted to share how the gift was wrapped up. I found this pleated gift-wrapping tutorial and gave it a try. Then I used my wax seal kit on the bottom center and tucked a few things into the pleats. I printed their photo in purple (I blurred the faces here). Then the card was tucked into the top pleat.

I have a few of the sunflowers leftover from this project so you may see them show up later on the wedding card. 🙂

Have a great week!

Flying Butterfly Clothespin Craft

Today I have another interactive project…but this time it’s a fun craft for kids inspired by this video on Instagram. I used the new Embrace Change Bundle by Creative Worship Stamps (Sweet ‘n Sassy Stamps) to make the butterfly.

Here’s a quick photo tutorial showing how to make it. Scroll down for a short video to show the fluttering wings. 😊 My helper had a lot of fun making this and even helped to die cut the butterfly.

Check out the video to see it in action. Have a great day!

https://youtube.com/shorts/YZzLmkMySjM

2023 Stamp & Swap projects

Last month we had our 8th annual NEPA (Northeast PA) Stamp & Swap and today I’m finally sharing the projects that I made for it. Be sure to read all the way to the end for a really cool project we did!

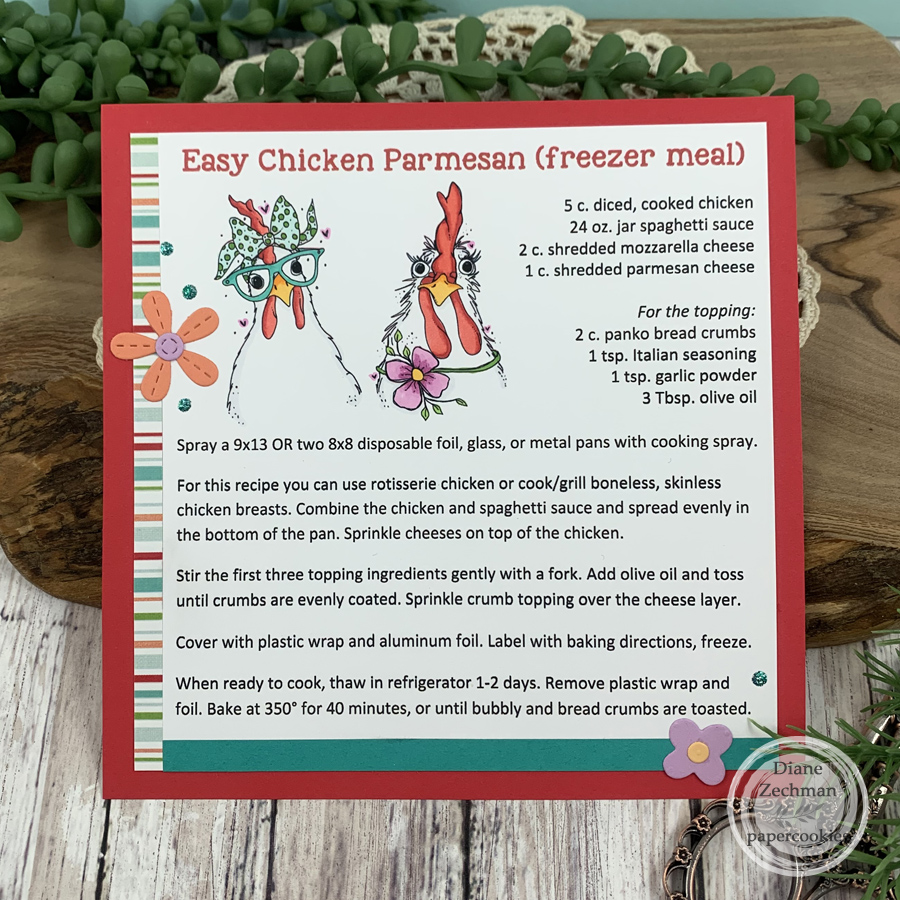
The first one I made was for our 6×6 Recipe Swap. I used Angie Blom’s Coolest Chicks Ever digital images, which are also available as physical stamps through Unity Stamp Co.

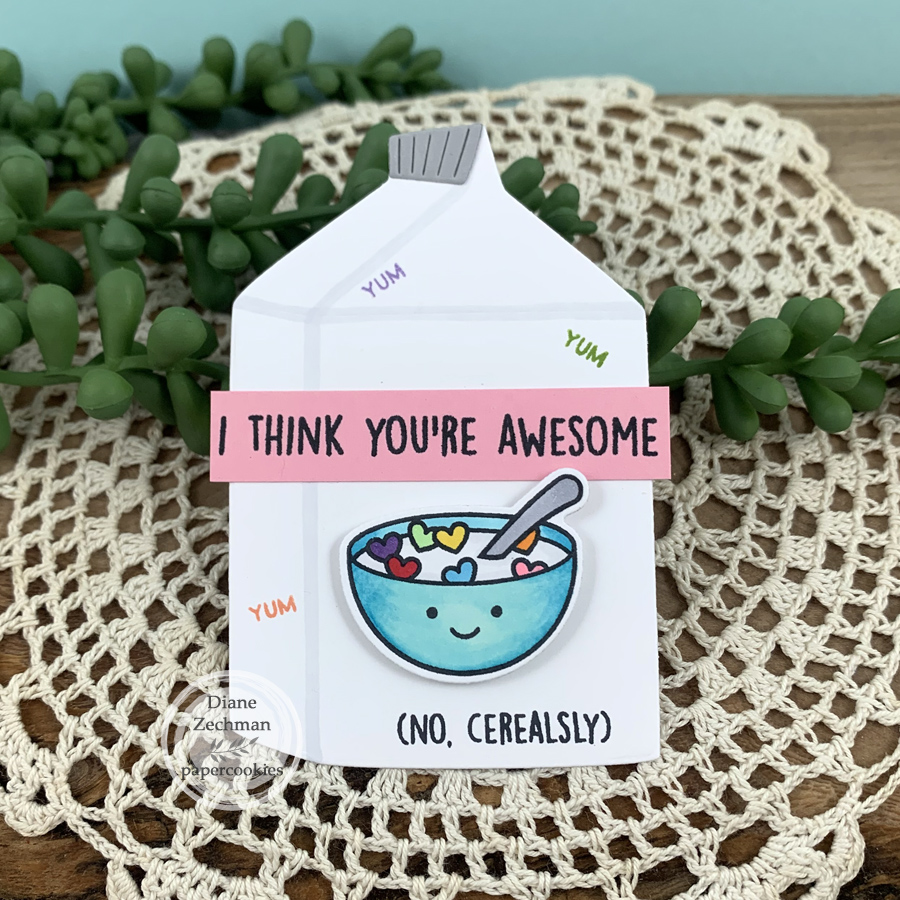
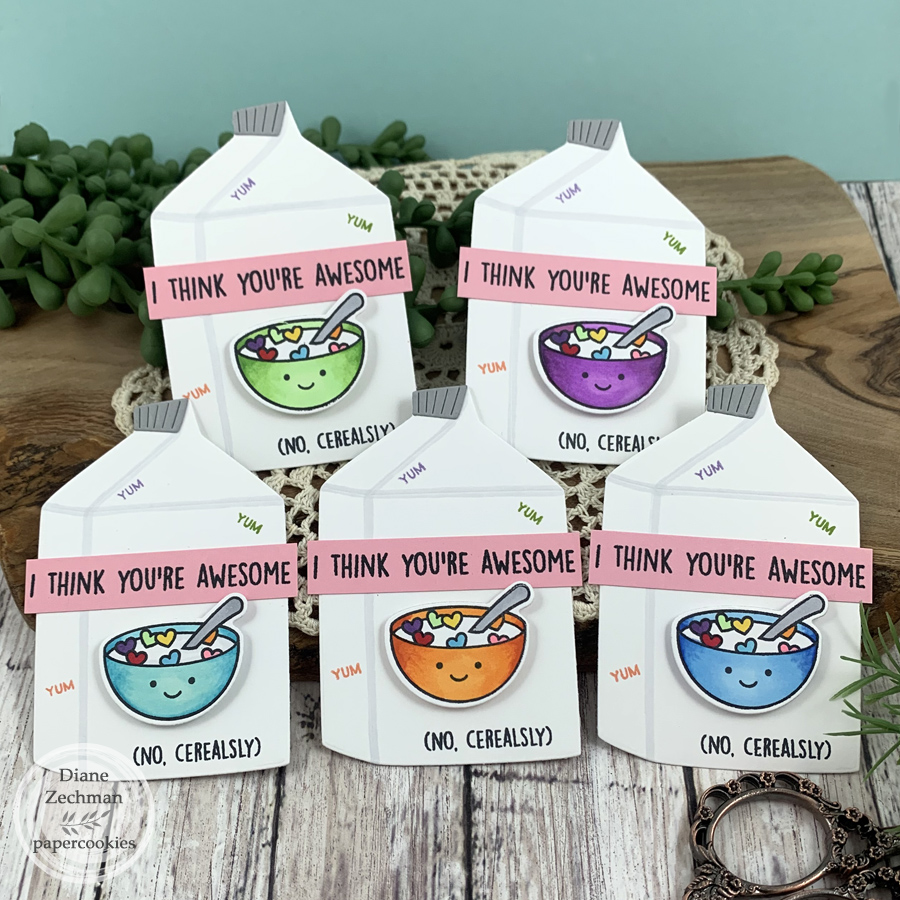
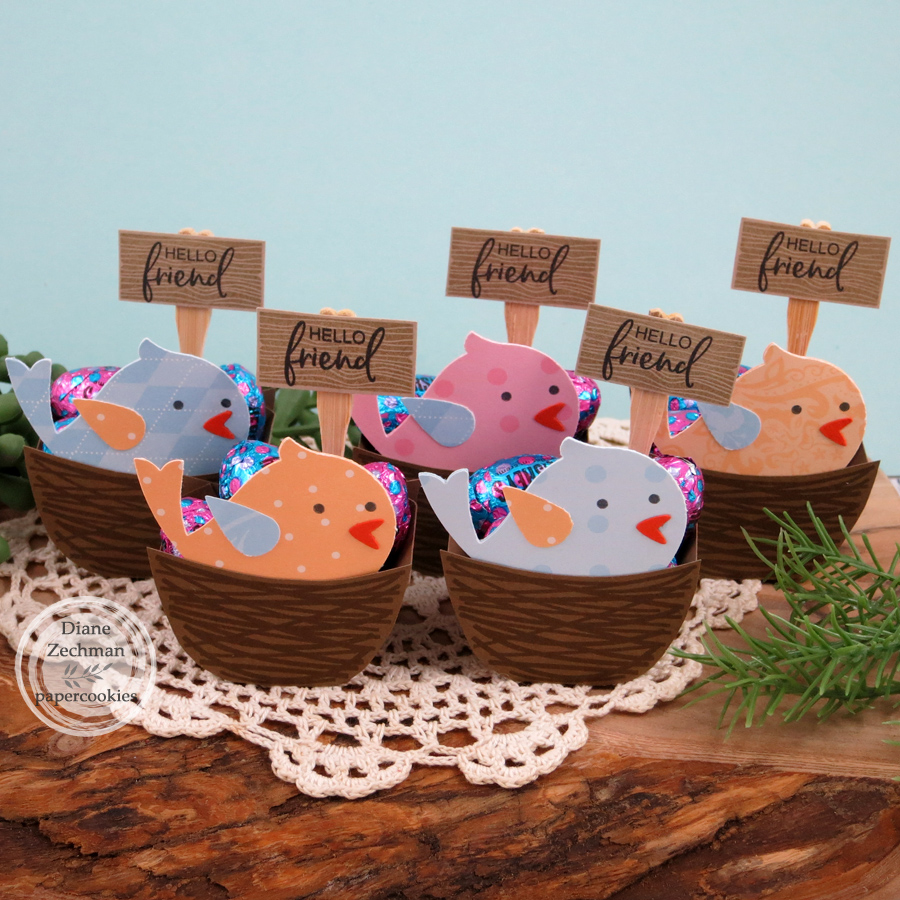
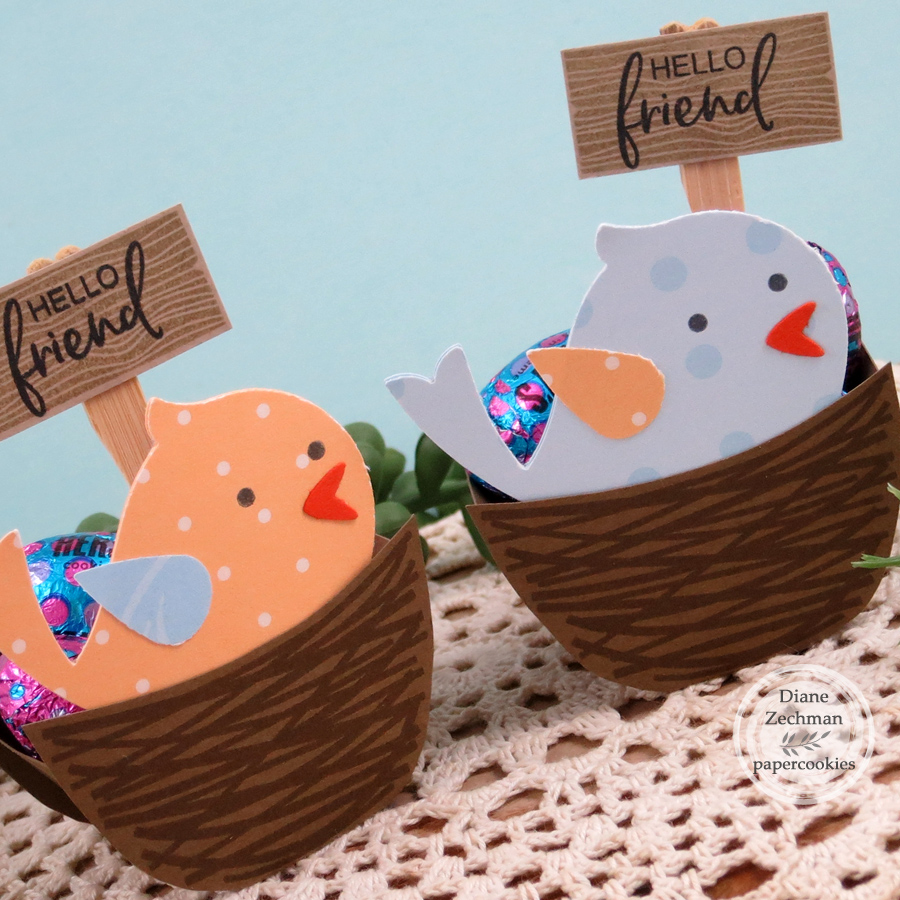
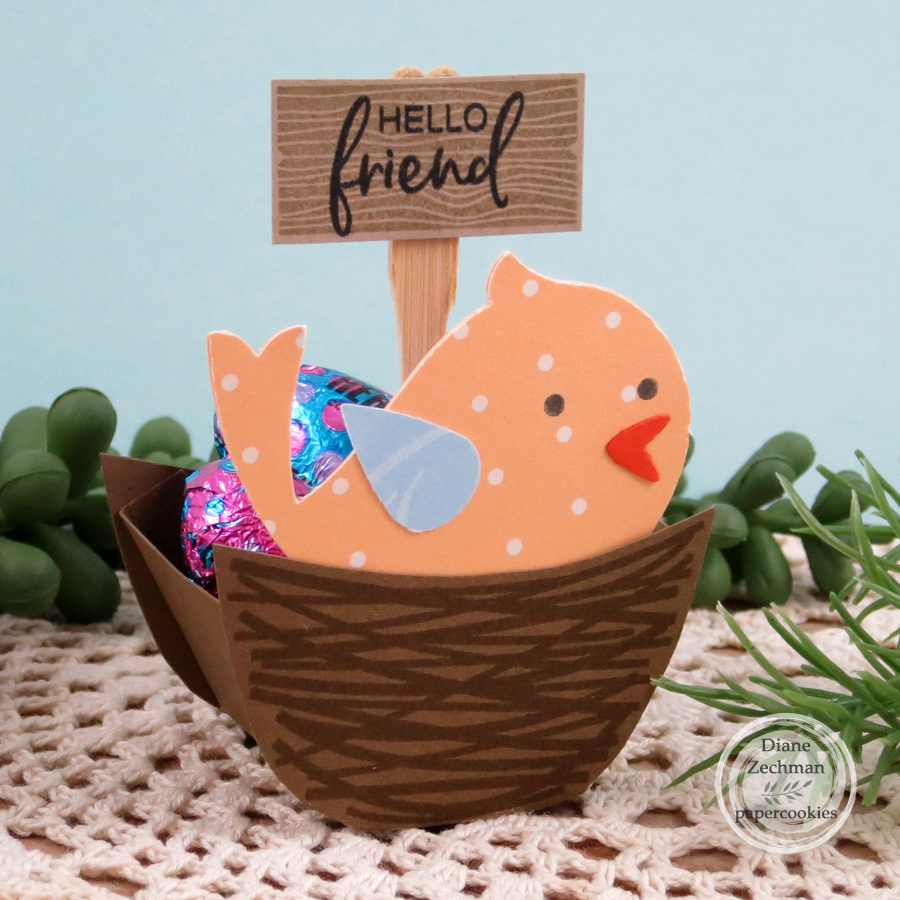
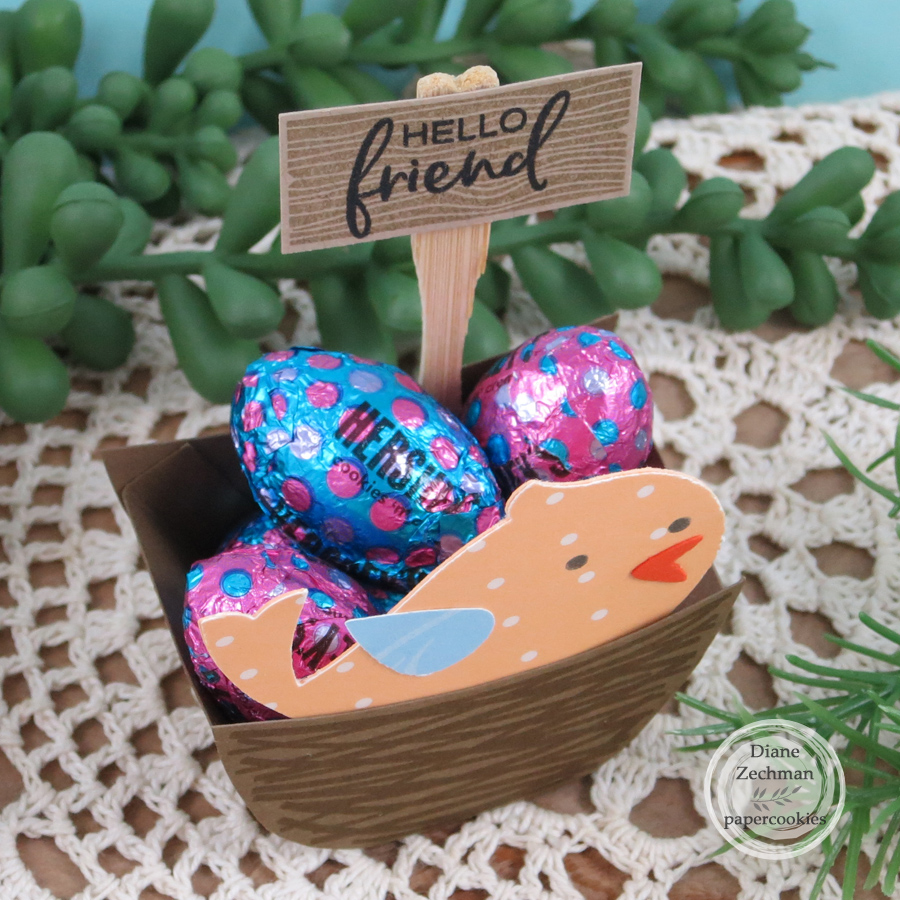
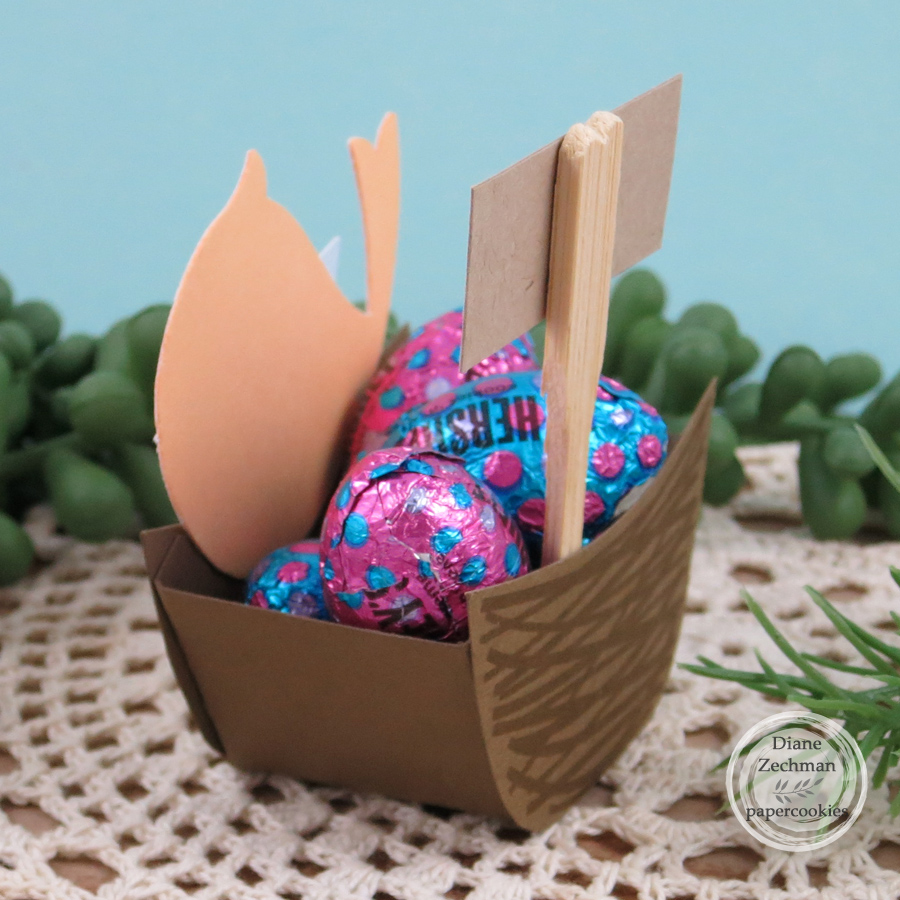
For the ATC swap, I wanted to create a shaped ATC. This retired MFT Milk Carton Die was the perfect size. I also used Lawn Fawn’s Cerealsly Awesome set & Dies, which was a cerealsly awesome gift from a friend! 🙂 How cute! I couldn’t decide what color to make the bowl, so I did several and let the participants choose.

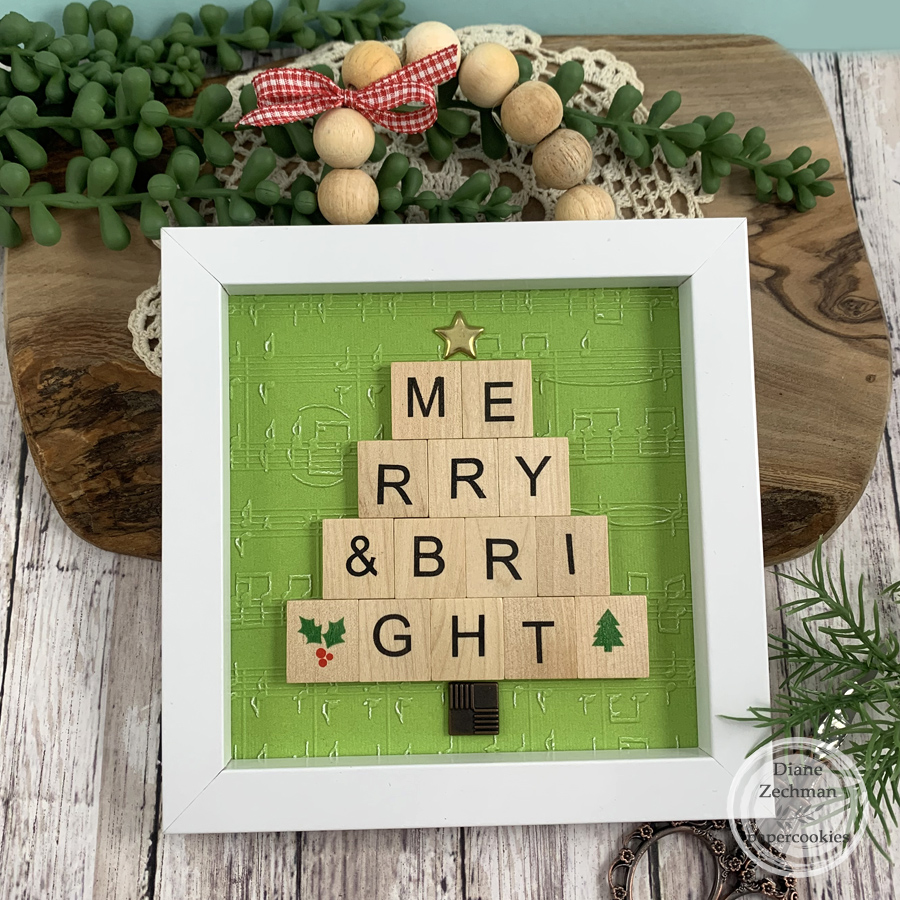
Several weeks prior, I found the event theme in a sentiment set of scrabble tile letters at Hobby Lobby. They already had an adhesive backing, so I just formed them in the shape of a tree and added brads for the trunk & star. I embossed the background and added a frame and ribbon.

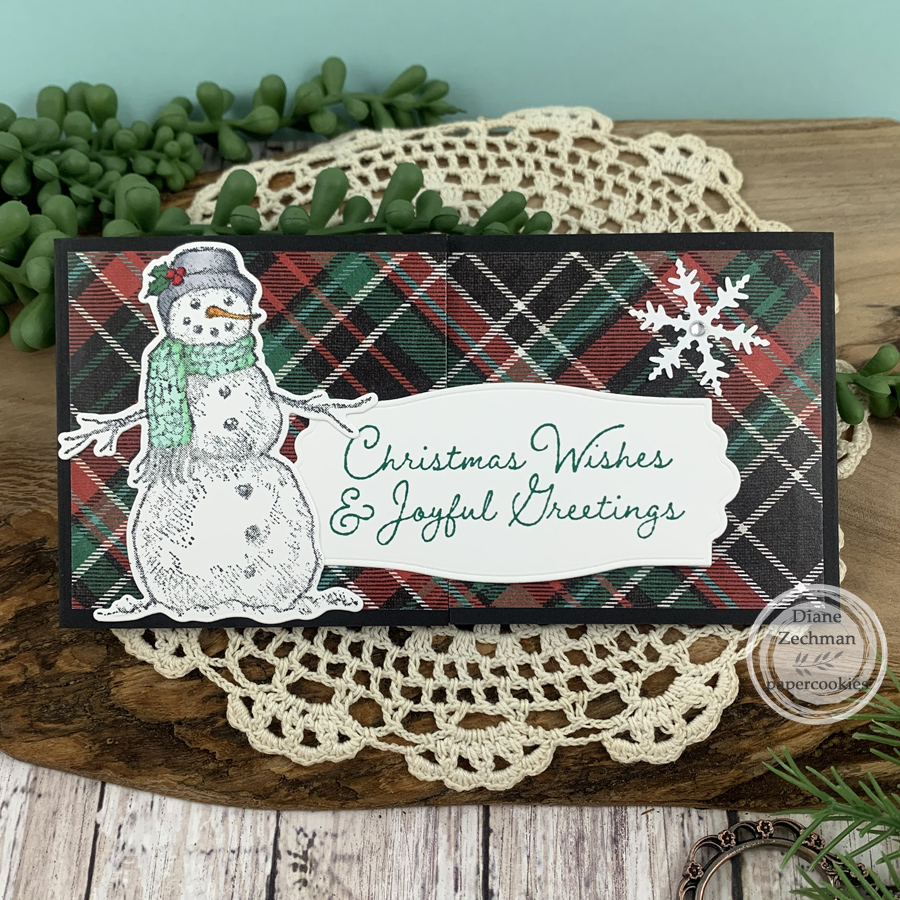
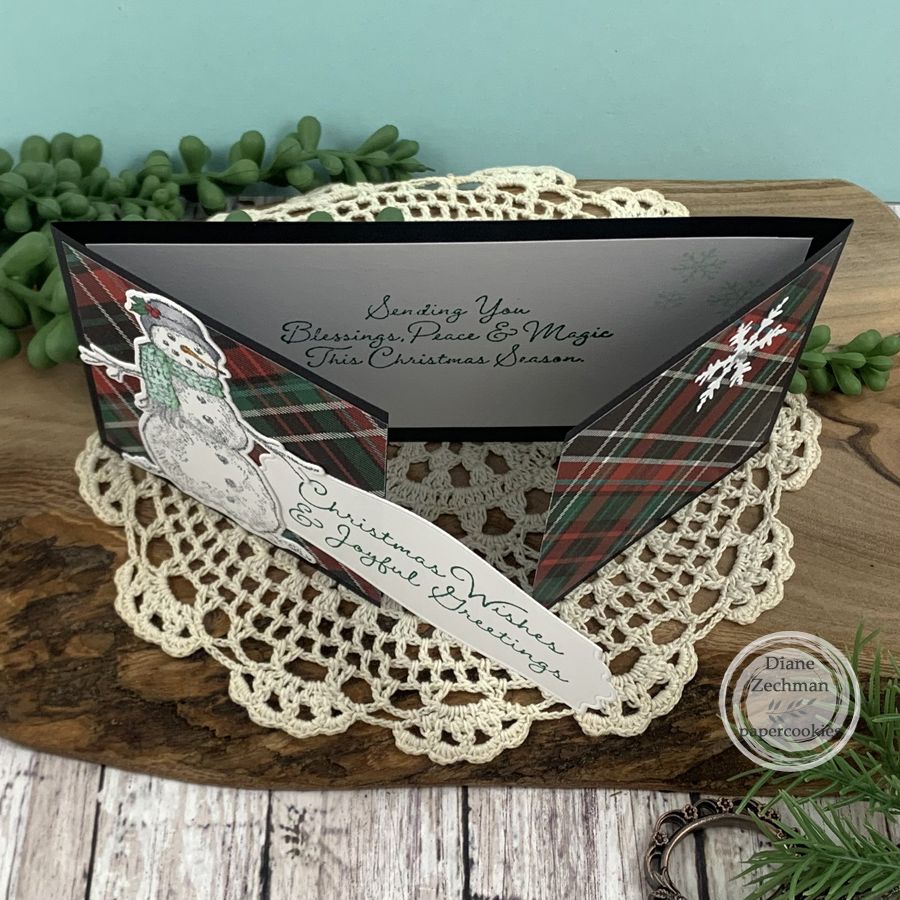
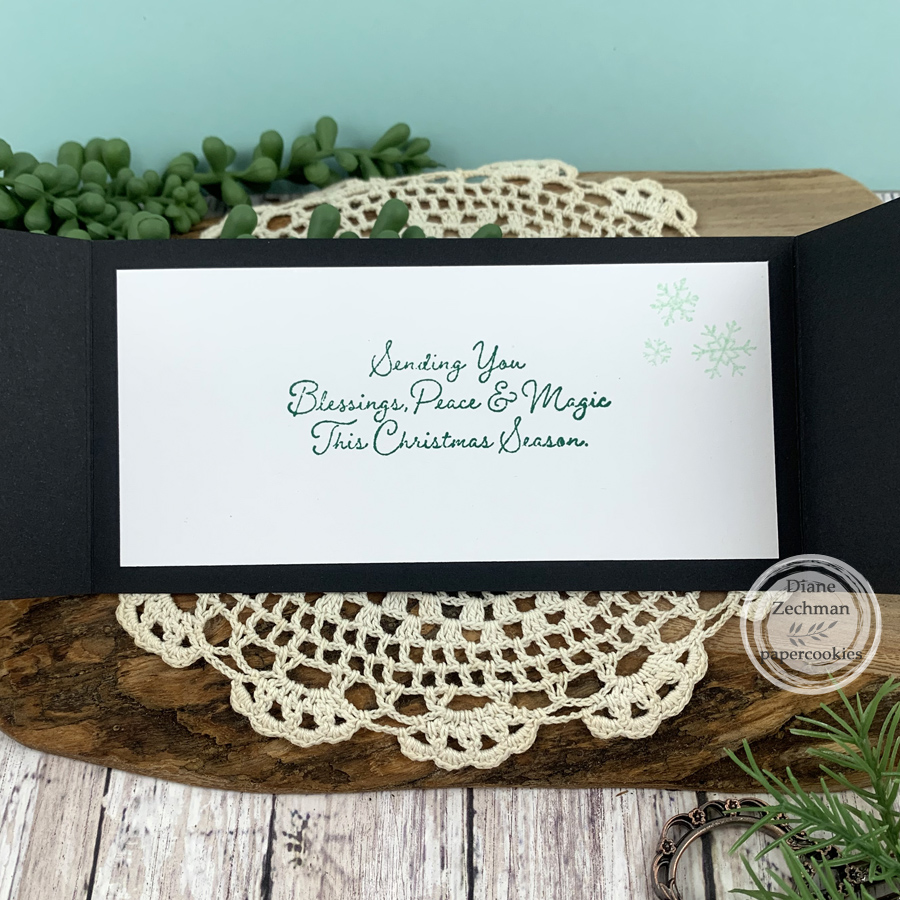
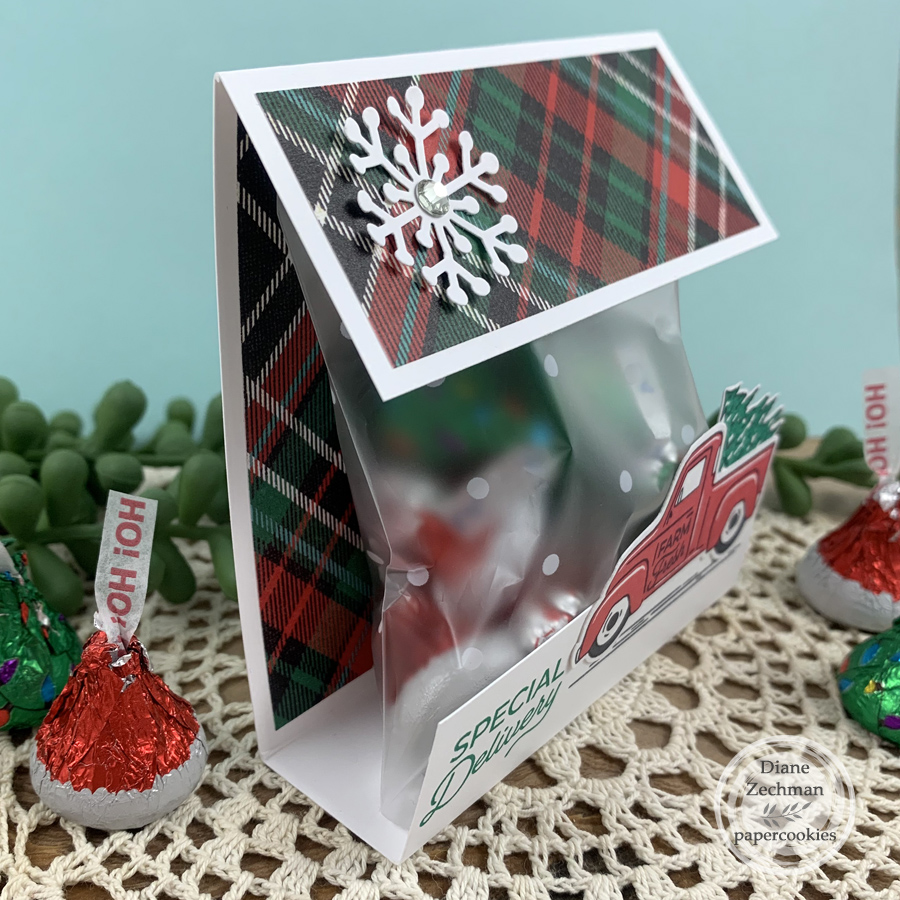
The Mini Slimline Swap was one of the most popular. I made mine a gatefold card using my favorite Christmas plaid paper from Hobby Lobby and SU! Snow Wonder Bundle. My base is 3 x 12, scored @ 3 and 9.

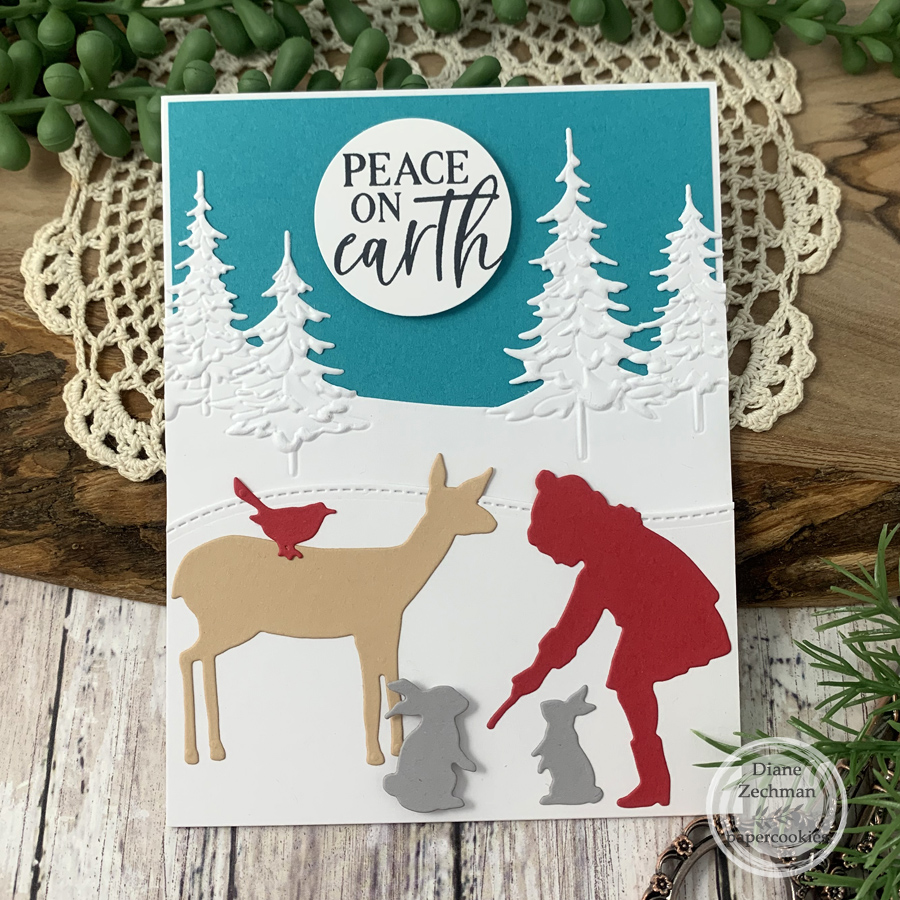
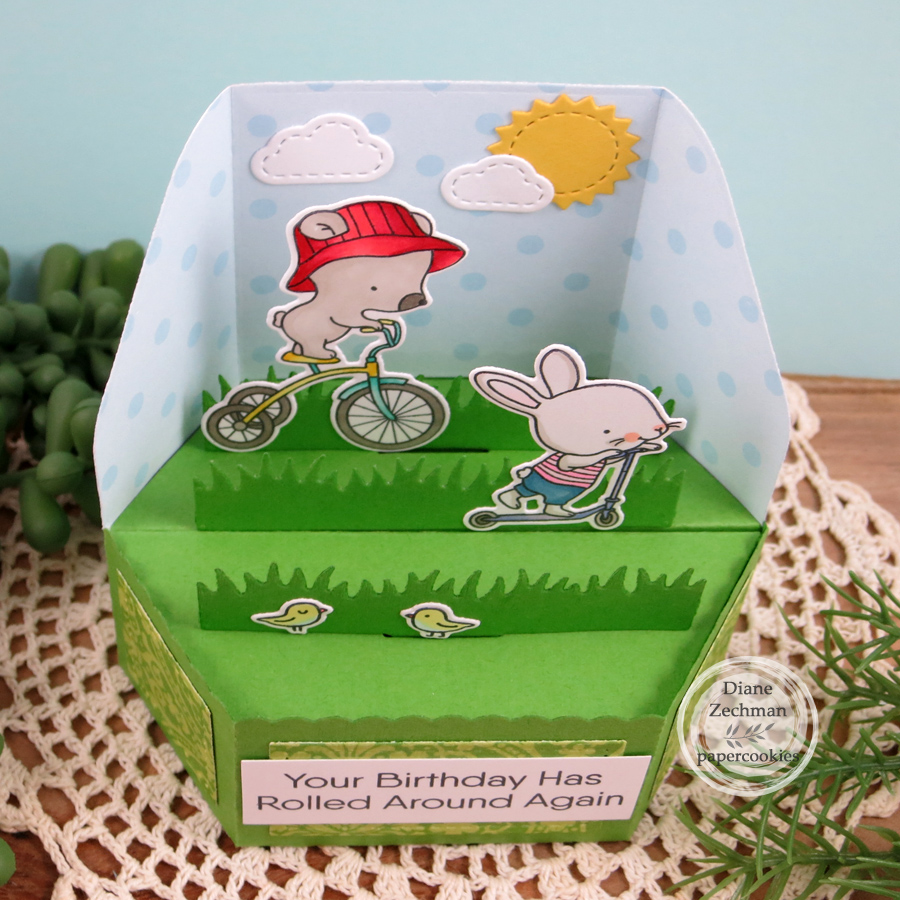
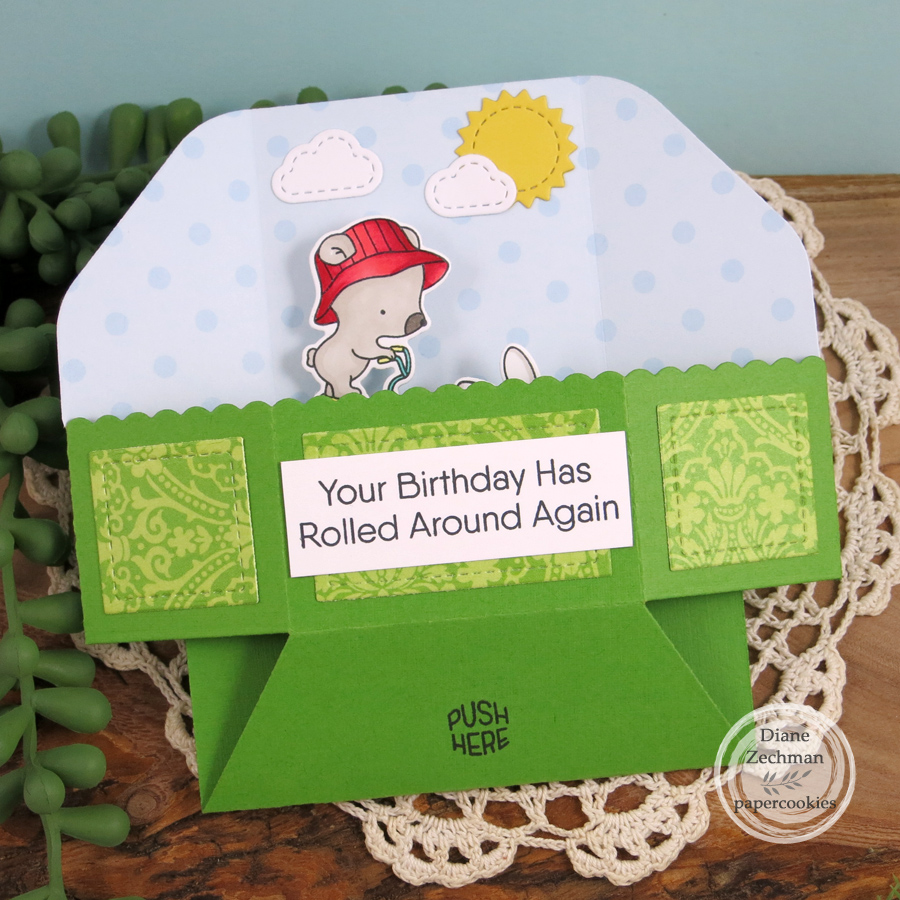
For my shoebox card, I used the retired Spellbinders Sharyn Sowell Winter Friends die set, Simon Says Stamp Pine Landscape embossing folder and die set, and SnSS Christmas Sentiments. The large bunny and sentiment circle are popped up with foam tape.

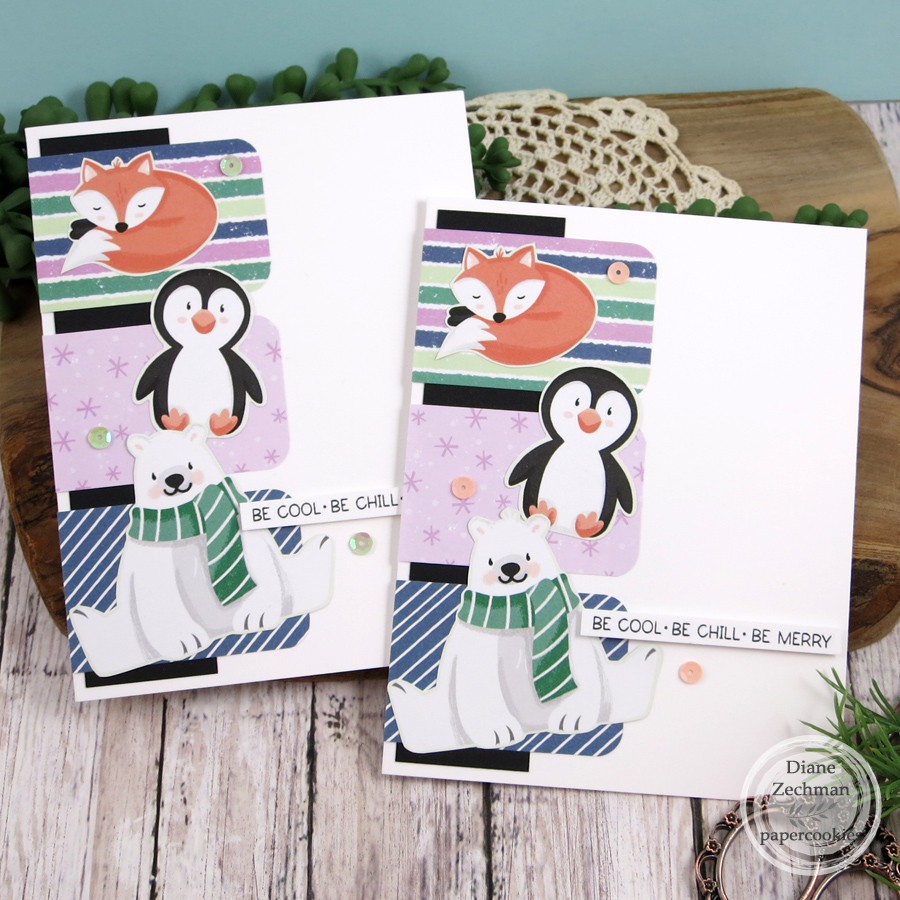
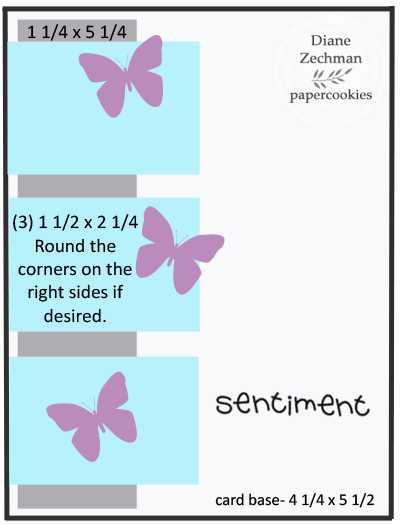
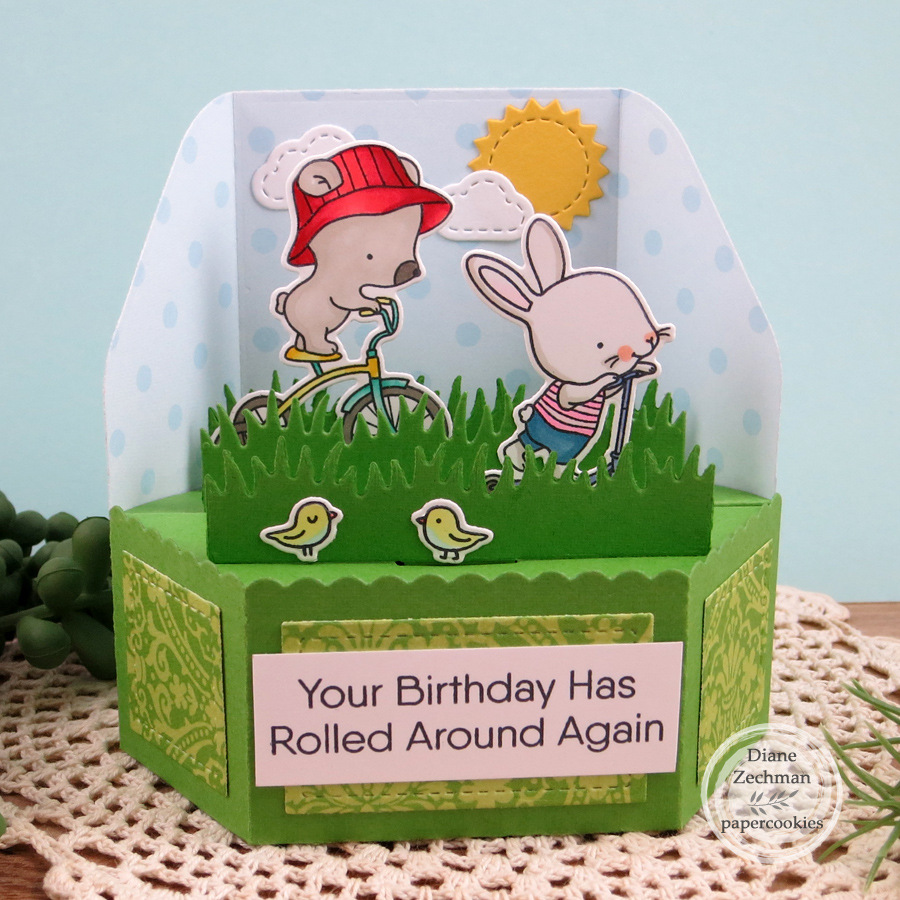
A new swap that I came up with for this year’s event was a Sketch & Card Front Swap. I used the SU! Penguin Place Bundle and coordinating papers on the card here. Below is my sketch that I started with. Participants swapped both of these together…the card front & it’s coordinating sketch.

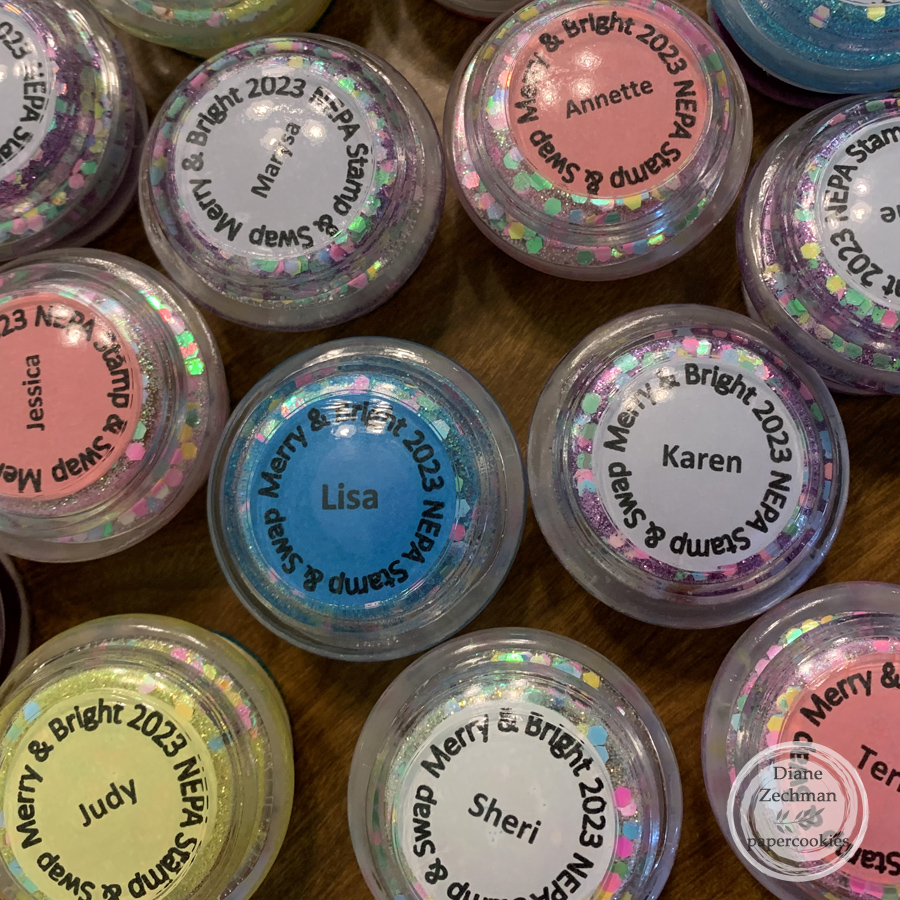
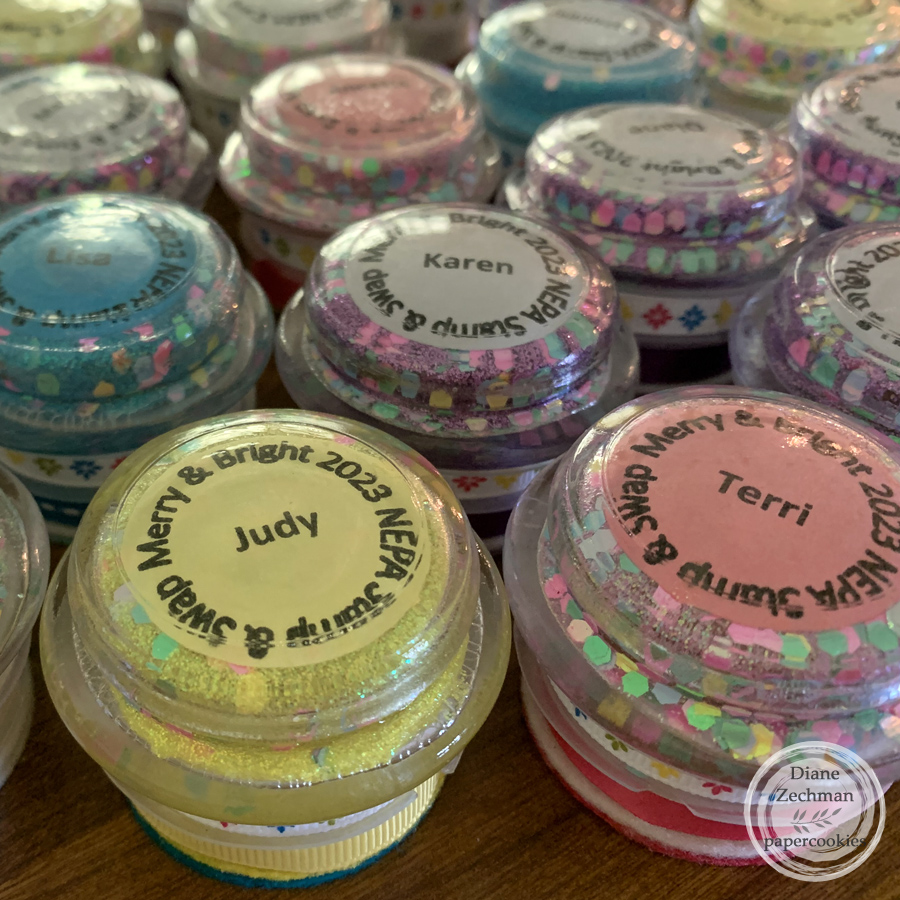
The last project that I’m sharing is the favor that we made for everyone who attended the swap. We decided this year to make the tools to use on the MISTI or other stamping platforms, but to also PERSONALIZE them. Someone from our committee (I can’t remember who) named them our NEPA tool. 🙂

We purchased mini candles from the Dollar Tree and used the glass tops, making sure to pick out the ones with a large clear space in the center of the lid. My friend, Lou Ann, and I had several hours LOL trying to get our swap words in a circle with each name inside but when we were finished, it was so worth the effort (Don’t ask me how we did it lol)! They were then printed onto colored copy papers and punched out with a circle punch. Lou Ann’s husband cut wood circles for us to place on the bottom of the glass for stability, and then we covered the base with felt. So, there’s the glass candle lid (with a plastic covering on the bottom of it), then a wood circle which we painted white, and two layers of felt circles. Each attendee was asked their favorite colors without knowing what we were making.

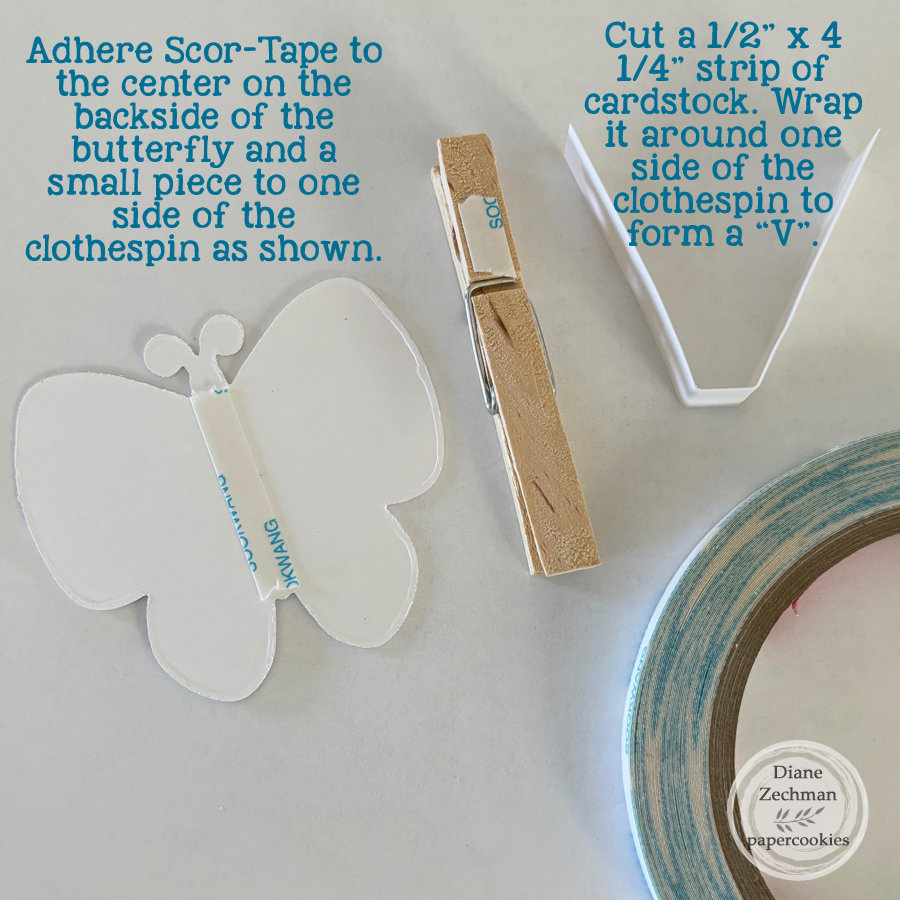
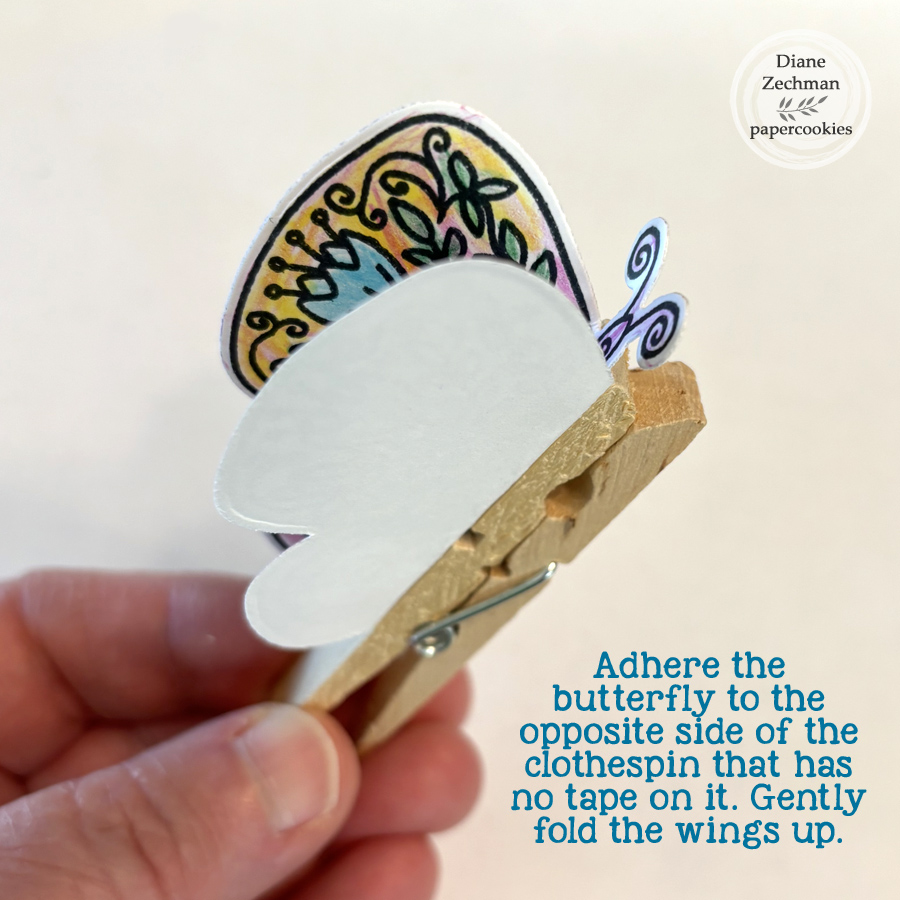
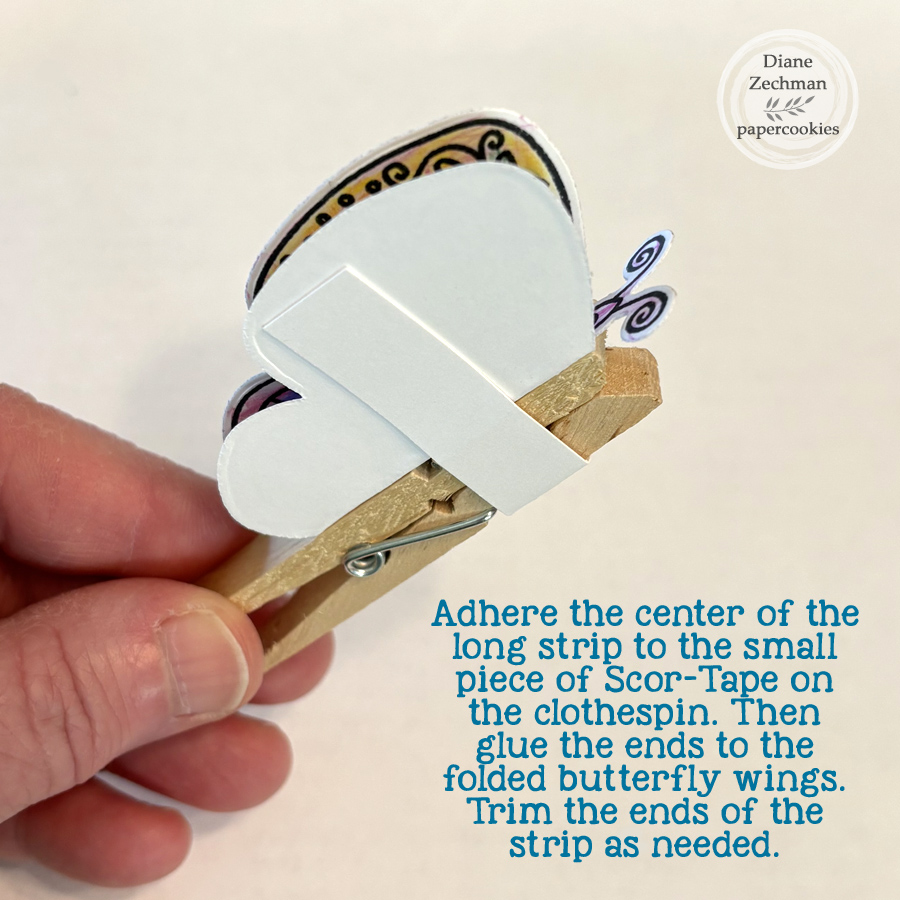
We used several glues and adhesives with trial & error until we figured out the right combination! Lou Ann used her Xyron sticker maker with the punched circles, so they had adhesive on top. Then I carefully adhered them in place inside the lid using tweezers to get them inside. Our committee got together and working quickly, Mod Podge was applied inside the entire lid and chunky glitter was dumped inside. Next, a fine glitter was added to fill in the empty spaces. It’s hard to capture the glitter in the photos below! When dry, E6000 glue was used to adhere the wood circle to the candle lid. Again, they were left to sit as the glue dries. Aleene’s Felt and Foam Tacky Glue worked great to adhere two felt die cut circles to the base. We finished them off by adding some ribbons with Scor-Tape. Whew! It was a lot of work but so fun!

Thanks for reading all the way through! LOL. Have a great day!

special delivery treats

I made some last-minute Christmas treats for friends using the SU! Trucking Along Bundle. Last year, my friend Michele shared some treats with this design/fold and left a bunch of the cute, dotted bags with me. I wanted to be sure to use the bags this year to make some treats of my own to share. 🙂

I followed the measurements on her treats to cut and score. The base is 3 1/2 x 7, scored @ 1 1/2, 5, and 6. The patterned papers are 3 1/4 x 3 1/4, and 1 1/4 x 3 1/4.

Have a relaxing after-Christmas week!

mitten ornaments

My project today uses dies from the Spellbinders 12 Days of Stitchmas 2023 Advent Calendar. (Sadly, it seems to be sold out in several places that I looked).

My husband’s workplace is decorating a tree to be donated and auctioned off for a benefit and they chose the theme of mittens and ice skates for decorations. Families are decorating mittens to hang on the tree. I grabbed these dies that recently came in the mail and I’m having fun die cutting felt again. 🙂

I am looking forward to stitching with these dies, but for this project I decided to omit it. Just like the felt houses on my recent card, I used Aleene’s Felt and Foam Tacky Glue with a toothpick to adhere the felt pieces to the knit mittens.

Have fun trying it!

bird’s nest treat box

Hello! I have a sweet treat box favor to share today. I saw two versions of this bird’s nest treat box made with the Stampin’ Up! Sweet Songbird Bundle but was unable to find/credit the original designer. I altered mine a bit, but these were inspired by Loni Spendlove’s Sweet Songbird Nest Treat Favors.

I started with a 3 x 1 3/4″ piece of Soft Suede cardstock for the box. This was slightly larger than Loni’s so it would fit the Hershey eggs. Score @ 1/4″ along both long sides and then score the 3″ length @ 1″ and 2″. The nest image is stamped twice for each one on scraps of Soft Suede cardstock with Soft Suede ink. Loni has a video in the link above for assembling the treats. I cut the tines off the bottom of some flat appetizer picks (slightly larger than a toothpick) for my signs. The “board” was stamped with Soft Suede ink onto Crumb Cake cardstock. The words are from the SU! set called A Touch of Ink. Mini glue dots were used to make the signs and attach them to the nests. I used some old dsp to punch the birds but thought they seemed a bit flimsy, so I also punched them from coordinating cardstock and layered them together for strength.

Note: My CVS store still had a few bags of Hershey eggs left from Easter candy…on sale!

Have a great day!

pop-up cards

Hello! Interactive cards are so much fun to create (and receive), and I have two to share with you today using the Lawn Fawn Scalloped Box Card Pop-Up Dies, Platform Pop-Up Dies, and Platform Pop-Up Add-On Dies.

First, I used the Platform Pop-Up and Add-On dies, and MFT’s retired Ride or Die stamps & dies to create a cute birthday card. The background (add-on) was cut with a fun polka dot patterned paper. There are several cute critters on wheels in this set…so hard to choose!

I was inspired by this card by Karen Amidon when I needed a masculine birthday card. I LOVED her idea of placing the lightbulb inside a sun…brilliant! 🙂 I used an old retired QuicKutz sun and a circle punch for mine. The lightbulb and test tube are attached with acetate strips. I always loved this Paper Smooches Great Chemistry set and was thrilled when I found one online to purchase! The seller shipped it immediately and it arrived just in time to finish my card! Yay!

Note: since this was for a masculine card, I simply trimmed the tiny, scalloped edge off of the box card diecuts.

Have a great day and keep warm!

baby banners

Hello! I have some baby name banners to share today that I recently made. Click on each image to see a larger photo.

The first is for a baby boy, Carsten, and the shower/nursery theme is classic storybooks. I used some Momenta banner dies, the WeR Memory Keepers Alphabet Punch Board, and various character images that I printed off the internet. The backgrounds on each banner flag are old book pages from a Caps for Sale book that a friend was going to toss. The flags were strung onto twine and wooden beads were placed between each one.

The second banner is for a baby girl, Elora. I started with a flower and ribbon banner from Hobby Lobby and added the flags cut with the same set of dies (these were smaller). The pink layers were embossed with a Park Lane- Bloom embossing folder from JoAnn’s. Then I added some die-cut papers left over from a previous project and some punched flowers. I added some Stickles to the letters made with Altenew Bold Alphabet dies to make them sparkle and stand out.

Banners are fun to make and personalize for each recipient…try one!

Stamp & Swap 2022

Today I am sharing the projects that I made for our annual Stamp & Swap, an all-day stamping event. Our theme this year was Gnome for the Holidays.

I had a bunch of Christmas Gnomes patterned paper from Hobby Lobby to use on some of my projects. The first one is a 6×6 recipe card. The gnome with mixer is a digital image by Last Minute Manda that I colored to coordinate with the background paper. The faint snowflakes were stamped with Sweet ‘n Sassy’s Cheerful Snowmen set.

We try to keep our shoebox cards simple so everyone can either complete them or make a kit to complete at home. The left side of my shoebox card with the plaid paper is glued shut and only the right portion with the gnomes opens. The sentiment is from Sweet ‘n Sassy’s Christmas Gnomes.

I made a simple interactive card for my ATC trade using a Unity itty bitty stamp set called Change is a Good Thing. This mini card has a top portion that is glued shut and the bottom opens up. 🙂

Next, I made a mini slim card with a tent topper using Stampin’ Up Hand-Penned Petals, Pierced Blooms Dies, and Friendly Hello. The paper is Colorbok- Beach House.

My last project was for a gift swap. I found a Pioneer Woman Christmas frame (first photo) on clearance last year at Walmart. The second photo shows how I decorated it with ribbons, gnomes, felt snowflakes, and Aleene’s True Snow. The gnomes are from Simon Says Stamp dies- Gnome, Pocket Gnome, and Li’l Gnome. As you can see in the last photo… it lights up!

Have a great week!

mini composition notepads

Recently I posted a few mini composition notebooks that I decorated and today I have a few more to share. These are a fun alternative to the normal card making and apparently were well received, as they were picked up as fast as I laid them out. I need to make more! I didn’t get photos of them all but here’s a few.

Product links: Prayer Time, Faith Phrases, SU! Honeybee Home, Last Minute Manda Gnomes.

The mini notebooks are from Walmart and are a great way to use up scraps and leftover bits. Have a great day!