Category Archives: masculine/boy

time to celebrate

This is my last card showcasing the new Creative Worship Stamps (Sweet ‘n Sassy Stamps) April release products. I’ve been wanting to try some more quilt cards, and I made this one masculine to pair with this awesome clock image from the Vintage Clocks Bundle.

I followed this layout by Klompen Stampers for the placement of the squares. Then I took it a step further and embossed the whole layer with the SU! Softly Sophisticated embossing folder.

Have an awesome day!

never ending universe

It has been a long time since I made a Never-Ending Card, and I forgot just how fun they are. I needed a masculine birthday card for a friend and wanted to use the SU! Reach for the Stars Bundle and the coordinating Stargazing papers. When I searched for the measurements for the N-E card, I found that someone already used this set in the A2 size. I will link her post HERE. I believe my measurements are a bit different, and I decorated mine slightly different as well.

As you continue to open the card from the center, four designs appear, then continue to repeat as it continually “opens”. (Quick video on my IG!)

If you haven’t tried this style of card yet, you need to! I even glued together two plain white N-E Cards for my granddaughters, and they had fun drawing on them! Have a great weekend!

2023 wrap up

I have a few more cards from the year to quickly share before 2023 is over. First is a CAS graduation card with a Darice embossing folder, some large Numbers Dies, and a simple die cut word from SnSS’s Script Sentiments Stamp & Die Bundle.

The next two CAS cards use My Father’s House stamp set. The first card was for a pastoral ordination and the second card was for some churches that were being prayed for. The church image was stamped directly onto patterned papers and only needed a sentiment added.

Tim Holtz’ Chilly & Freezy dies from SSS 2022 Diecember were used on this card. I made it back in February to thank a friend for sharing the dies with me. Distress inks were applied to the background and then spritzed with water for the snowy sky. The sentiment is from my own set, Snowy Hello.

I love to personalize cards, but don’t do it often enough! Here’s a notecard that I made and personalized with the recipient’s name. The flowers are SU!, the alphabet, sentiment, and stencil are SnSS, and the frame and border are Sizzix.

The next two cards use SU! Peaceful Cabin. The second one is an altered Paper Pumpkin kit which I made a pocket inside for a gift card.

I loved this Paper Pumpkin kit just the way it was designed…no alterations here!

I needed several last-minute money holder cards and didn’t find any in the store. I made a quick slimline sample with an optional belly band and took some photos of it when done. I used different patterned papers but forgot to take photos until I was going to seal the last one. lol. This card uses a Tim Holtz stamp and Hobby Lobby patterned paper.

Have a safe & happy New Year!

birthday bunch

Happy Friday! Today I am catching up with nine of my favorites from the past year that were hanging out in my files…a bunch of birthday cards! These cards were not made for a company design team and just hadn’t been shared yet. It’s another photo heavy post today!

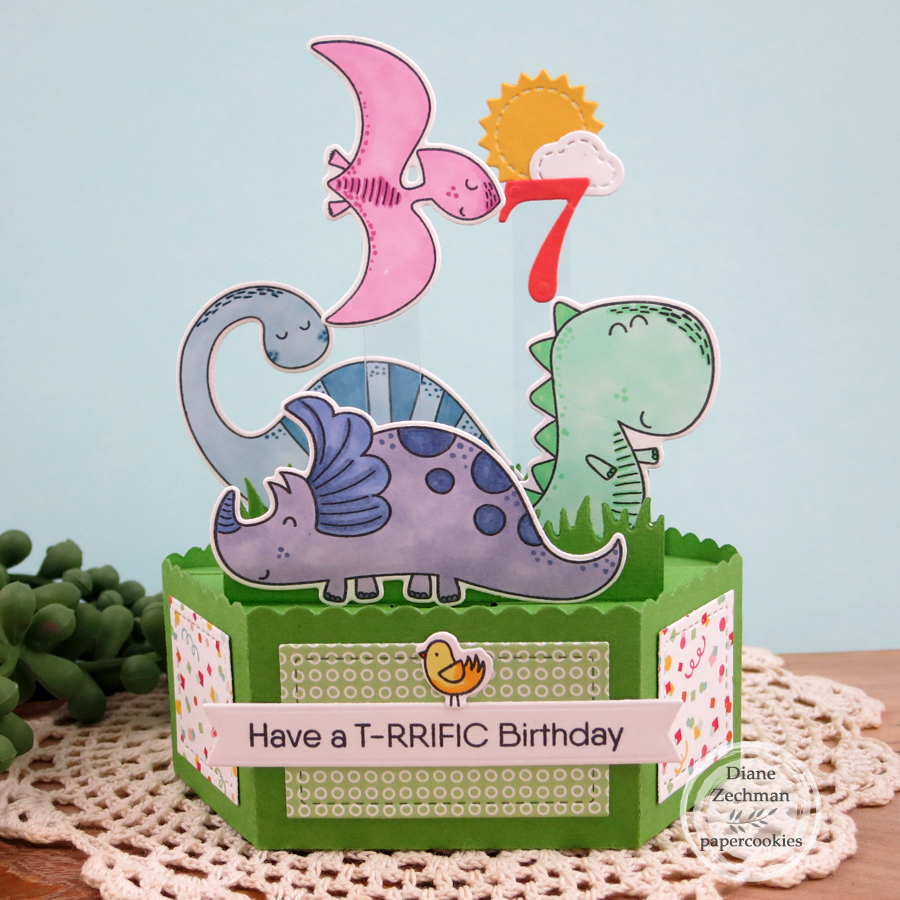
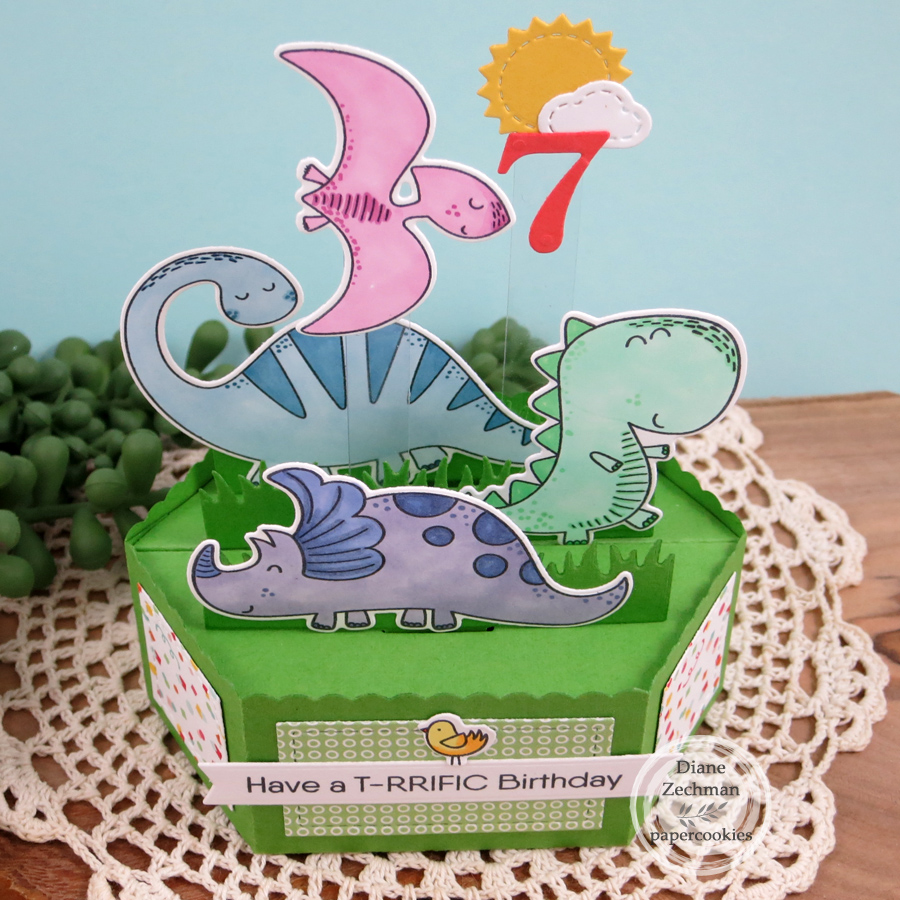
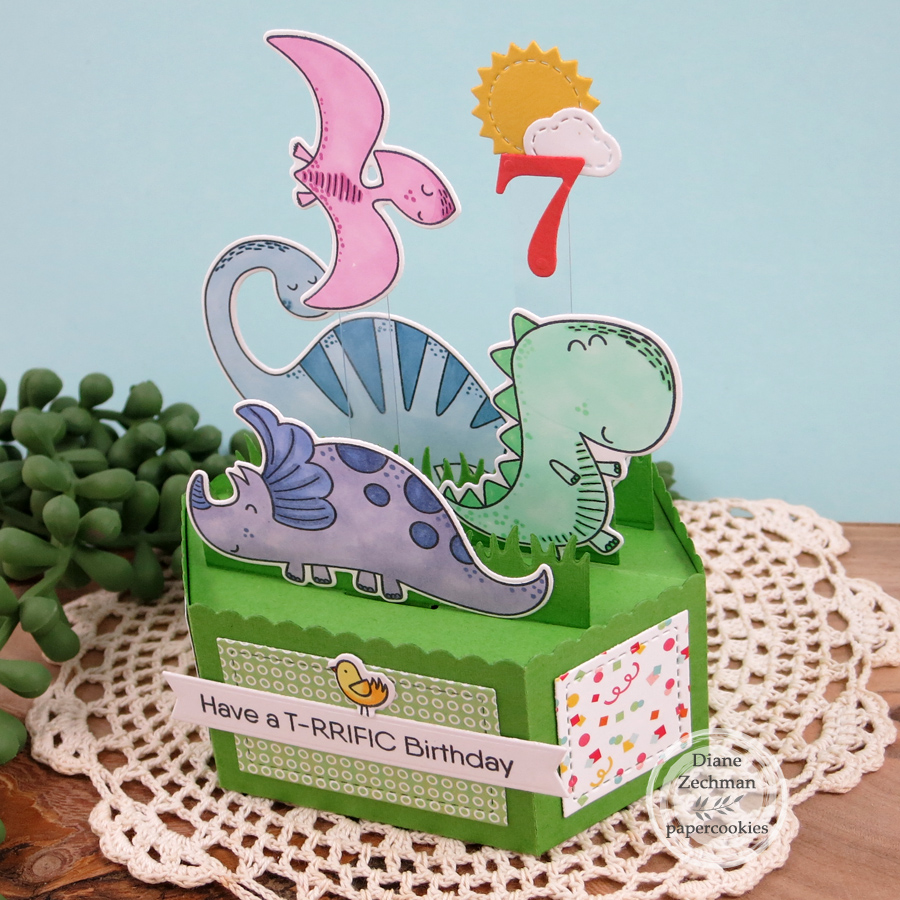
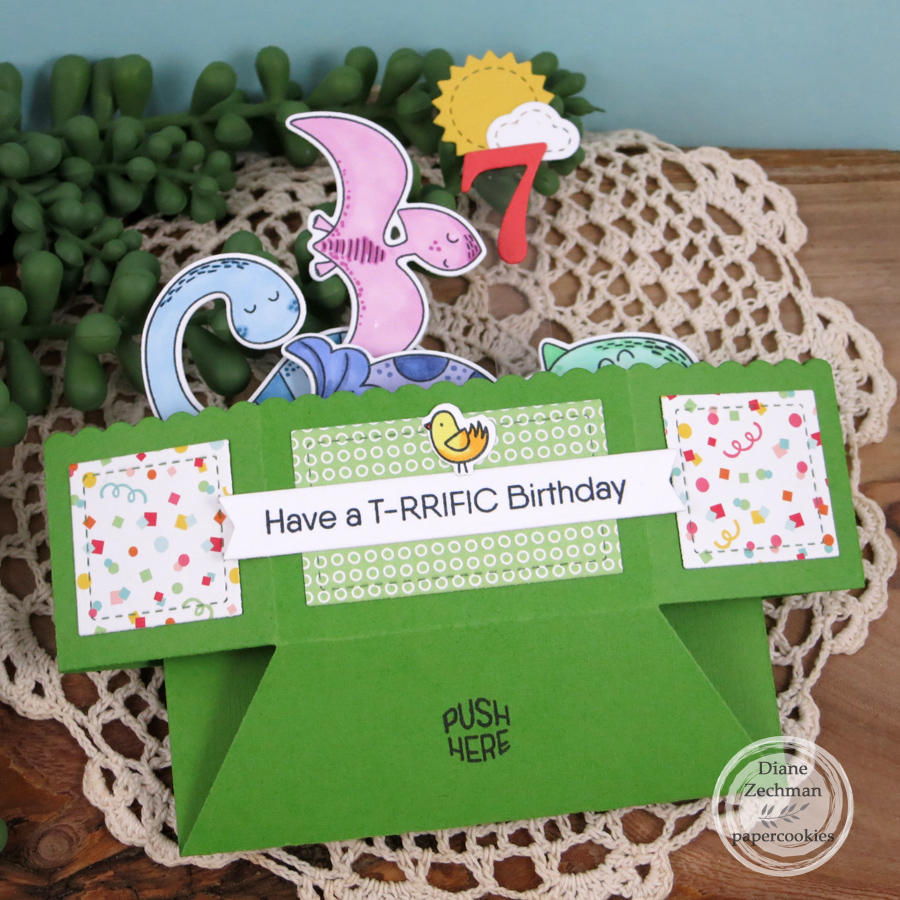
My first card was for a dinosaur-loving girl who turned 7. I used MFT‘s A-roar-able Friends and Lawn Fawn’s Platform Pop-Up Dies. The platform card folds flat for placing into an envelope. Strips of clear acetate were used to attach a few of the elements.

For the mini slim birthday cake card, I used… Spellbinders Stitched Fringe Cake Dies, Taylored Expressions Happy Birthday Banner and Skinny Mini Party Borders Dies, Sizzix Bold Flora Dies, and SU! Scattered Sequins embossing folder. Each cake layer was stitched by hand with white thread.

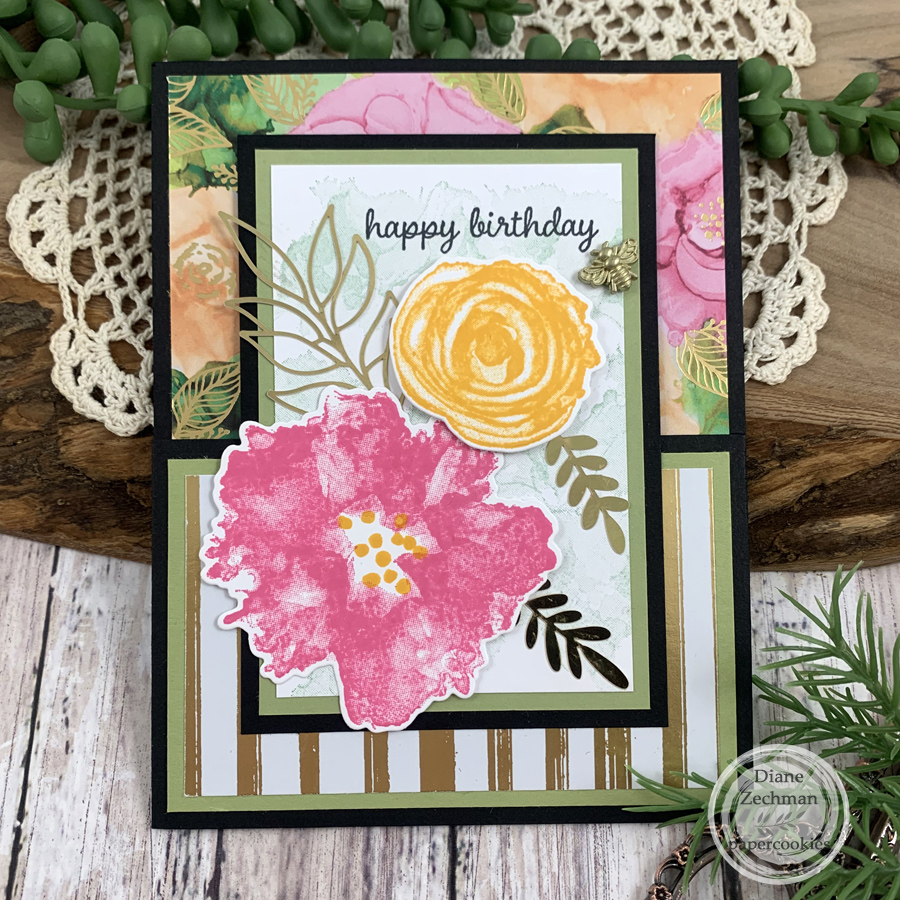
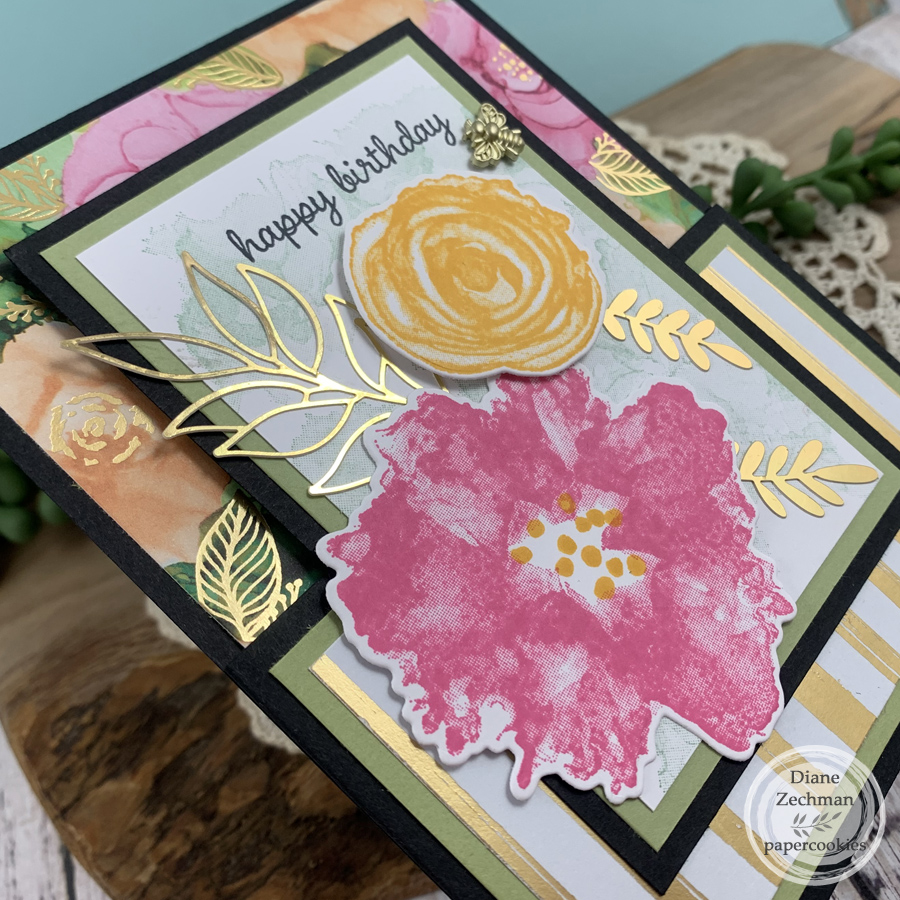
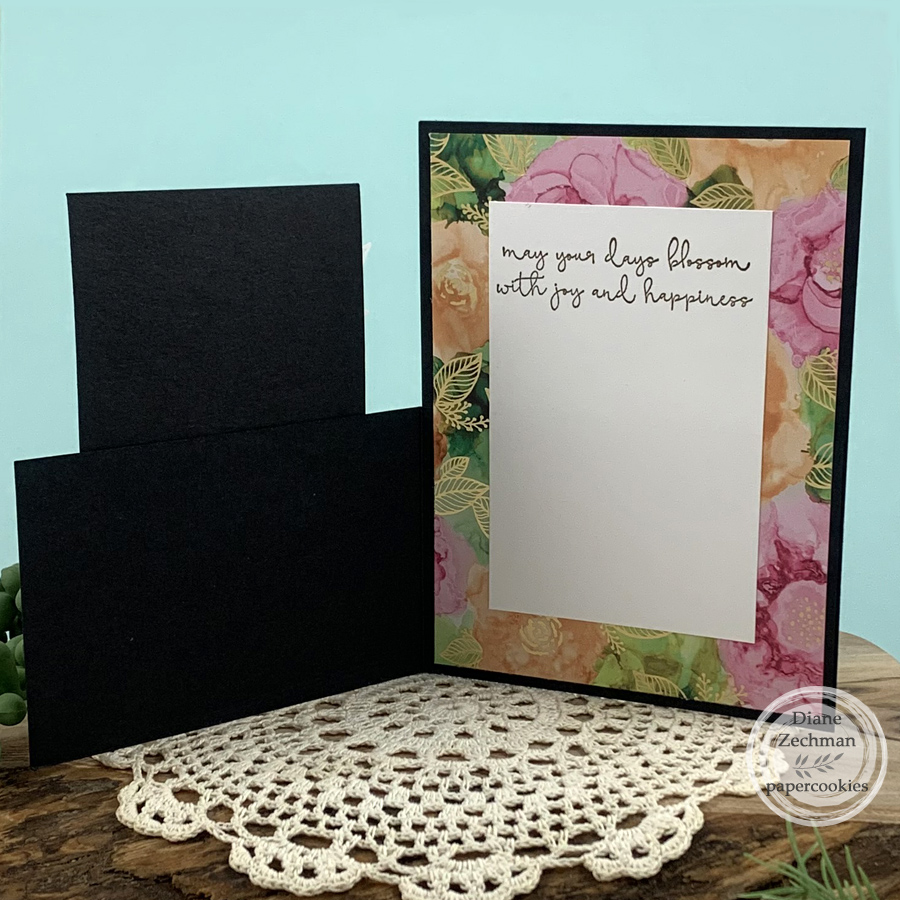
My next two cards were made in the same style, with the top half of the card front cut away. (Cut the top of the card front @ 2 3/4″) This piece is then turned 1/4 turn and adhered to the bottom front. So, for the center front layers on the first card… the black is 2 3/4 x 4 1/4, the green is 2 1/2 x 4, and the white is 2 1/4 x 3 3/4. The inside white layer is 2 1/2 x 4. Add additional cardstock and patterned paper layers as desired. Here I used SU! Artistically Inked Bundle, and Expressions in Ink dsp and Ephemera (gold foliage), plus a gold bee charm.

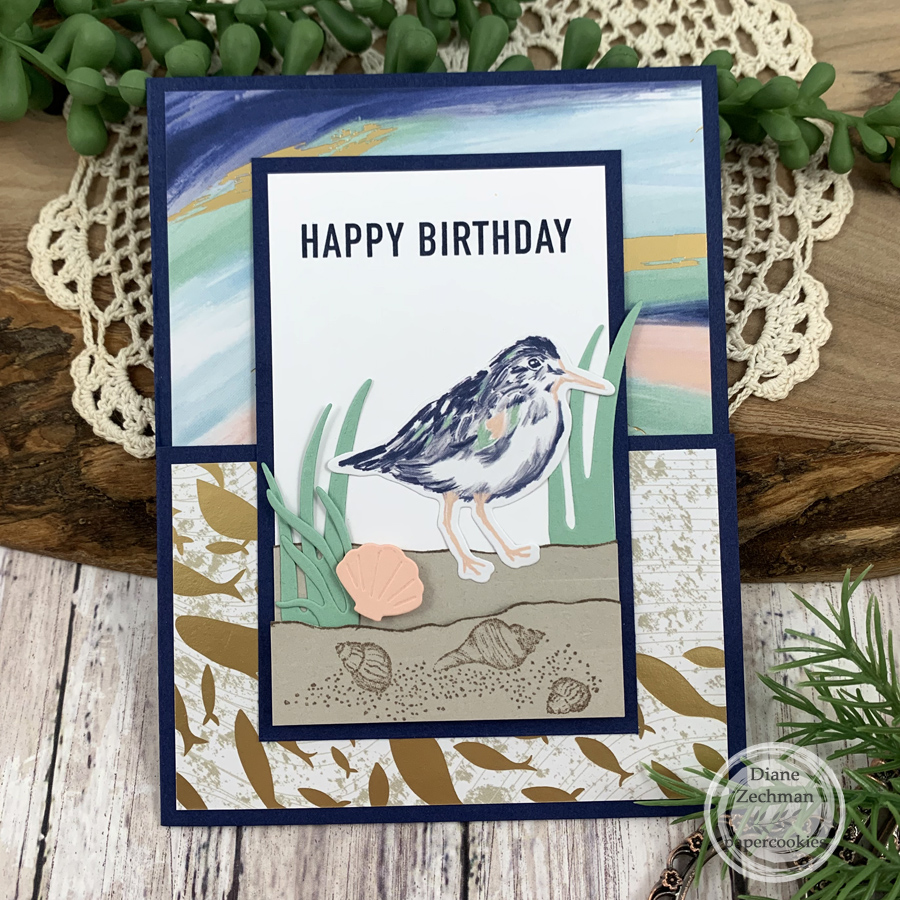
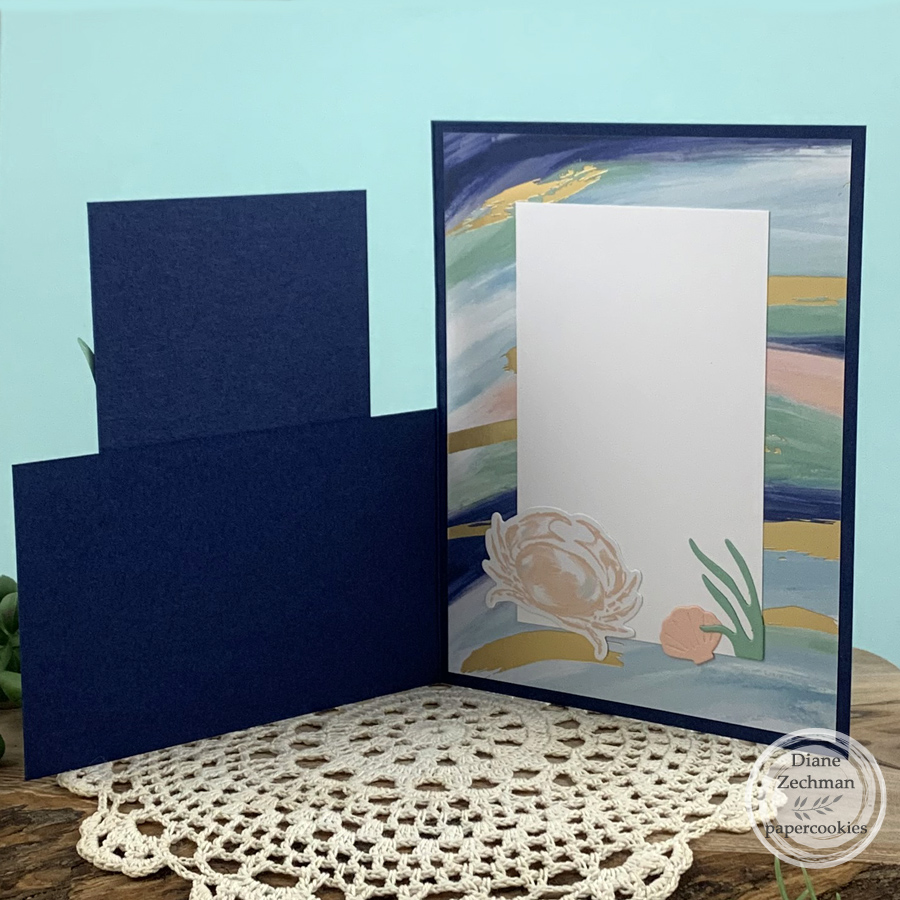
The masculine version was made the same way, using SU! Seaside Bay and coordinating papers.

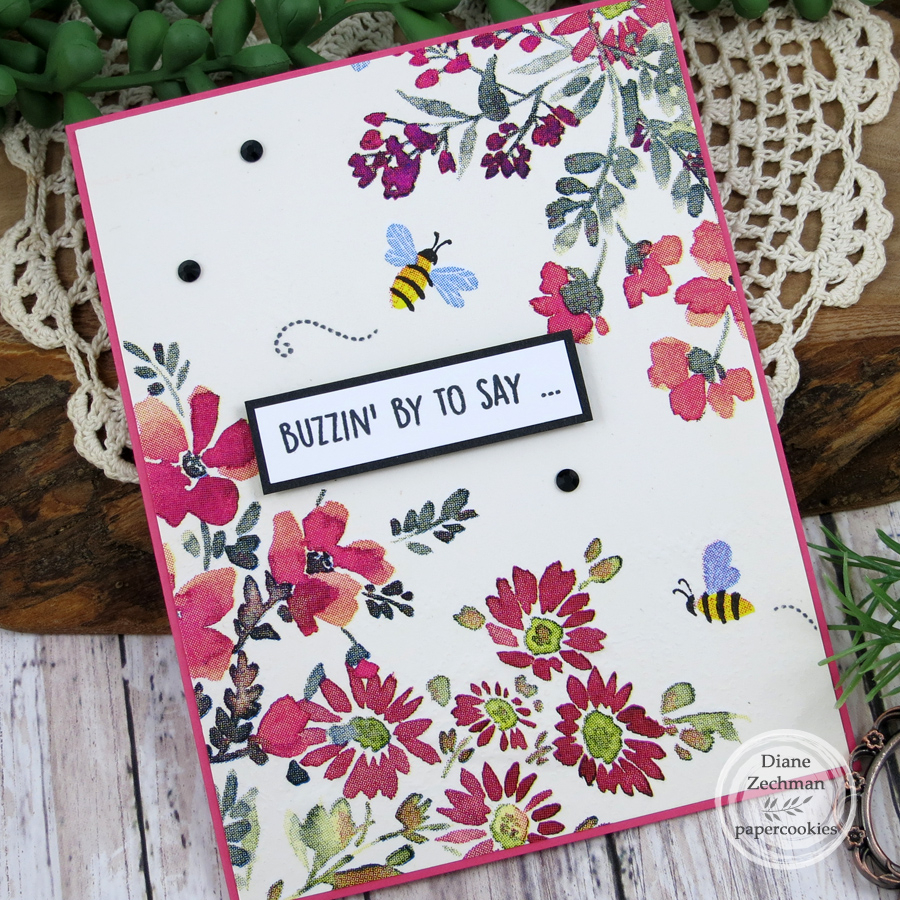
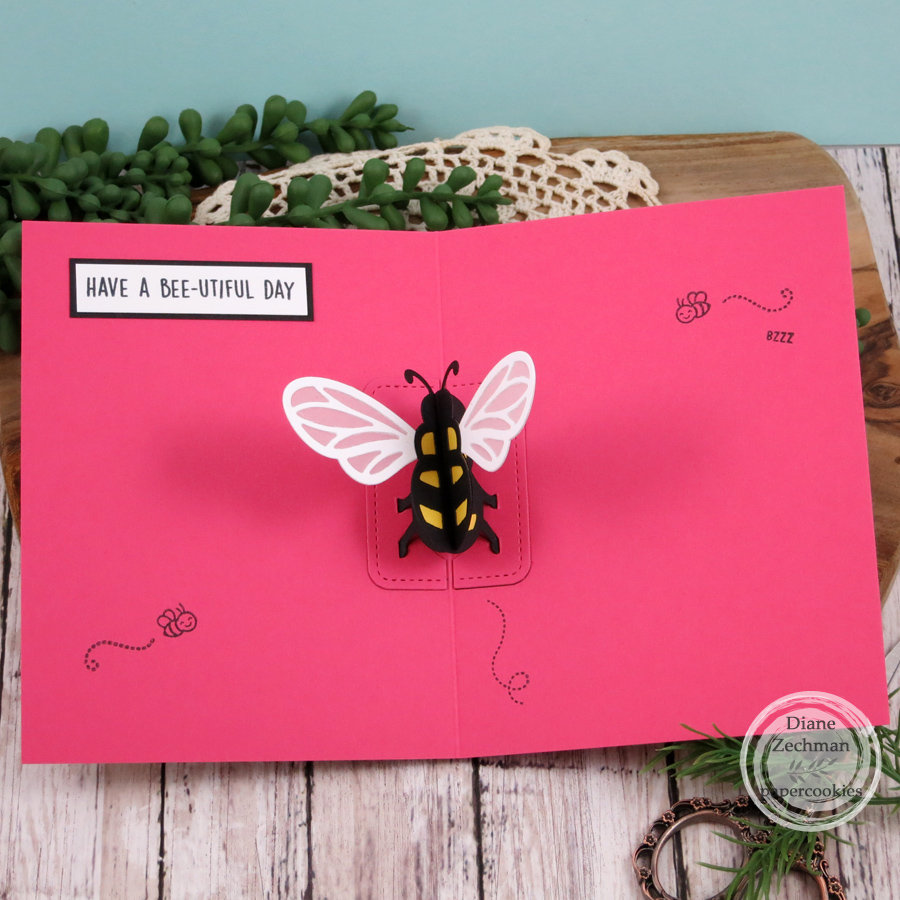
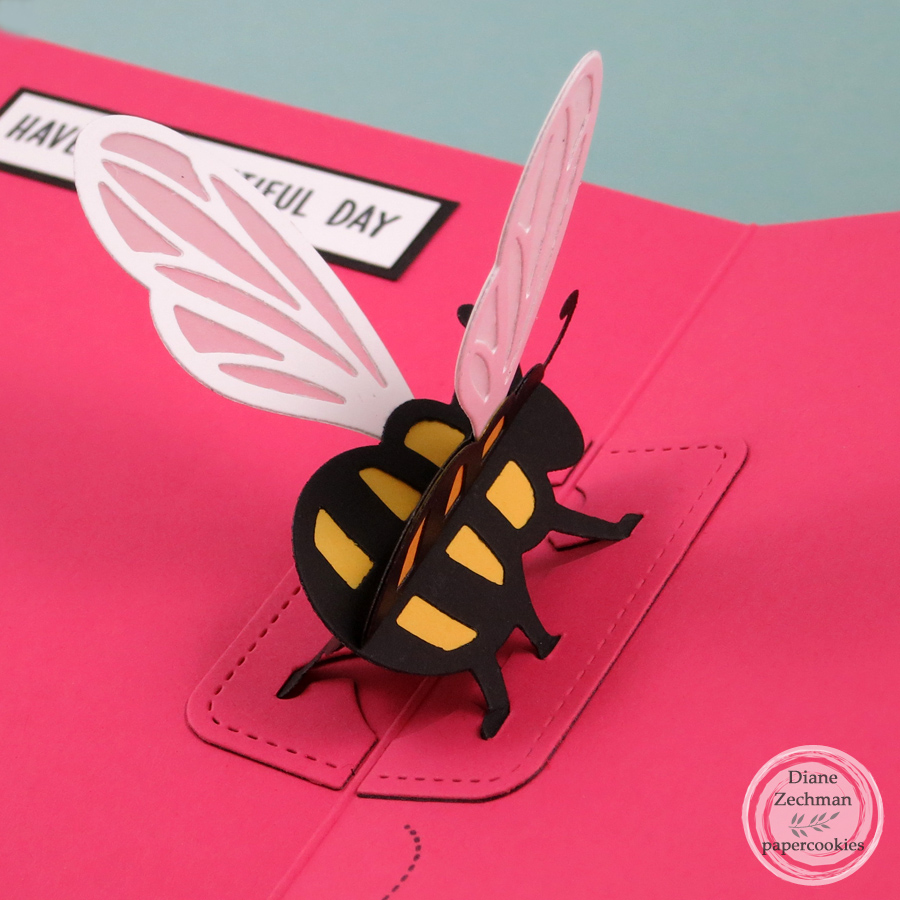
A beautiful paper napkin was applied to the following card front for a pretty floral background. Then I used Lawn Fawn’s Pop-Up Bee Dies and You’re a Keeper stamp set to create this sweet pop-up card. LOVE the bee dies!! This card is so cute in person. I only wish I had made those wings sparkly!

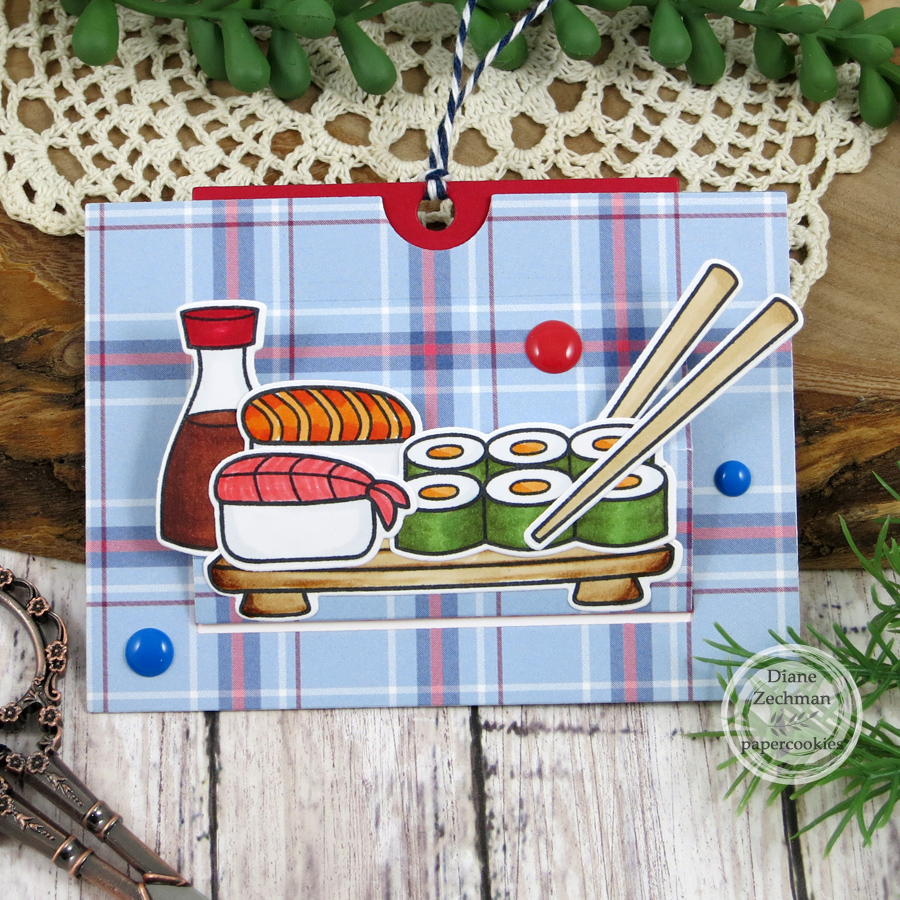
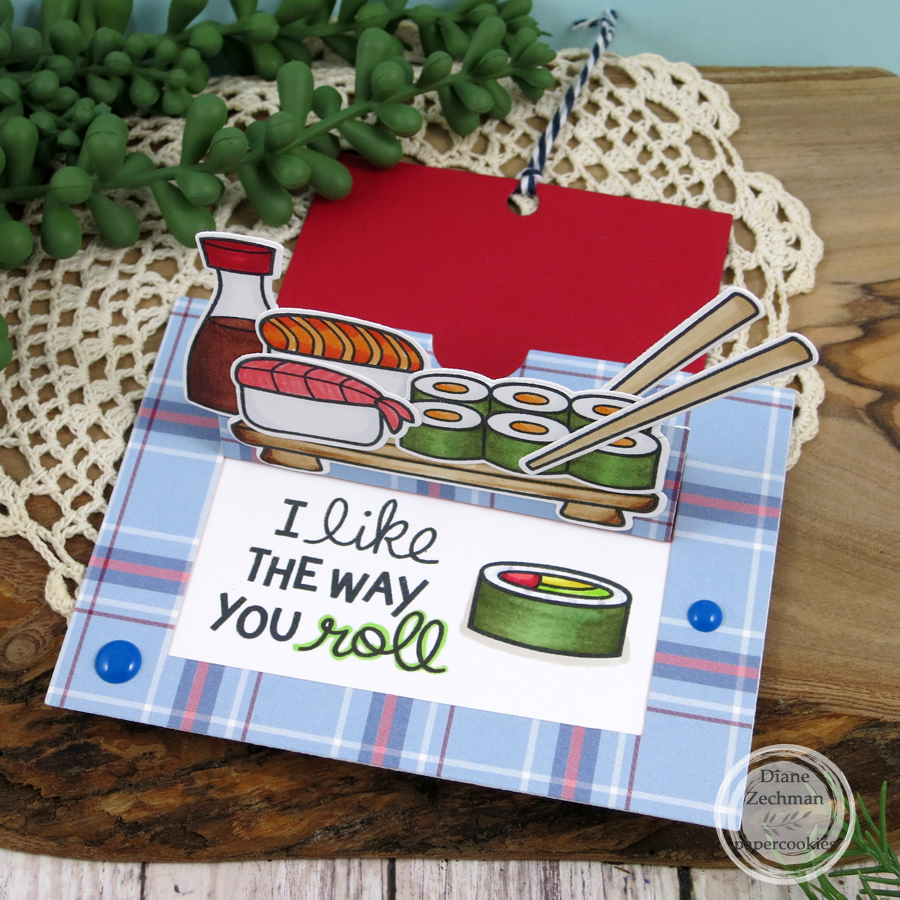
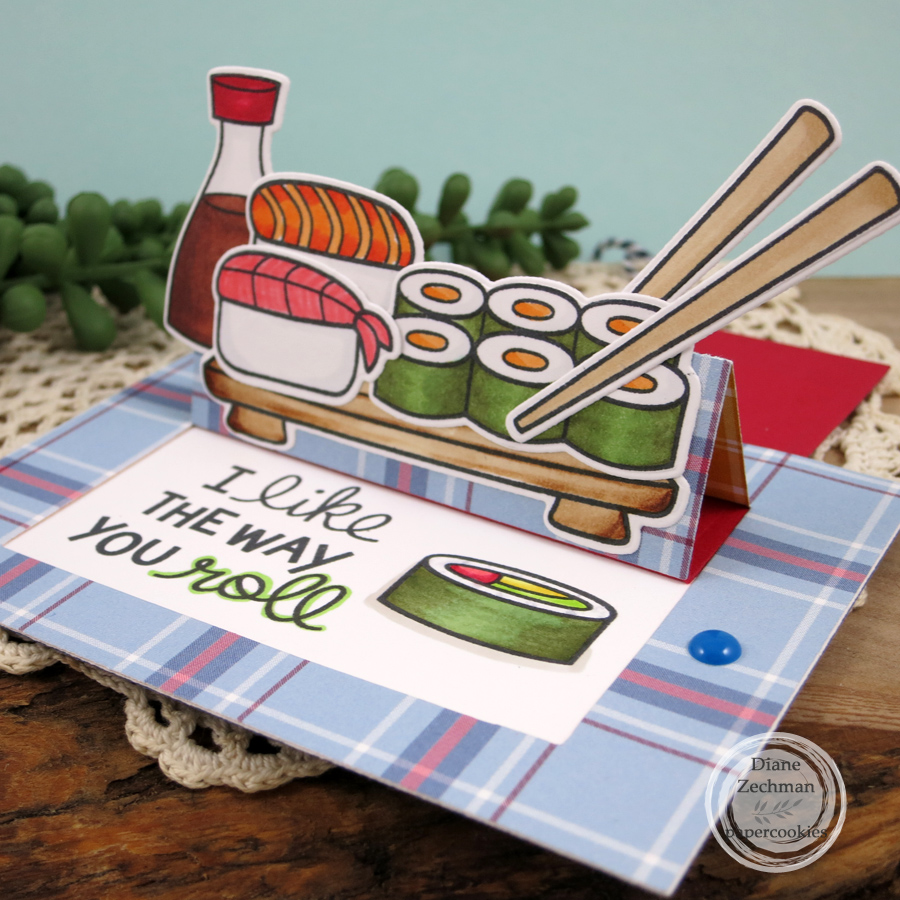
Another masculine card, this one’s for a sushi lover. I used Lawn Fawn’s Let’s Roll and Sizzix Tropicool Slider Card Dies. The Sushi pops up and reveals the greeting inside as the top is pulled.

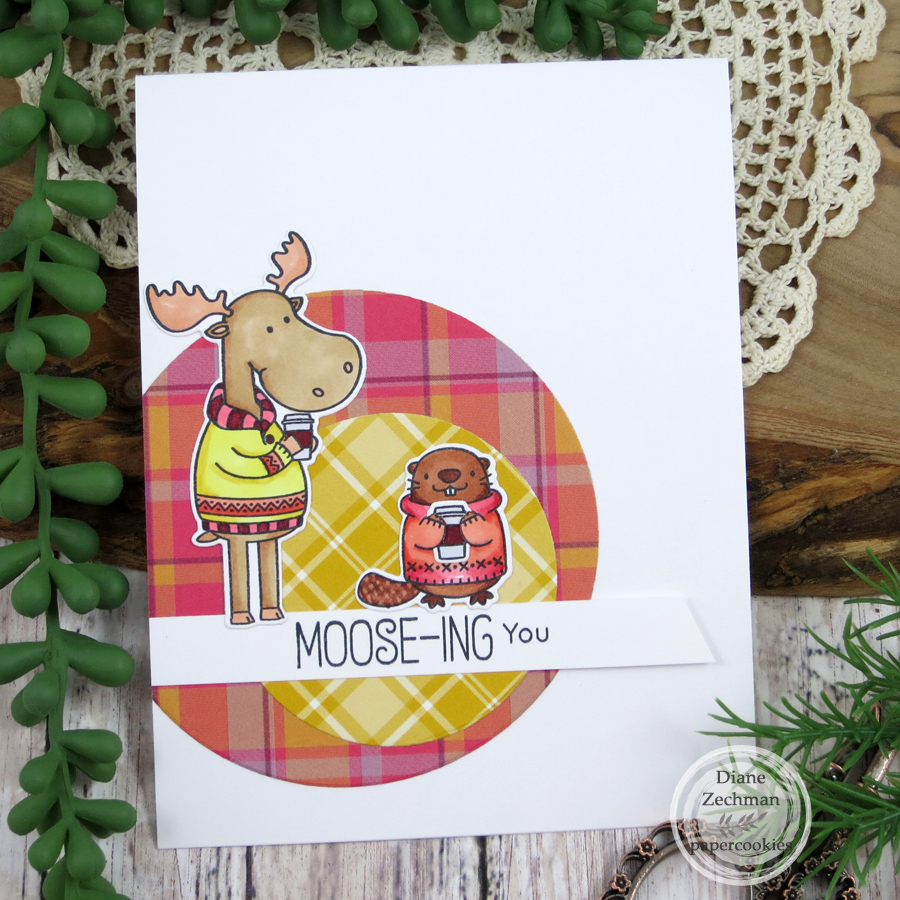
How cute are these two from the MFT Sweater Weather- In the Woods set? I kept this card CAS and spot-lighted them with some plaid circles. I followed the MFTWSC498 sketch.

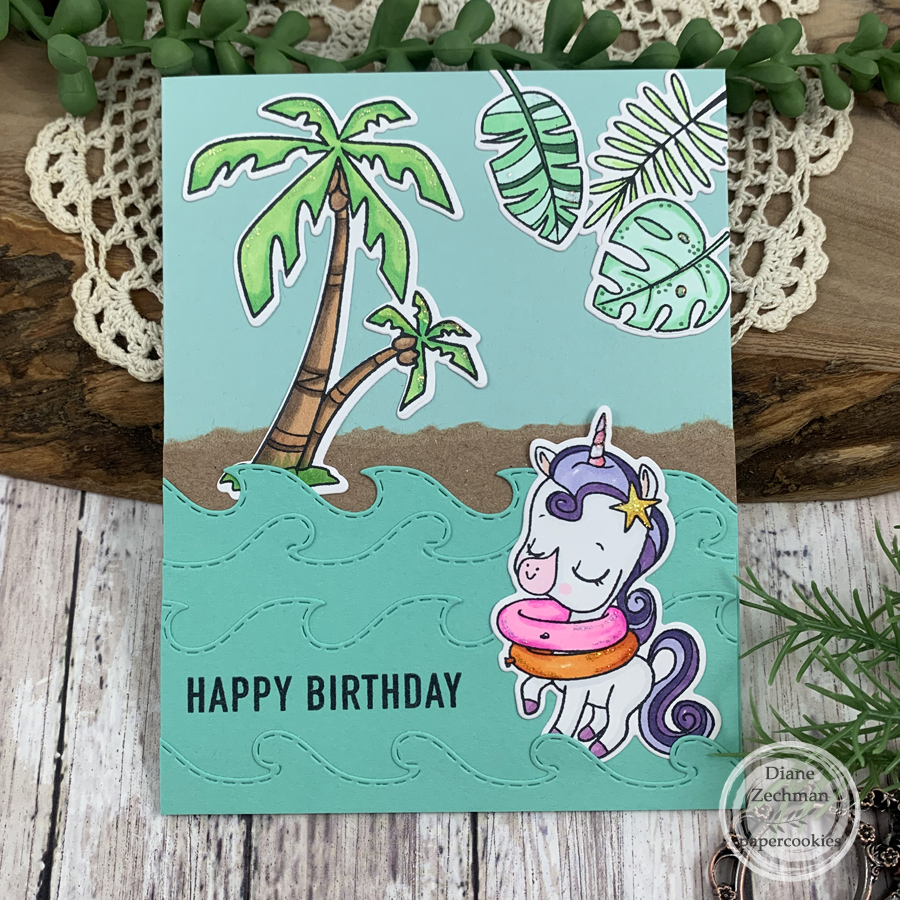
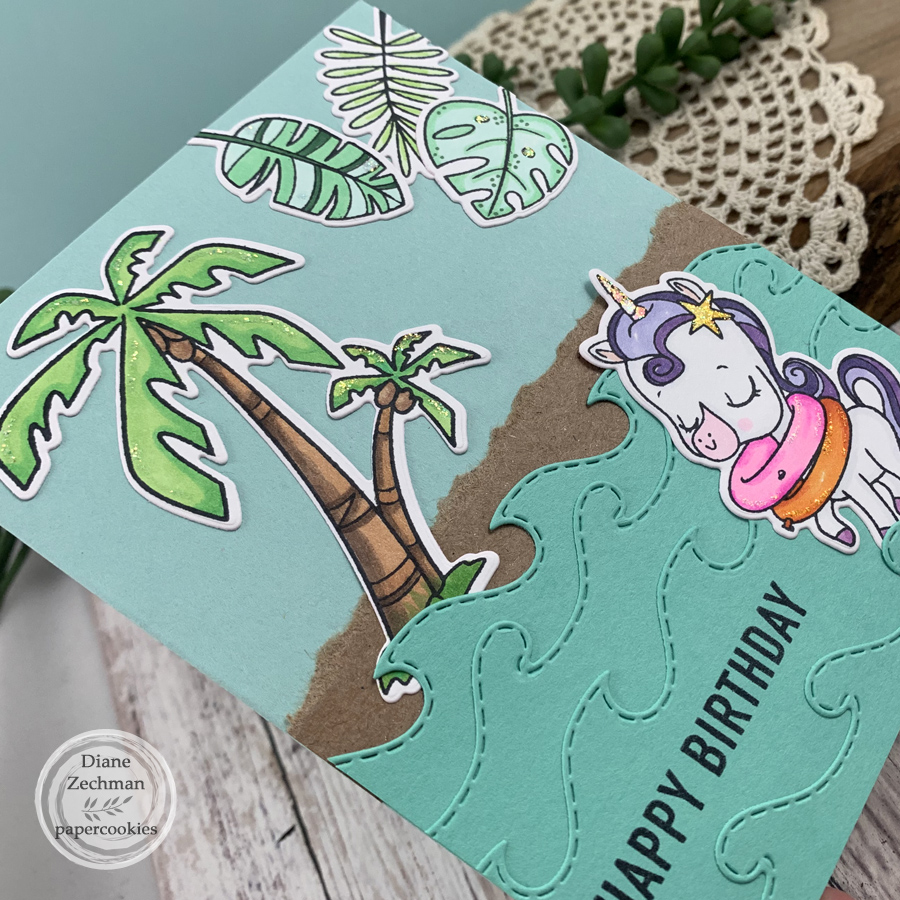
Pink & Main has some terrific stamps…this is from the Beach Unicorn set. I also used the Waves Border Dies. You can see some of the glitter sparkle in the second photo.

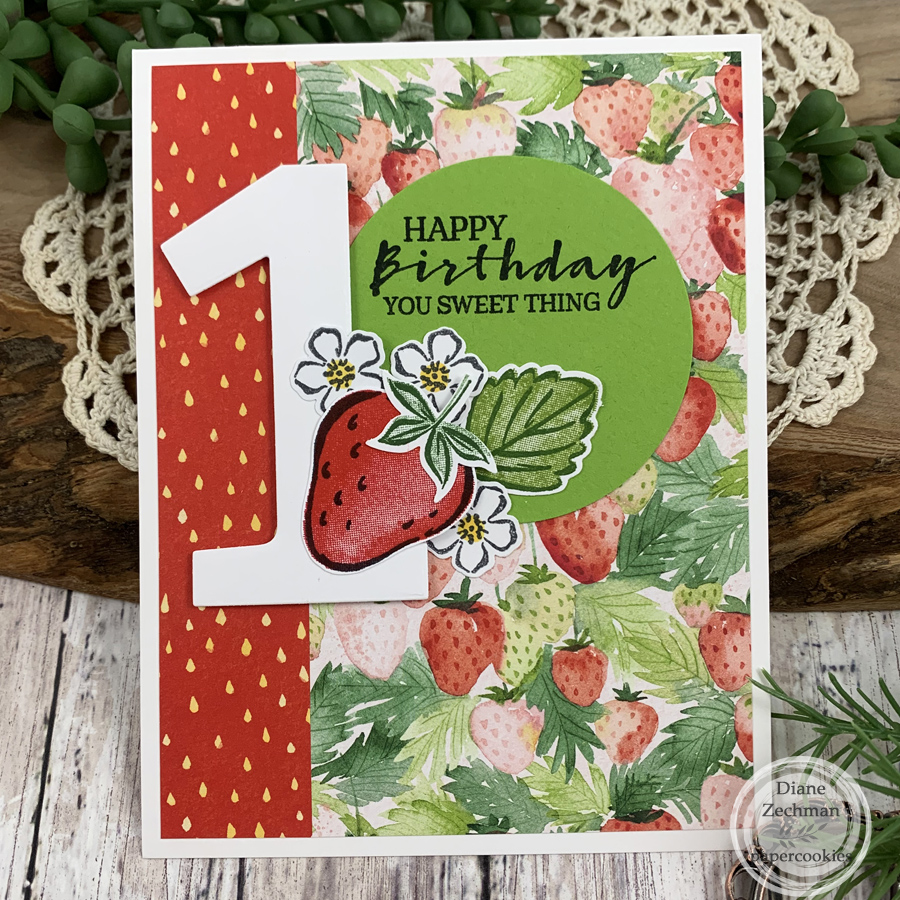
And last for today, I was asked to make a strawberry themed birthday card for a little girl turning one. I used the Altenew Mega Number 1 die and SU! Sweet Strawberry bundle.

Have a great weekend!

autumn birthdays

I have quite a few photos from the past few months that I haven’t shared, so I will try to catch up with them before the end of the year. Here’s a few fall birthday cards that I made. The first two used a pretty patterned paper from Hobby Lobby. I also used the SU! Soft Seedlings & Birthday Banners on the first card. The second card has Crafty Secrets Wizard of Oz (a set from 2010).

Here’s the sketch that I used for those cards. I started with a 4 1/2 x 2 3/4 piece of patterned paper before cutting it into strips.

Next, I used the Taylored Expressions Create in Quads- Word Party to make some masculine cards. I only used one section of the stencils. The leaves are Spellbinders Mini Fall Blooms and the small sentiment is from SNSS Birthday Wordfetti.

Have a great day!

acorns with split background

I have a second card to share today…this time with the new SNSS Colors of Fall stamp set. I wanted to keep this card simple, so I pulled out a pretty patterned paper with a gold design for the background to make it shine.

My goal was to leave the sentiment off of this one and some future cards that I make so that I have a stash ready to go for any occasion. Then I am able to simply add a sentiment to the front or inside when needed. It was SO hard to leave a sentiment off this card lol but I’m glad I did. 🙂

Note: I did not measure the diagonal cut on the patterned paper. I just placed it in my trimmer on an angle and chopped.

Have a great Monday!

simple thanks

Happy Saturday! Today I have one more card using stamps from this month’s Sweet ‘n Sassy Stamps release. Here I used the Be a Wildflower Stamp & Die BundleSew Many Stitches stamp set, and the Sew Happy Stamp & Die Bundle. This card is really simple…it only looks more involved because of the stitches, but they are stamped!

I wanted to try making a more masculine card with this month’s sets, so I chose this simple image of foliage and stamped it in black on kraft. Then I paired it with some blue and green patterned paper layers. Stamp a few stitches and done!

Have a great day!

tons of love

Today I’m sharing another card using Sweet ‘n Sassy Stamps‘ new Make Waves Stamp & Die Bundle and the awesome Waves Layering Stencils. This time I made the waves blue & purple.

This wave stencil set sold out but is now back in stock! And it’s a perfect time to order…SNSS is having a Summer Stencil Sale!

These stencils are so fun!

And so are the sea creatures! 🙂

Have a great weekend!

ahoy matey!

Good morning! Today Sweet ‘n Sassy Stamps is having their June Instagram Hop. The theme this month is Splash into Summer. Be sure to check over there for this card plus all the other projects in the hop, and comment on IG for a chance to win a $25 prize. You can find me on IG- @papercookies4u, and the hop will start at @sweetnsassystamps.

I made another card for today using the new Seas the Day Stamp & Die Bundle. This time I used the other bird, which was perfect to go with the boat and waves. All three were popped up with dimensionals.

Have a great day!

birthday guy

I have two cards to share today with a masculine sentiment set, Birthday Guy from Sweet ‘n Sassy Stamps. I also used the Make A Wish Bundle.

My first card is a fun tri-fold birthday card that includes a gift card pocket on the inside. When you open the first flap, you see another birthday sentiment. Then it opens further to reveal a spot to write your message and a cute little pocket for a gift card. 

For the card base, start with a 5 1/2 x 12 piece of double-sided patterned paper. Score it @ 1 3/4, 4 3/4, and 7 3/4. Add adhesive to the back of the two center sections and glue them together to create the middle flap. Then you will need to cut or punch three of the same shapes for each fold (I chose squares here).

Here’s how I created the pocket: Start with a piece of patterned paper measuring 3″ x 2 3/4″. Score on 3 sides at 1/4″. Trim away the bottom corners and add double sided tape to the flaps. If desired, punch half of a circle or other shape from the top. Fold the flaps under and adhere the pocket to the card.

My second card is a simpler design. I cut three 1 1/4 x 5 1/4 strips of patterned paper for the background. The sentiment was stamped four times, each in a different color. Then I cut words from three of the colors and layered them onto the blue one. One candle was popped up with foam tape.

Here’s the inside…

Have a great day!