Category Archives: cards, etc.

no prob-llama

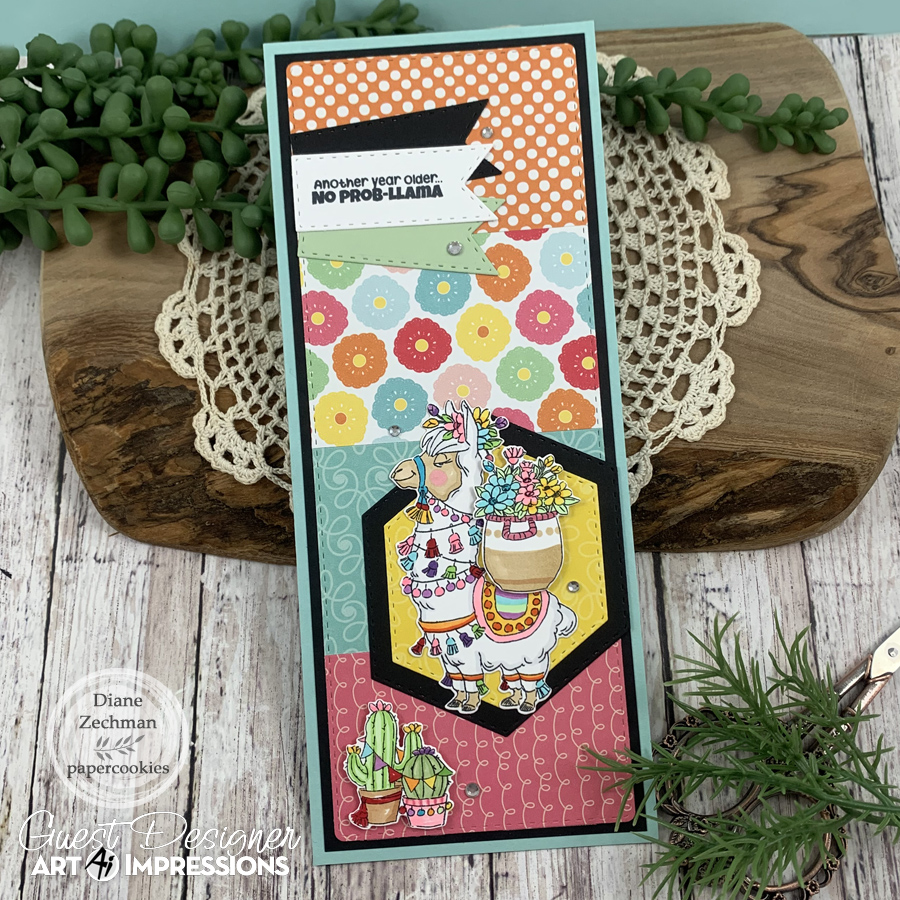
Hello friends! I was previously on the Art Impressions Design Team and although I have taken some time now to care for my grandkids, I am still in love with Bonnie’s stamps. They are timeless, classic, and oh so FUN! When I was asked to Guest Design for February and told that the Theme is All Creatures Great and Small (Animals), I immediately thought of the Llama Set from the Funny Farm Series which I purchased a while back but hadn’t used yet. It’s an awesome set!

Products used: Ai 5458- Llama Set, 5463- Slimline Dies, 5135- Hexagon Double Stitched Dies, and 5133- Flag Double Stitched Dies.

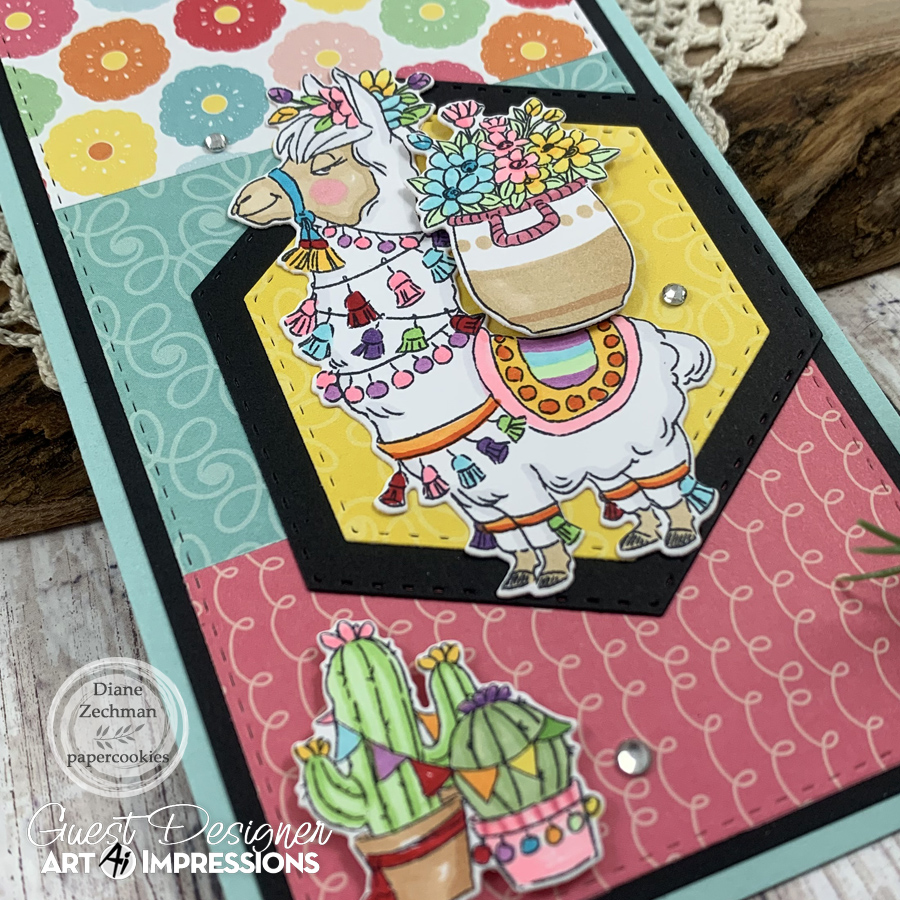
This cute llama needed some bright and fun papers, and I colored the images with Copic markers to match. I cut some strips of the patterned papers, each about 2″ wide, then taped them together on the backside. This long piece was then die cut with one of the slimline dies to create the background. Then I offset 3 of the flags and the stitched hexagon die cuts were placed on a diagonal for a bit of whimsy. The second photo has a close-up showing the pot of flowers and cacti popped up with foam tape.

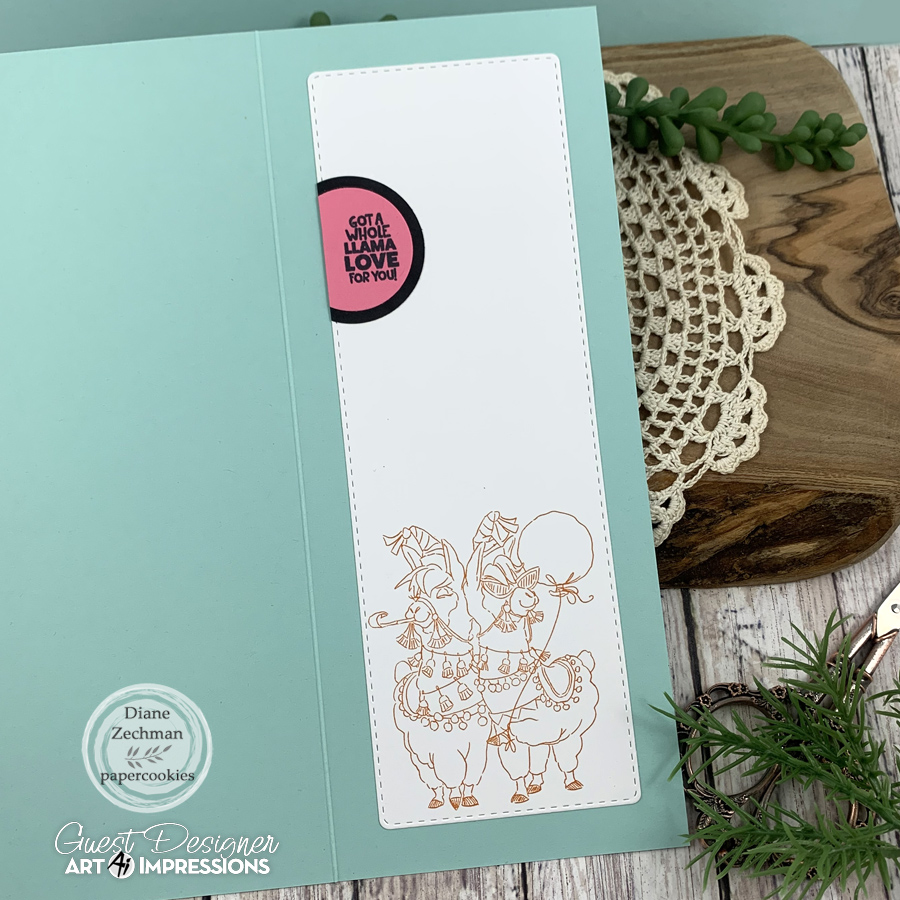
For the inside of the card, I added another one of the sentiments in the set and stamped the 2 llamas with orange ink.

I hope you join this month’s challenge and I am looking forward to seeing all of your creatures, great and small!

never ending universe

It has been a long time since I made a Never-Ending Card, and I forgot just how fun they are. I needed a masculine birthday card for a friend and wanted to use the SU! Reach for the Stars Bundle and the coordinating Stargazing papers. When I searched for the measurements for the N-E card, I found that someone already used this set in the A2 size. I will link her post HERE. I believe my measurements are a bit different, and I decorated mine slightly different as well.

As you continue to open the card from the center, four designs appear, then continue to repeat as it continually “opens”. (Quick video on my IG!)

If you haven’t tried this style of card yet, you need to! I even glued together two plain white N-E Cards for my granddaughters, and they had fun drawing on them! Have a great weekend!

diamond floral flakes

Hello! I have another card today with a background using new Sweet ‘n Sassy Stamps stencil sets. Read on to see how I created this fun background, then head to the store and check out the Bursting at the Seams Sale!

Products used: Diamond Floral Stencils, Simple Sentiments Bundle, Seasonal Trees Stencils, and Large Snowflake Dies (which are now on SALE!)

After brushing purple ink over the stencil shown below for this project, I didn’t clean the ink off of the stencil right away. Instead, I spritzed it with water and lay it down on a fresh piece of cardstock to transfer the remaining ink. It made such a cool, distressed looking pattern and reminded me of snowflakes.

Next, I randomly brushed purple ink “dots” with the circled stencil below. Then, I blended the card edges with the same purple ink.

The card was finished with a die cut snowflake, added sentiment, and a few rhinestones.

Have a great weekend!

love is in the air balloon

I am loving the new Sweet ‘n Sassy Stamps Love is in the Air Bundle! I previously shared a card with the cute helicopter boy and today I’m using the girl in a hot air balloon. I used shades of purple, pink, and blue and paired her with one of the new window dies.

Products used: Arched Window Die, Love is in the Air Bundle

Some teeny pearl hearts were added to finish it off. ♥

Have a great day!

cathedral shaker card

I am sharing two cards today using products from this month’s Sweet ‘n Sassy Stamps release. The first one is a shaker card. They are fun to create and receive.

Products used: Cathedral Window Die, Love is in the Air Bundle, Delicate Doily Die, and With Love.

I started with a 4 1/4 x 5 1/2 piece of double-sided patterned paper and cut it in half diagonally. One piece was adhered to the bottom front of the shaker card. The other piece was flipped and added to the bottom of the second card. A different coordinating pattern was added to the top of the shaker card, but I left the top of the other card white. Some polymer clay valentine chips from Hobby Lobby were placed in the shaker window (check out the cute tiny envelopes) and I fussy cut the sentiment and envelopes to add on top.

The second card is simpler, with a die cut doily accenting the sentiment.

Have a great day!

cathedral window sympathy

There are some mixed emotions with making sympathy cards, right? It’s not our favorite, but I was pleased with how this one turned out and will probably make more of the same in the future. I used Sweet ‘n Sassy Stamps products, along with the SU! Brick & Mortar embossing folder. I traced the outside of the window die to cut the layer with the scene behind it by hand.

SnSS Products used: Cathedral Window Die, Nature Silhouettes 2, and Simple Sentiments Bundle.

Have a great day!

Diamond Floral background

Who says you need a lot of supplies to make a card? Sometimes it’s fun, and a nice change, to let the background do all the work. You can make multiple pieces with your stencils or background stamps and then cut or tear the edges and layer them. I used a new stencil set from the Sweet ‘n Sassy Stamps January release to make this card.

Products used: SnSS- Diamond Floral Stencils, Simple Sentiments Bundle.

First, I brushed ink on three pieces of white cardstock using three colors of ink, varying the combination of colors. Note: I traced the edge of the cardstock with pencil onto my scrap paper and taped the top of the stencil down so that all three pieces were stenciled exactly the same. If you have a sticky mat for this purpose, that might help.

Next, I tore the edges of two pieces as shown below and layered them together. You will have two pieces leftover for another project.

Here’s the finished background.

Have a great evening!

cardinal trifold

Edit: I can only find two cards with this trifold design, and I cannot find a name for it. Since any shape could be added to the top, I am simply calling it a Topper Trifold Card going forward. The other circle shaped Topper Trifold card that I made is here.

Yesterday I was virtual stamping a bit with some friends and I made a trifold card with the Art Impressions Cardinal freebie stamp. This was some quick coloring, and I kept the card design simple as well. I made it for an Ai challenge to use one of the bird freebies in a 3×3 size.

Products used: Art Impressions– EX5840 Cardinal freebie, 5193 Woodland Holiday Set, 5434HL Greenery Invite Set, and 4804 Snowflake Dies.

When you open the card, there are two more panels with the same circle top. I originally saw a card with this design by Paula Barin. The base card is 10 1/2 x 4, scored @ 3 1/2 and 7. My circles are approx. 2 3/4″ and 3″. The patterned paper and white cardstock layers are 3 1/4 x 3 3/4.

The strong winds here have us out of power with trees down everywhere. Stay warm!

sending you my love

Hello! I have a Fun Fold card today using new products from the Sweet ‘n Sassy Stamps January release. It has been a long time since I made a Tunnel Card, and I thought the new window dies would be perfect to create one.

Products used: SnSS- Arched Window Bundle, Seasonal Trees Stencils, Love is in the Air Bundle, Bitty Hearts Stencil, Script Sentiments Bundle.

I die cut a window from kraft cardstock for the front and layered some white cardstock behind it which I stenciled the bare tree onto. Then I added a few small images and a sentiment.

On the inside, I first used the tiny heart stencil with the tree stencil to create a valentine tree. You could alternately use a tiny heart stamp. Also, try other shapes or images such as stars, flowers, etc. Note: Any stenciling or stamping needs to be done before the base card is scored.

Next, I added an extra piece of cardstock to create the window or “tunnel”. Start with 5 1/2 x 8 1/2. Score @ 2 1/8, 4 1/4, and 6 3/8. Center any shaped die over the middle scored line and die cut. Valley-Mountain-Valley fold the cardstock and adhere the left and right sides to the base card.

Have a great evening!

Love is in the Air

Good morning! I hope your new year has gotten off to a great start. Today Sweet ‘n Sassy Stamps is starting out the year with a new release, and we are having an Instagram Hop with card samples using the new products, plus some oldies but goodies too! Be sure to check over there for this card plus all the other projects in the hop, and comment on IG for a chance to win a $25 prize. You can find me on IG- @papercookies4u, and the hop will start at @sweetnsassystamps. This month our projects are created with the theme of Loving One Another.

My project for today is a fun pocket card which features an awesome new set that I just think is so cute! (I recently shared directions for the pocket card here).

Products used: SnSS- Love is in the Air Bundle, With Love, Circle Dies.

How sweet is this valentine helicopter? It’s from the new Love is in the Air Bundle. I also used the Happy Valentine’s Day sentiment on the insert from the new With Love stamp set. These pocket cards are a way to easily change up your ordinary cards and make them fun. You can use any shape for the focal point…it doesn’t have to be a circle!

Enjoy the hop and be sure to comment on Instagram for a chance to win!