Category Archives: recipes

need a last minute gift?…

hot-cocoa-jar-diane-zechman.jpg
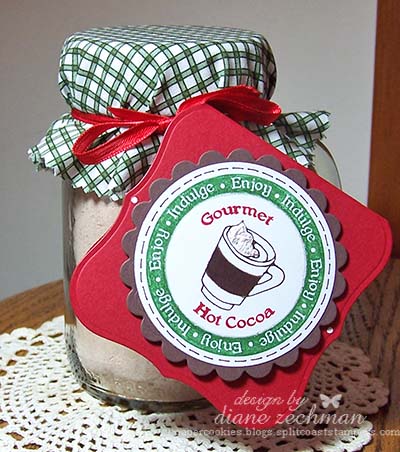
…Just run to your local grocery store!  I found a few recipes on the internet for hot cocoa mix but I ended up altering one to suit my own taste.  Then I found these drinking jars with a handle in a local store but you can easily use canning jars or any other jar with a lid. 

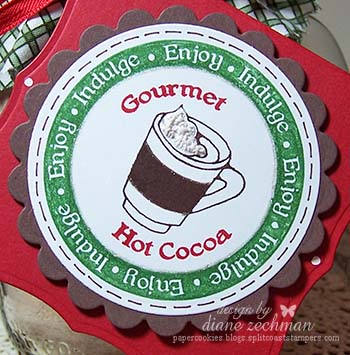
I made the tags by placing the folded edge *just inside* the top edge of the Labels 1 Nestability die.  The stamped image is from JustRite Stampers and can be found here or here.  It was a gift to me and turned out to be perfect for this project.  In the close-up pic below you can see that I added some dimension to the frothy cocoa with a puffy ink marker (similar to Liquid Applique).  I also added a bit of sparkle with a glitter pen. 

hot-cocoa-tag-diane-zechman.jpgstamps- Baking Stamp Ensemble by JustRite Stampers; paper- Red, Choc. Chip, white; ink- Choc. Chip, Real Red, Garden Green; accessories- Labels 1 and Circle Nestabilities, glitter pen, gel pen, Marvy Puffy Velvet fabric marker, heat tool

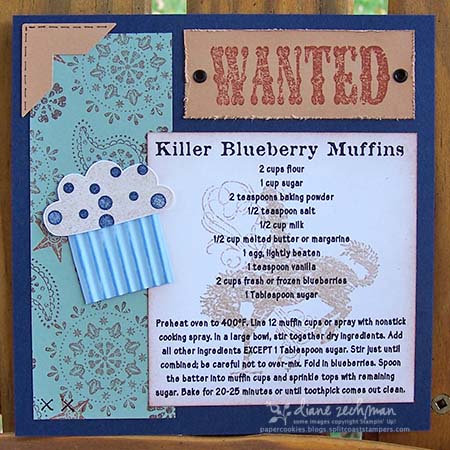
And here’s the recipe I ended up using after my alterations:

Hot Cocoa Mix

8 cups powdered milk

2- 3.5 oz. pkgs. Cook and Serve chocolate pudding mix

1 cup powdered chocolate drink mix (Nestles Quik)

1 cup powdered non-dairy creamer

3 cups confectioner’s sugar

3/4 cup unsweetened cocoa powder

Mix all together in a large bowl and place in jars. 

Attach a tag with the following instructions:  Dissolve 1/3 cup cocoa mix in 1 cup boiling water.

I hope you and your family have a Blessed Christmas!  Thanks for stopping by!

6 x 6 dill dip

6x6-dill-dip-diane-zechman.jpgSorry I’ve haven’t posted lately!  It’s been a busy week.  Among other things going on, I had Jury duty again.  It’s always interesting and I really don’t mind going.  It just throws a little wrench into my routine, but that’s ok.  I have also been busy getting a few projects ready for another gathering coming up soon.  I wasn’t originally planning on attending this one since I knew I’d be busy.  But someone wasn’t able to come and they had a spot they were looking to fill.  I really enjoy getting together with my NY friends, so I changed my mind.  I am filling in a spot in a recipe swap and this is what I came up with.  It’s my family’s favorite dip…I’ve made it so many times over the years and I never measure the ingredients anymore.  When I saw this flower in the Garden Silhouettes set, I thought it looked like dill weed.  I have been wanting to use it with this recipe for a while….I’m glad I finally made them!  Don’t ask me what the frogs have to do with dill….except maybe they are both green.  LOL.  But I thought they would make a fun page.  The frogs on the top are a retired SU! wheel and the bee, butterfly and frog on the bottom are from a Cuttlebug die.  I used markers to color portions of them and added a little Stickles to the bee & butterfly.  The recipe words are computer generated with the Scrap Baby font found here.  It’s on sale right now for $1 if you want to check it out. 

Have a great day! 

stamps- Garden Silhouettes, Leapfrog wheel

paper- Olive, non- SU!

ink- Olive, Summer, Black

accessories- Designer Label punch, circle punch, Ticket Corner punch, Cuttlebug dies- Garden Creatures & Spring Floral, Stickles, pop dots, gel pen

6×6 Pesto Ravioli with Chicken

I have been busy getting ready for another gathering.  This one is hosted by two of my Dirty Dozen Alumni friends,  Tracy Harp (Lodichick) and Holly McMillen (Toy).  I can’t wait!  It will be great to see some of my stamping friends again and meet some new ones!  I will have some projects to share with you over the next week that I will be taking with me.  6x6-pesto-ravioli-diane-zechman.jpg

This first project is for the 6×6 recipe swap.  I look forward to this swap and seeing all the wonderful recipes we exchange.  The recipe I scrapped here is a new family favorite that was shared by my friend, Linda G.  I changed it up a bit, adding the diced tomatoes.  Everyone reaches for seconds with this one….yum!  I can smell the pesto now.  😉 

The chicken is Anna Wight’s image called Greta.  I watercolored her and paper pieced her apron with some retired SU! paper.  The ravioli were made by punching some squares of vanilla cardstock and rounding the corners on the large square.  I hope they look like ravioli! 

stamps- Greta by Whipper Snapper

paper- non SU! and Olive

ink- Black, various colors for watercoloring

accessories- square punches, Round Tab punch, button, corner rounder, Three for You flower punch, paper paint

oldies but goodies….recipes

I have been busy with paperwork and a few other things….blech… 😉 and haven’t stamped the past few days. So I thought I would share a few 6×6 recipe pages that I did a while ago for some swaps. Enjoy!

For this first one, I found a picture of a pineapple in my clipart and used it to make a pattern. Then I printed the ingredients on the computer, traced the pattern and cut it out. The top of the pineapplewas stamped with the Cornish Heritage Farms Dotted bg and then run through the Cuttlebug. The bottom was stamped with the plaid background.

6×6-banana-bread-dmz.jpg

stamps- Flannel Plaid, Monkey Business, CHF dotted background
paper- Karen Foster, Green Galore, non-SU
ink- Marigold, Garden, Summer, Caramel, Cocoa, Banana
accessories- Cuttlebug D’vine Swirl, circle punches, round tab punch, ribbon

On the second one, I used the mug from Like It A Latte and cut off the handle for a soup bowl.
And after watercoloring the chicken, I used the color spritzer tool with the Caramel marker over top.

6×6-it-chicken-chowder-dmz.jpg

stamps- Walk This Way, Like It A Latte, Karen Foster snap stamps- small casual
paper- non SU and patterned paper unknown

This last 6×6 page was actually the first recipe page I’ve done. Here’s how I made the burgers:
Buns- 2″ circles, edges sponged & color spritzer tool on top bun.
cheese- 1 3/8″ square with 1/8″ and 1/16″ holes
lettuse- torn cs
meat- 2″ circle with deckle scissors around edge

6×6-cheeseburger-soup-dmz.jpg

stamps- Paisley, Flannel Plaid, Cheesecloth, Newsprint and Whimsical Lower alphas
accessories- EK Success flower punch, color spritzer tool, circle & square punches, deckle scissors, eyelet, ribbon

a quick yummy pizza

No stamping for this post, but I hope you like it anyway. 🙂 I saw a recipe for a chicken pizza but it was spicy and I don’t care for a lot of spicy foods so I changed it up a bit. This was super easy and pretty quick to make. It seemed to be a hit with everyone too. If you try it, let me know how you like it!

Diane’s Orange Spiedie Chicken Pizza

3 Tablespoons Lupo’s Spiedie marinade*
2 Tablespoons orange juice
8 pieces of Perdue frozen chicken tenderloins (about 10- 12 oz.)
1 can Pillsbury refrigerated pizza crust
1 ½ cups shredded mozzarella cheese

Preheat oven to 400 degrees.
In a large covered frypan, cook the chicken, marinade and orange juice over medium heat until chicken is no longer pink, about 10 minutes.
Meanwhile, lightly grease a 12 inch pizza pan. Unroll the pizza dough and spread to cover the pan. Bake for 7 minutes.
Remove the cooked chicken and cut into small pieces. Return the chicken to the marinade and toss to coat.
Brush the partially baked crust with some of the marinade and sprinkle with mozzarella cheese. Top with the chicken pieces.
Bake for 12 minutes.

*Lupo’s spiedie marinade originated in Endicott, NY and is available throughout the USA. If you cannot find it locally, visit www.spiedies.com to order it online. We like this so much that we buy it by the 1/2 gallon at our Sam’s Club. Another brand is State Fair and can be found at www.spiedie.com (without the extra “s”). Italian dressing could be substituted, but it won’t be the same as the spiedie sauce. 😉

6×6 yule logs

Here’s a 6×6 recipe page I recently made for a swap. I took the photo that I previously posted and reduced the size. Then I placed 8 of them together to fit on a 4×6 size sheet of photo paper and made a few prints. The recipe was printed onto vellum and wheeled with the Bold Snowflakes Jumbo wheel. The snowman and snowflakes are Cuttlebug dies….very fun to use! A snowy ground was cut free-hand from white cardstock. And the holly was stamped, cut out and accented with a red eyelet for the berry.

6×6-triple-chocolate-yule-logs.jpg

stamps- Bold Snowflakes wheel, Sleigh Bells Ring (holly)
paper- vellum, non SU!
ink- Bashful, Garden, Cocoa, Pretty in Pink
accessories- photo, eyelet, staples, Cuttlebug Snowflakes #2 die and Winter die

Grandma’s Sand Tarts

Christmas just wouldn’t be Christmas if we didn’t make my Grandma’s cookies! It is one of our family’s traditions and brings back fond memories. My job is to mix, roll & cut them out. Everyone else decorates them. DH said the trees were Blue Spruce this year….I guess we ran out of green sprinkles. oops! And I think that Santa hat looks like it belongs to Mrs. Claus! I doubt that Santa would be sporting pink. 😉 (I have to admit….I decorated the hat. LOL.)

christmas-cut-out-cookies-dmz.jpg

My Grandma’s Sand Tart Cookies

Cream:
2 cups sugar
1 1/2 cups butter

Beat in 2 eggs.

Add:
4 cups flour
1 tsp. baking powder

Chill 2 hours.
Roll out and cut with cookie cutters. Place on baking sheet.
Brush with unbeaten egg white and decorate with colored sugars and sprinkles.
Bake at 350 degrees for 8-10 minutes.

Snickerdoodles

snickerdoodles.jpg

I made a double batch of these yummy cookies yesterday for a cookie exchange. I ended up with 9 1/2 dozen. I bagged 6 dozen for the exchange and froze some. I love to have a variety of cookies in the freezer for Christmas and be able to pull out a few at a time! This is the first time that I can remember of participating in a cookie exchange, so I am curious to see what everyone else is making. Here’s the recipe….very easy to make and oh, so yummy with the cinnamon sugar on them!

Snickerdoodles

1 cup shortening or margarine
1 ½ cup sugar
2 eggs
2 ¾ cups flour
2 tsp. cream of tartar
1 tsp. baking soda
¼ tsp. salt

Beat shortening & sugar. Add eggs & mix well. Add the remaining ingredients. Roll into balls the size of walnuts.

Mix 2 Tbsp. sugar and 2 tsp. cinnamon in a bowl.

Roll the balls in the cinnamon & sugar mixture. Place on a cookie sheet and bake @ 375 degrees for 8-10 minutes.

Triple Chocolate Yule Logs

Yum! One of my favorite things to do at Christmas is bake cookies! But I bet you figured that, huh? 😉 This is a new recipe I tried this year. I didn’t have the white chocolate chips on hand that it called for so I used milk chocolate instead. I modified the recipe and added a note at the end. They turned out pretty well, though and I will definitely make them again!

triple-chocolate-yule-logs.jpg

Triple Chocolate Yule Logs

1¾ cups flour
¾ cup powdered sugar
¼ cup unsweetened cocoa powder
1/8 tsp. salt
1 cup butter, softened
1 tsp. vanilla
1 cup white chocolate or milk chocolate chips
1 cup chocolate sprinkles (jimmies)

Beat butter and vanilla. Gradually add flour, sugar, cocoa and salt. Mix until well blended. * see note below. Cover & chill dough.
Form dough into 1 inch balls. Shape balls into 2-inch logs about ½ inch thick. Place on cookie sheet about 2 inches apart.
Bake @ 350 degrees for 10 minutes. Let stand for 2 minutes and then remove from the cookie sheet to cool.
Place chocolate chips in a small bowl and microwave until soft (45 seconds to 1 ½ minutes depending on microwave). Stir until completely melted.
Place chocolate sprinkles in a separate small bowl. Dip each end of the cookie into the melted chocolate and then into the sprinkles. Lay onto waxed or freezer paper and let stand until chocolate is set. Or place the cookies and paper onto a cookie sheet and refrigerate until set.
* I had a few cookies break in half when I dipped them into the chocolate, so I added a tiny bit of Crisco shortening to the chocolate to thin it down a bit. Next time I think I will also add an egg to the cookie dough to help bind the dough together and hopefully break less easily.

killer blueberry muffins

yum! I don’t remember who shared this recipe but they sure are good muffins! This is for a recipe swap I’m in. I was anxious to try using the Wanted and Bronc Buster sets to go along with the name of the muffins. The muffin was made by stamping the top of the cupcake from the Big Bold Birthday set with Caramel ink. Then I used the dots from the same set in blue. The base of the cupcake has words printed on it and I knew that wouldn’t work for this design…..so I used my large tag punch to punch out the bottoms. I could have just cut some squares but the shape of the tag fits under the curve of the frosting and gives a nice place to attach them together. Next I ran the bottoms through my paper crimper and swiped them across my Bashful inkpad to highlight the ridges. The green layer on the left was stamped “one sheet wonder” style and cut into strips.

6×6-killer-blueb-muffins-dmz.jpg

stamps- Big Bold Birthday, Wanted, Bronc Buster
paper- is or is comparable to Navy, Sage, Bashful, Caramel, White
ink- Caramel, Navy, Choc. Chip, Cocoa, Rust, Bashful
accessories- Photo Corner punch, Lg. tag punch, Crimper, eyelets, Crop-A-Dile, edge distressor, sponge