Category Archives: tutorials and templates

gnome for the holidays

Hello! Today Sweet ‘n Sassy Stamps is having a Christmas in July Instagram Hop. Be sure to check it out if you are on IG! I have a card also to share here using the SNSS set called Christmas Gnomes. Turquoise & red is a great color combo for the holidays, and I pulled some papers in those colors to create my card.

The measurements for my panels, starting at the top left and going clockwise, are 1 1/2 x 1 1/2, 2 3/8 x 3 5/8, 1 1/2 x 2 3/8, and 1 1/2 x 3 5/8.

Have a great day!

stamps- Sweet ‘n Sassy Christmas Gnomes; paper- white, SU! Real Red & Soft Sky, MFT- Cool Collab; ink- Memento Tuxedo Black; accessories- MISTI, Copics, enamel dots.

roses for you

Good morning! I’m sharing a quick & easy set of cards today using stamps from the Sweet ‘n Sassy Stamps April release. Sometimes I like to show how images can be used without coloring them in, so this set of cards is another example. (Next week I’ll share a card with the same image, colored).

Product links: Roses For You Bundle, stamps and dies are also sold separately.

I started this CAS set of cards with four A2 size white card bases. Then I cut 4 pieces of cardstock in various colors to 3″ squares. Using a MISTI stamping tool, I was able to stamp all four colors with the image being in the exact same place. Then each square was cut into quarters (cut @ 1 1/2″, turn and cut again). The pieces were shuffled so each card base has one of each color that realigns to complete the image. You could tape them together on the back before adhering to the card, but I chose to leave about 1/16″ space between them.

After the pieces were glued down, I added the sentiment. Again, a Misti tool makes it quick and easy for perfect placement.

Have a great day!

stamps- Sweet ‘n Sassy Roses For You Bundle (also sold separately); paper- white, SU! Pretty in Pink, Grapefruit Grove, Mint Melody, Cool Caribbean; ink- Memento Tuxedo Black; accessories- MISTIScor-Pal.

song birds

Good morning. The weather is finally feeling like spring here and even God’s creatures seem to be celebrating. Do you hear the birds singing? We have a nest with eggs and I’m not sure what type of bird is living there as I haven’t seen them yet. Birds are in the Sweet ‘n Sassy Stamps April release too. It’s another great one!

Product links: Song Birds (also sold in a Bundle with Dies), Church Family (Stamp of The Month).

I made two fun fold cards with this set. For the first one I cut off half of the card front and turned it, using it for the layered panel. Start with a 4 1/4 x 11 piece of cardstock and score/fold at 5 1/2″. Then cut the card front at 2 3/4″. Turn the trimmed piece and layer it back on.

I stamped part of the image again, trimmed, and placed it on the inside. Part of the image was also stamped lightly in the corner with the words.

For my second card, I made a Double Triangle Fun Fold card with a belly band to close it following directions in this video. Don’t be intimidated by the triangles…they’re actually squares folded in half. It’s easy to put together!

No coloring on this one made it a snap to make several quickly and the navy color gives it an elegant feel.

I added the bird to the inside as well and stamped a sentiment from the Church Family set. My patterned paper was one-sided so the inside remained white.

Have a great day!

stamps- Sweet ‘n Sassy Song Birds (also sold in a Bundle with Dies), Church Family; paper- white, SU! Polished Pink, Rich Razzleberry, Pink Pirouette, Bazzill Basics- Vintage Marketplace, The Paper Studio- Flower Cluster with Berries, SEI- Think Of Me; ink- Memento Tuxedo Black, Distress Picked Raspberry, SU! Misty Moonlight; accessories- MISTIScor-PalGemini Jr., Copics, MFT Die-Namics Cross Stitched Circles, Penny Black- Zig-Zag Stackers, Prismacolor pencils, Gamsol. SU! Scripty embossing folder, Gina Marie Stitched Circles, adhesive pearls.

Faux Heat Embossing and a fun fold

Hello! I have some cards to share today that I made using a few Sweet ‘n Sassy Stamps dies, an awesome technique, and a fun fold. First, I used the Wildflowers 2 Die and Thanks Die with the Faux Heat Embossing technique to make my die cut image and sentiment shine. It’s very simple, fun, and takes your project up a notch! Simply cover your cardstock or patterned paper with clear packing tape, smooth it out with an old credit card, and die cut. So easy!

Here’s another photo of the shine…

Since I wanted my die cut image to have different colors, I first loosely traced the die (cutting side down) onto white cardstock with a pencil.

Next I blended the inks in the general areas that the colors were desired. I didn’t worry about getting them perfect!

After the cardstock was covered with ink, I applied the clear packing tape. Remember to smooth it out with the edge of an old credit card.

Then place the die inside your pencil lines and cut. Admire the shine! 🙂

My second card uses an older poppy set but the matching dies are new! I added the colored & die cut image to a fun card fold. Here I used the Poppies & Greetings Stamp & Die Bundle (also sold separately).

The yellow card base is an A2 size- 4 1/4 x 5 1/2. A panel is die cut from the card front and then attached to the white z-fold piece inside. The white cardstock is 5 1/4 x 8 inches, scored @ 2 and 4.

Thanks for popping in and have a great day!

stamps- Sweet ‘n Sassy Poppies & Greetings Stamp & Die Bundle; paper- white, black, SU! Crumb Cake, Crushed Curry, MME-Breeze; ink- Memento Tuxedo Black, SU! Crushed Curry, Distress Kitsch Flamingo, Abandoned Coral, and Mowed Lawn; accessories- MISTIScor-PalGemini Jr., SNSS Wildflowers 2 Die and Thanks Die, Copics, circle punches, Gina Marie Stitched Scalloped Circles, sequins, rhinestones, SU! Timeworn Type embossing folder, blending brushes, packing tape, Penny Black Zig-Zag Stackers, foam tape, linen thread.

Alleluia

Hello! Yesterday I posted a few cards with the Sweet ‘n Sassy Stamps Alleluia Lilies and Alleluia Lilies Dies for the blog hop. If you missed the hop, be sure to check it out. Today I have another card with this pretty set. When I was creating with it, something reminded me of the old Faux Cloisonne Technique I learned many years ago and I set out to try it again. The original technique was to heat emboss the image with gold powder on glossy magazine pages and layer it onto black cardstock. Well, I couldn’t find a magazine page that I liked so I used patterned paper. Then I decided to add some layers on the black…so in the end, it ended up a variation of the technique but I still liked the results. 🙂

To try the FAUX CLOISONNE TECHNIQUE: gather some colorful, glossy magazine pages.  Stamp a detailed image with Versamark ink on both the black cardstock and the magazine pages.  Heat emboss with gold embossing powder.  Cut out portions of the image on the magazine pages and adhere on top of the image on the black cardstock.

I added a layer of gold paper to accent the gold embossing and some black rhinestones to match the card base. The word was embossed in black. It’s fun to revisit old techniques as well as learn something new. Whether you’ve tried this before or not, I hope it inspires you to create something!

Have a great day!

stamps- Sweet ‘n Sassy Alleluia LiliesAlleluia Lilies Dies; paper- black, gold, SU! Melon Mambo, K&Co. Que Sera Sera; ink- Versamark; accessories- MISTI, gold and black embossing powder, rhinestones, SU! Tasteful Textile embossing folder.


virtual stamping 9

Hello! Here’s a few more cards that I’ve made while stamping “virtually” with my friends. These were all stamped with Sweet ‘n Sassy Stamps.

First, I have two more gnome cards using the new Winter Gnomes stamp set. These gnomes are so cute and fun to create with! I paired them with papers from American Crafts- Noel.

If you like sketches, I drew this one up…

My second gnome card was for another sketch challenge. I used the same paper pack, along with the Cuttlebug Ice Crystal die & embossing folder combo and the Martha Stewart Polar punch.

The next two cards use the new Encouraging Peonies stamp set. These beautiful flowers can be colored many ways or stamped simply like I’ve done here. This card was also for a sketch. The sentiment was cut with Sizzix Stacked Baroque dies and accented with gold thread (hard to see!). Also difficult to see in the photo are a few adhesive pearls.

Sympathy cards can be difficult to create…I kept this one CAS. The large flower was stamped onto a speckled cream base and the smaller one onto white cardstock, which was fussy cut and popped up with foam tape.

Refresh…something we all could use a little of right now, right? A gift card to a local coffee shop would go perfectly with this “Jesus & Java” card. I used the SNSS Fill Me Up set and matching dies. The coffee cup was paper pieced, popped up, and accented with a small epoxy heart sticker. This was for a challenge to use any beverage.

My last card today uses the Thrill of Hope stamp set. It was for a challenge to create this special cut & fold. My largest trimmer is 12″ so I had to cut the diagonal on the 8 1/2 x 11 cardstock by hand with a craft knife and ruler! But I was happy with the end result. I love the trees in the Gina K Red Velvet ink! I used Gina Marie Stitched Circles and Rectangles and the SU! Northern Flurry embossing folder.

EDIT: To answer some questions… I didn’t follow a tutorial,  I’m sure there’s one out there but I’m not sure what it is called. I just scored an 8 1/2 x 11 piece of cardstock at 4 1/4 on the short side and 5 1/2 on the long side. Then I used a ruler and craft knife to cut it diagonally to get the two card bases. For the music paper, just cut a layer… 4 x 5 1/4  or 4 1/8 x 5 3/8  diagonally.

The inside…

Thanks for popping in and have a great day!

virtual stamping 3

Hello! Today I have some more cards that I’ve made while “virtual stamping” with friends and playing along with challenges. My first card was for a sketch challenge and I used a digital image by Nola Pierce Chandler called Socially Distant Hug. She is cute and quite perfect right now, isn’t she?

This dragonfly card was for a challenge to use an old technique and I chose the Acetate & Tissue technique. I’m guessing this piece I found in my supplies was made about 2005. It was a few years before a good friend passed away. We loved trying out techniques! I used Dragonfly Dreams and matching dies.

To create the background, add white glue like Elmer’s or Crystal Effects (your choice) to the acetate. (Stamp on the opposite side first if you want to). Then add some drops of reinker and spread it around. Add glitter and Pearl-Ex powders. Then crumple tissue paper and smooth it back out and lay it over the glue. Set it aside to dry. Trying to get a pic of the shimmer, sparkle & shine…

My next card was for two challenges…using butterflies and make a collage. I used Your Story, Psalm 23 Background, Begin Again, and In This Together.

This card was also for two challenges…a sketch challenge and “make a wish”. I used Blessings in Disguise and Lots of Love.

Here’s another super old technique. It’s just like the Acetate & Tissue above but without the tissue paper. This is called Caught In Crystal. I used the Made New butterfly dies, In This Together, Encouraging Thoughts, & Your Story.

Trying again to see the shimmer, sparkle & shine…

While making the Socially Distant Hug card, I printed off another digital image by Nola and made a grad card that’s perfect for this time we are facing!

For a color and a sketch challenge…again I used In This Together. The sentiments are so good right now!

Here I used Sweet Little Lamb with the Psalm 23 Background and Encouraging Thoughts. The MISTI was awesome for stamping the background. I used several colors of ink cubes and stamped a few lines at a time, overlapping the inks.

These two fun kid’s cards were stamped with the Reverse Confetti Later Alligator set and matching dies.

Here’s a CAS Z-Fold card with those tulips again, this time for a plaid challenge.

Last one for today…using the elk from SU! The Wilderness Awaits and Tree Rings for a wood theme and sketch challenges.

Have a great day and stay safe!


they’re back… with fun folds!

Hello! I’ve been having fun with two of my retired stamp sets that were brought back in stock… Special Blend and Get Well Critters at Sweet ‘n Sassy Stamps. I’ve always loved different card folds and recently have been trying a few more. I don’t know who updated this fun fold but it’s a variation of Beate’s Buckle Card from many years ago on SCS. The teacup is popped up on the front flap that tucks into the punched slot. I stamped a matching envelope for this one too.

Here’s the card open.

And here’s the measurements I typed up to save. I replaced one of the white layers with the yellow patterned paper on the front.

Here’s a new fold that lays flat and fits in an A2 envelope for mailing. The original creator of this fold is Emma Goddard. She didn’t have a name for it when I asked but decided on Fold Flat Pop Out Card! I love how the middle layer is scored and the front strip is curved!

I was curious at first about how this card goes flat without wrecking the curved piece. Let me see if I can explain…it folds flat like an open book, not closed. Does that make sense? So the front curved piece is flattened out, not folded. The card stays “open”.

Here’s the measurements for this card. I tucked the tabs for the curved front panel behind my apricot patterned paper.

And here’s my two stamp sets…go check them out!

stamps- Sweet ‘n Sassy Special Blend and Get Well Critters; paper- white, black, SU! Bermuda Bay, Pretty in Pink, Apricot Appeal, MME- Unforgettable and SU! Prints Pack; ink- Memento Tuxedo Black, Bermuda Bay, Crushed Curry; accessories- MISTI, Copics, foam dimensionals, Die-Namics Cross Stitched Squares, Enamel Dots, SU! Classic Label punch.

hello spring!

Good morning! Today I have some cards to share using the Springtime and Sentimental Mash-Up stamp sets from this month’s release at Sweet ‘n Sassy Stamps. This cute spring set is a must have and the sentiment set will be a great go-to set for your cards! First I stamped the boots image and accented it with the little ladybug. The blue cardstock layers were leftover from die-cutting the frame for this card. I embossed them with a subtle texture embossing folder.

I’ve been wanting to try the Bridge Card fold so that’s where my inspiration for my second card started. I wanted the bottom piece across the front to be grass and the pieces all fell into place from there. These are SO fun and easy. I can see many more in the future!

This card does lay flat and fit in an A2 envelope for mailing!

There are a few variations on these, including horizontal and vertical cards. The measurements I followed are to start with a 4 1/4″ x 8″ base, scoring each end @ 1 1/4″ and 2 1/2″. The Bridge piece is 5 1/2″ wide x however tall you want it. Mine is about 1 3/8″ at the tallest peak after die-cutting the grass edge. My patterned paper layers are 1 1/8 x 4 1/8 and 2 7/8 x 4 1/8.

Have a great day!

stamps- Sweet ‘n Sassy Springtime and Sentimental Mash-Up; paper- white, red, black, SU! Pool Party and Daffodil Delight, Echo Park- Sunny Days Ahead; ink- Memento Tuxedo Black; accessories- MISTI, Copics, foam dimensionals, rhinestones, ribbon, MFT- Grassy Hills, Stitched Scallop Squares Frames, Cross Stitch Squares, and Blueprints 26, Spellbinders Labels Eighteen and Standard Circles, SU! Subtle embossing folder, glue dots.

SNSS hops with My Sweet Petunia!

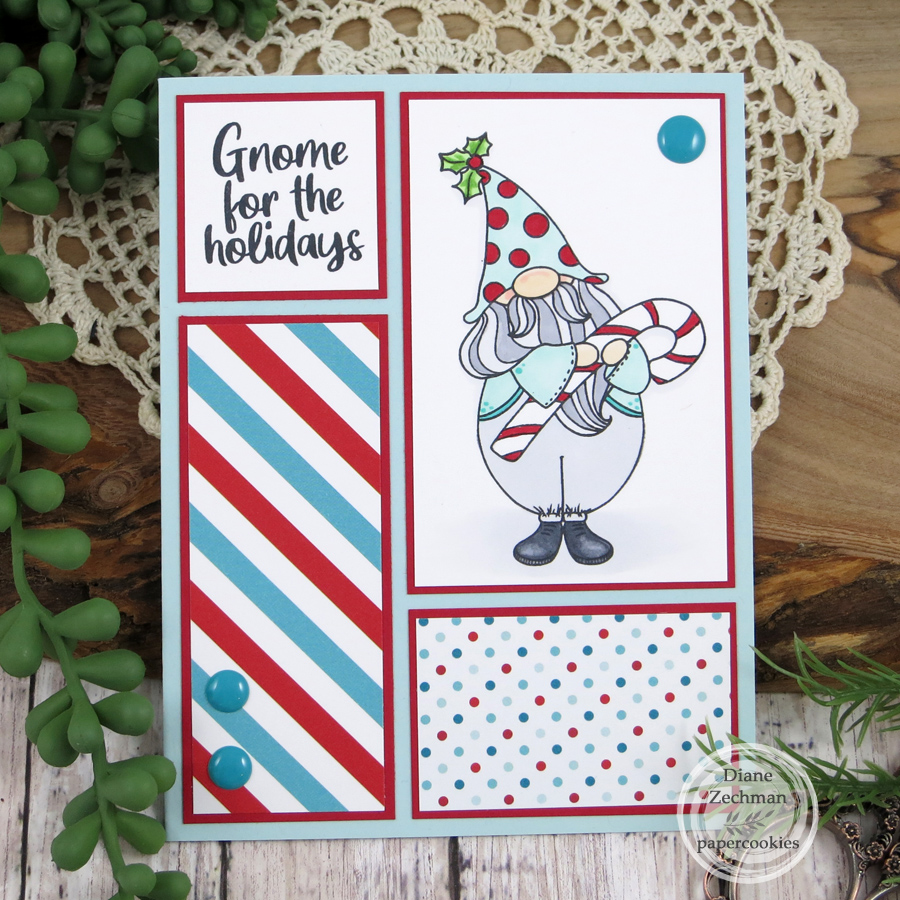
Good morning! Today Sweet ‘n Sassy Stamps is joining with My Sweet Petunia for an awesome blog hop and giveaway! There’s a chance to win a $50 gift code to each shop, so we hope you’ll join us and hop along! To be eligible for the drawing, leave a comment at each stop along the hop.

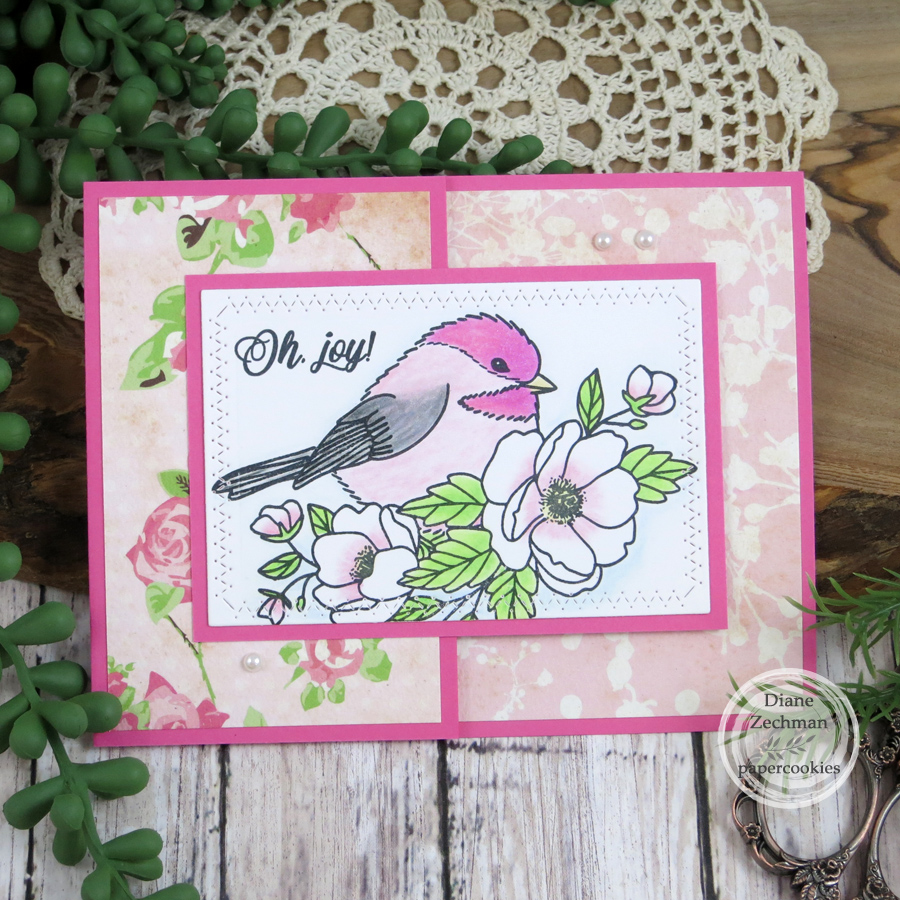
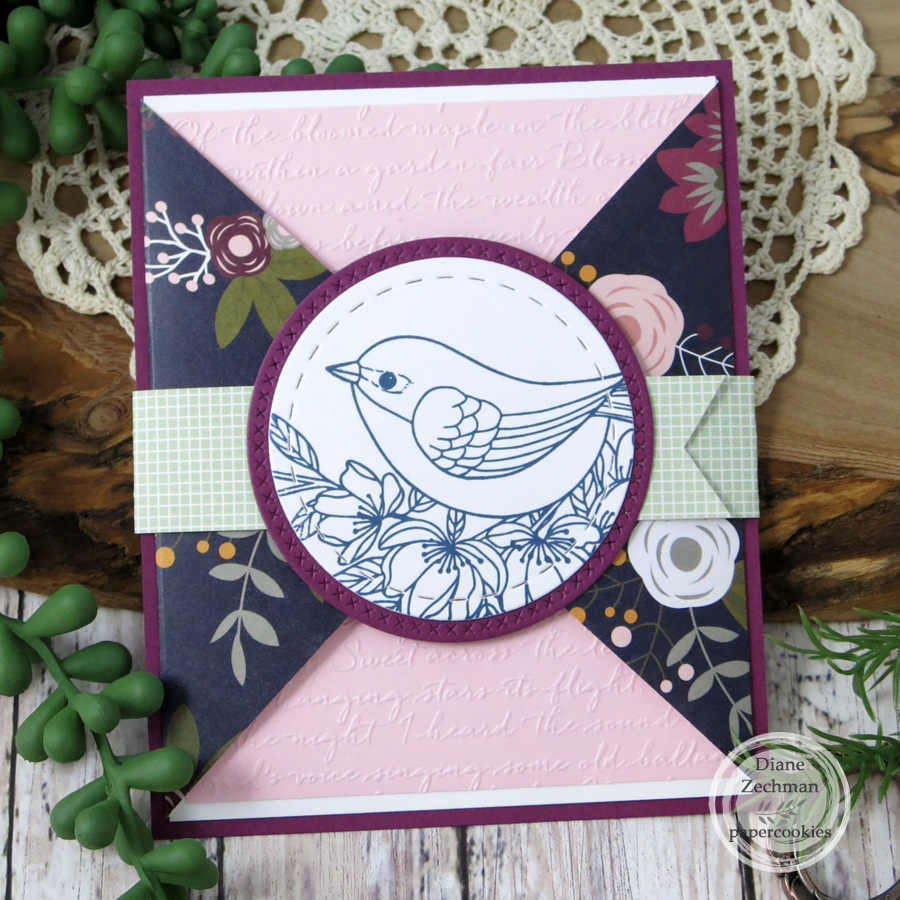
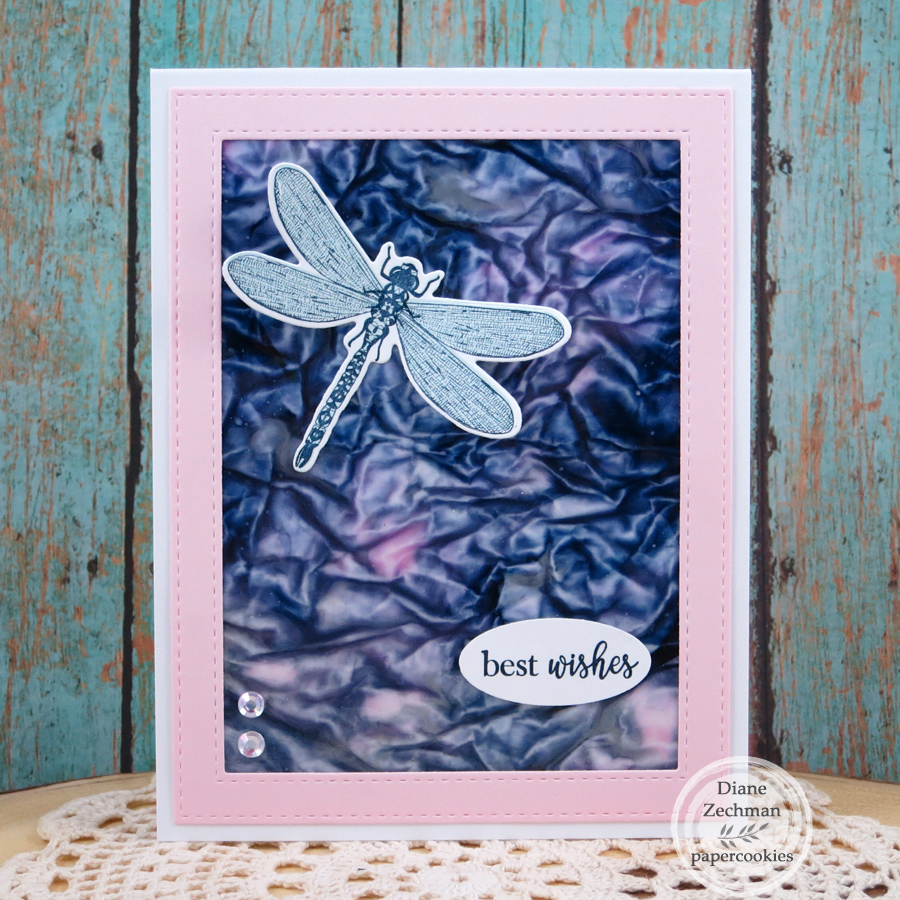
I made my card for the hop today using the Sweet ‘n Sassy Singing Praises stamp set which is the August Stamp of the Month (free with your order of $75 or more). Love those birds!

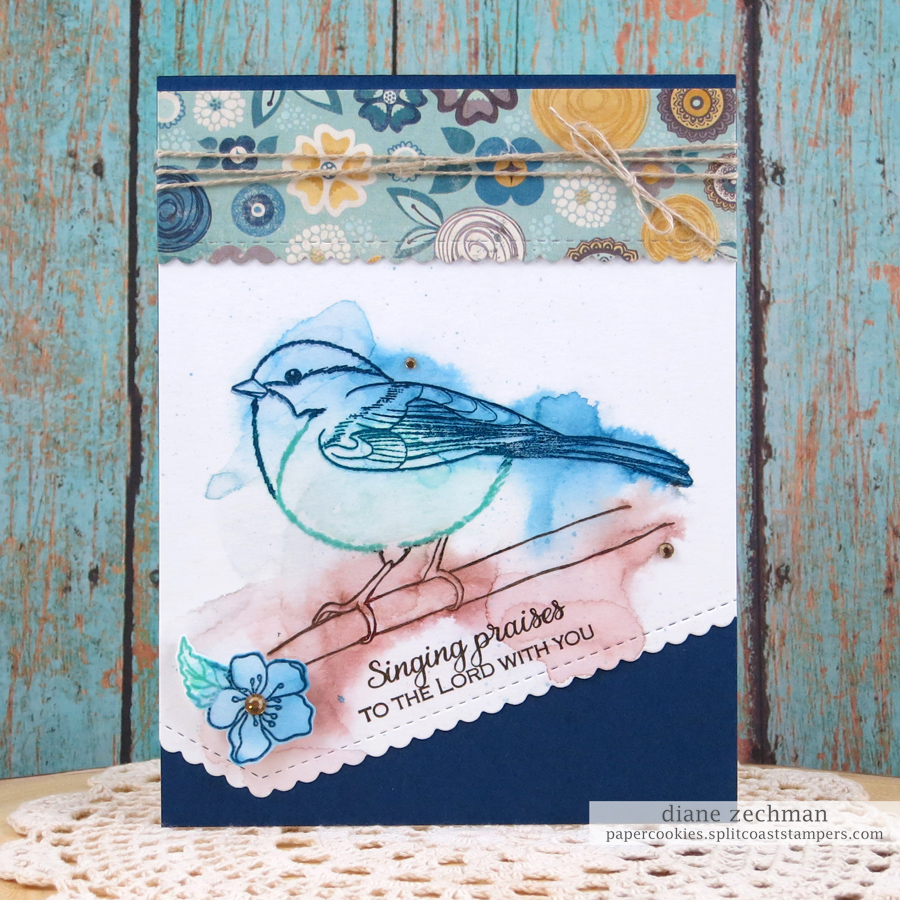
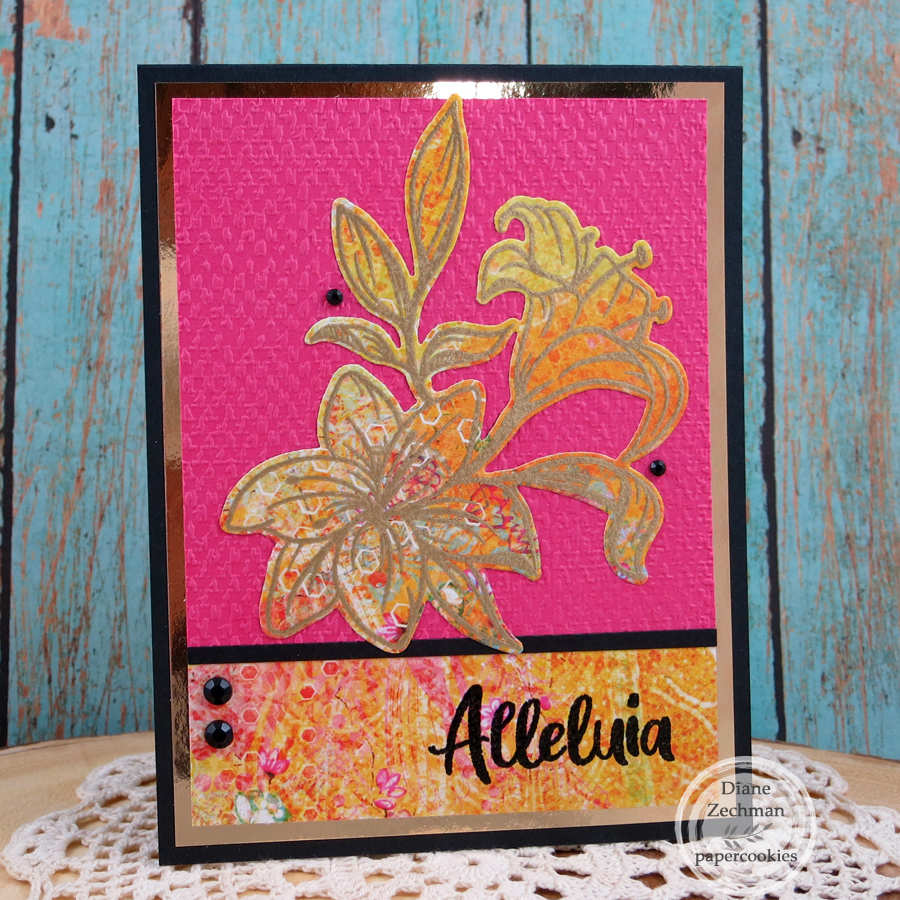
I combined several techniques on this card… Repeat Stamping, Multi Color Inking/Selective Inking and Dye Ink Bleed. It was very easy with the aid of the MISTI!

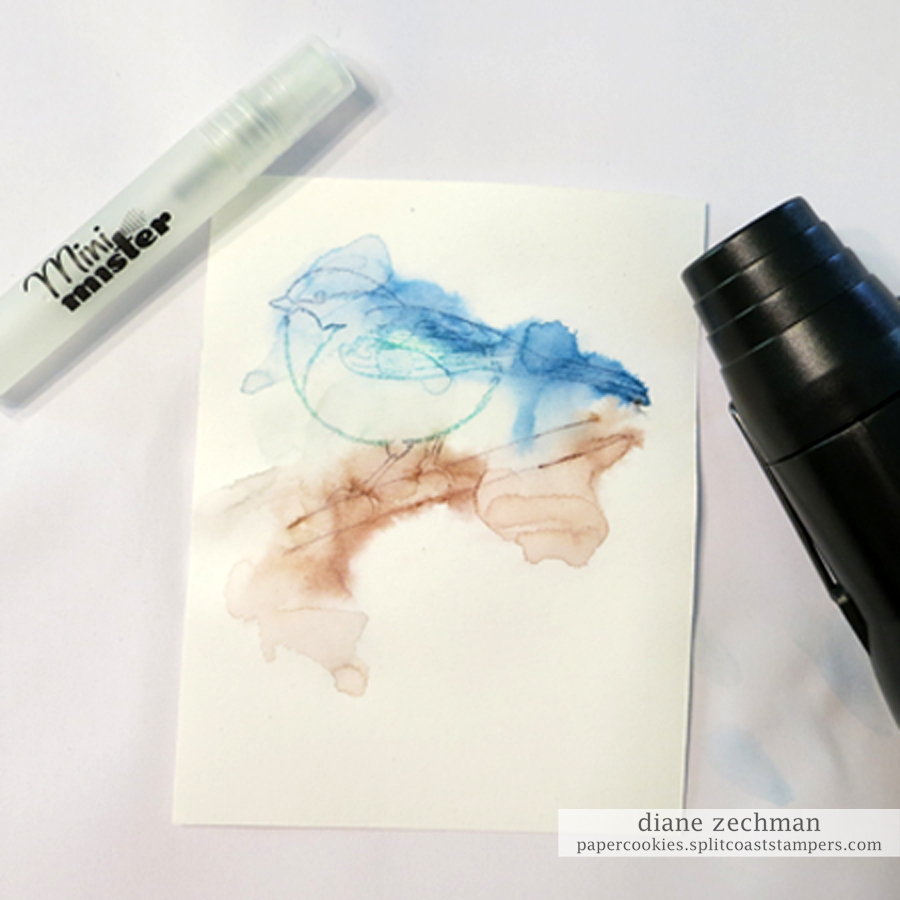
First I placed a piece of watercolor paper in the corner of the MISTI. I like the lighter weight of this watercolor paper for cards. The magnet holds your paper in place. Then I positioned my stamp where I wanted it and closed the lid to pick up the stamp. (The MISTI is great for placing your images exactly where you want to stamp them!)

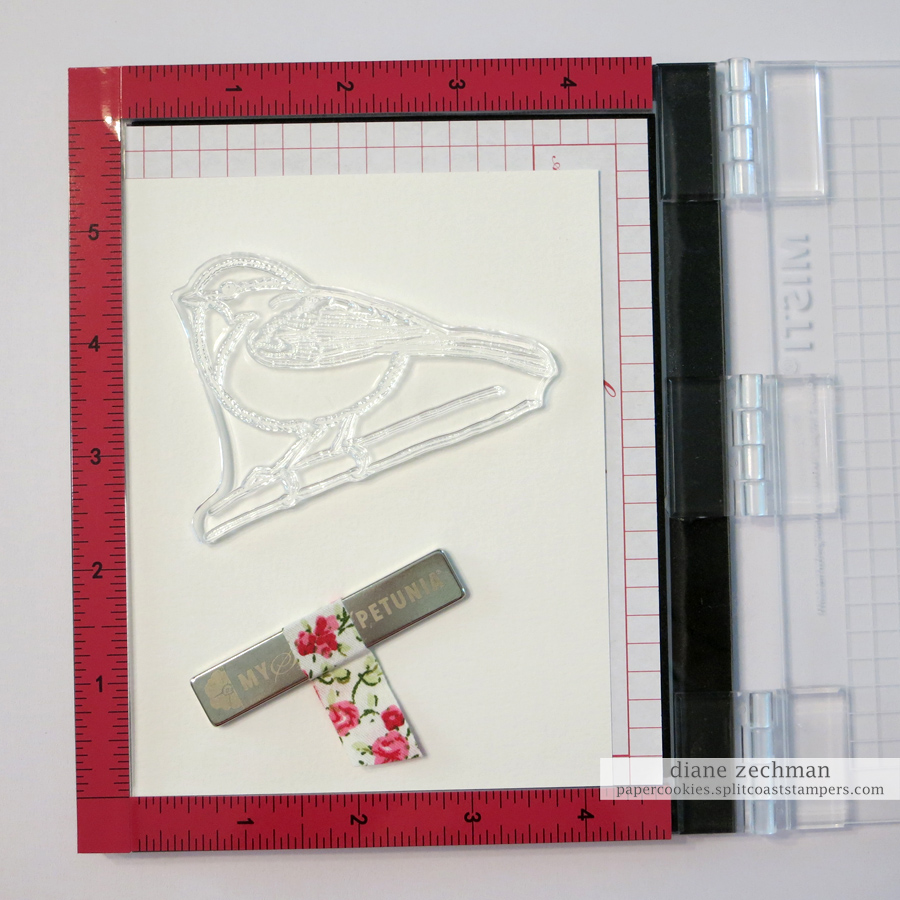
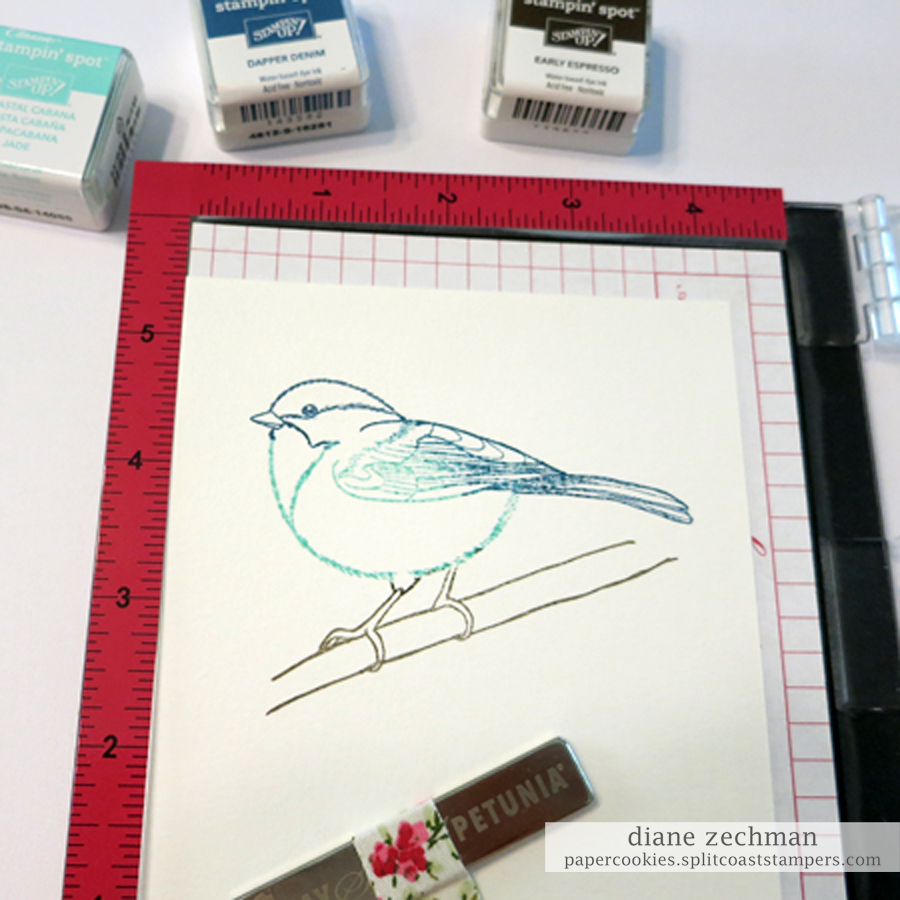
I inked sections of the bird image with three different colors. Using a smaller ink pad such as the cubes or dewdrops makes this easier. I started with the turquoise color and inked the body, then stamped it. Then I inked and stamped the head, back, and tail feathers with blue. Finally, I inked the feet and branch with brown. I cleaned the stamp between colors but it really isn’t necessary. (With a MISTI you can repeatedly stamp an image in the exact same place with perfectly aligned results!)

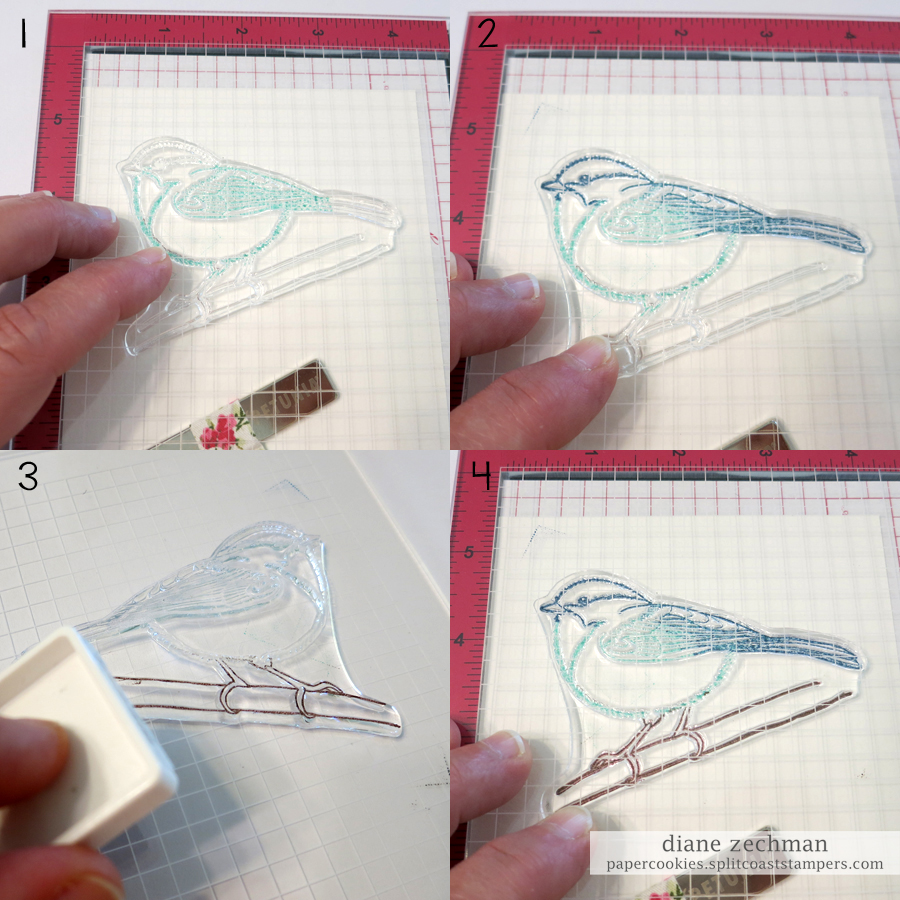
Here is my tri-color bird. 🙂 But I’m not done!

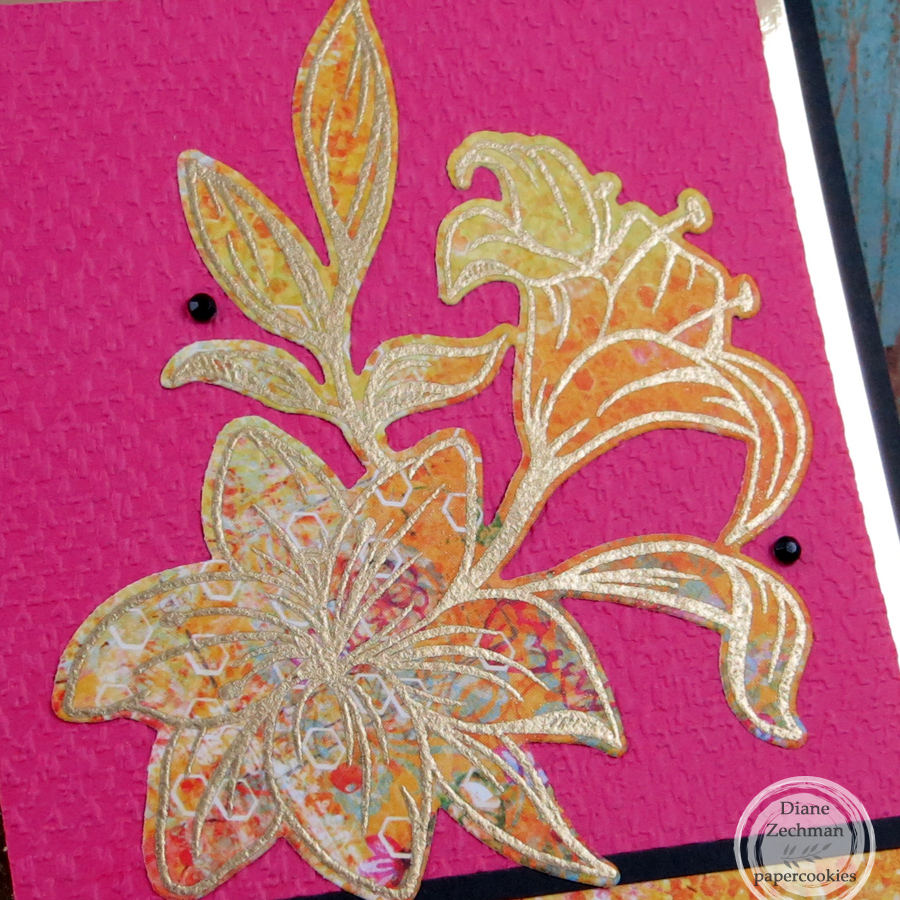
Instead of coloring it in, I gave it a watercolor look. I misted the image with water so the ink would bleed and then dried it with a heat tool.

When completely dry, repeat the stamping process again…starting with turquoise, then blue and brown. (By placing your paper back in the same corner of the MISTI it will stamp in the exact same place again!)

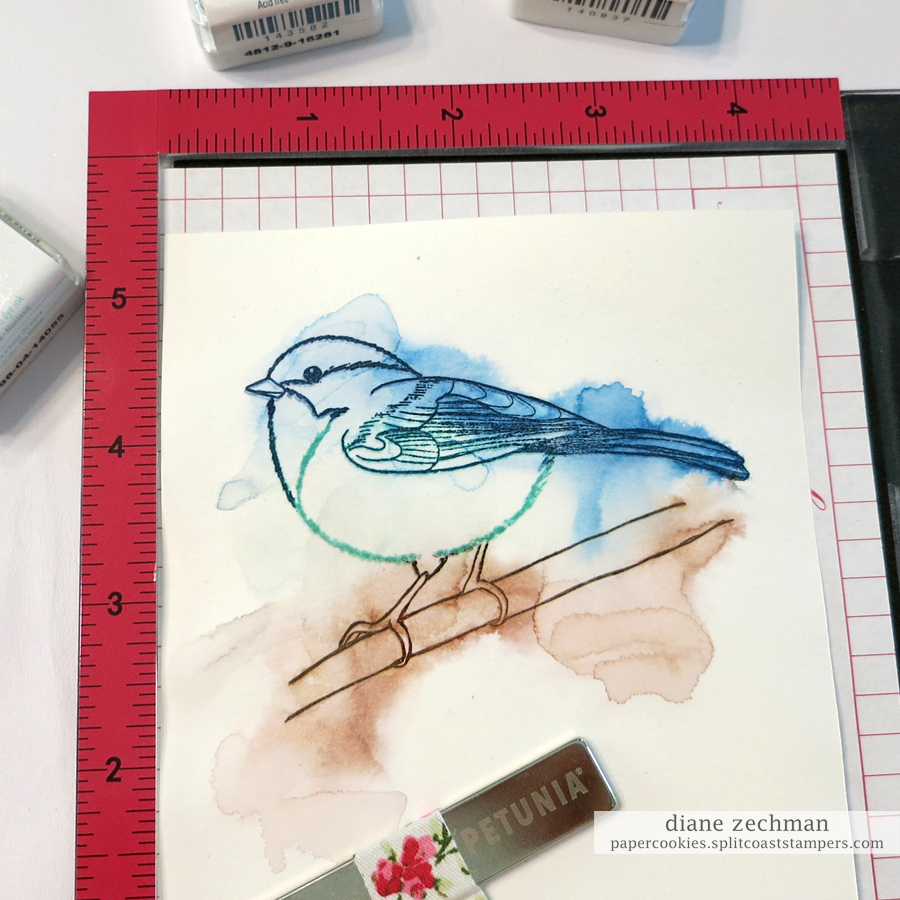
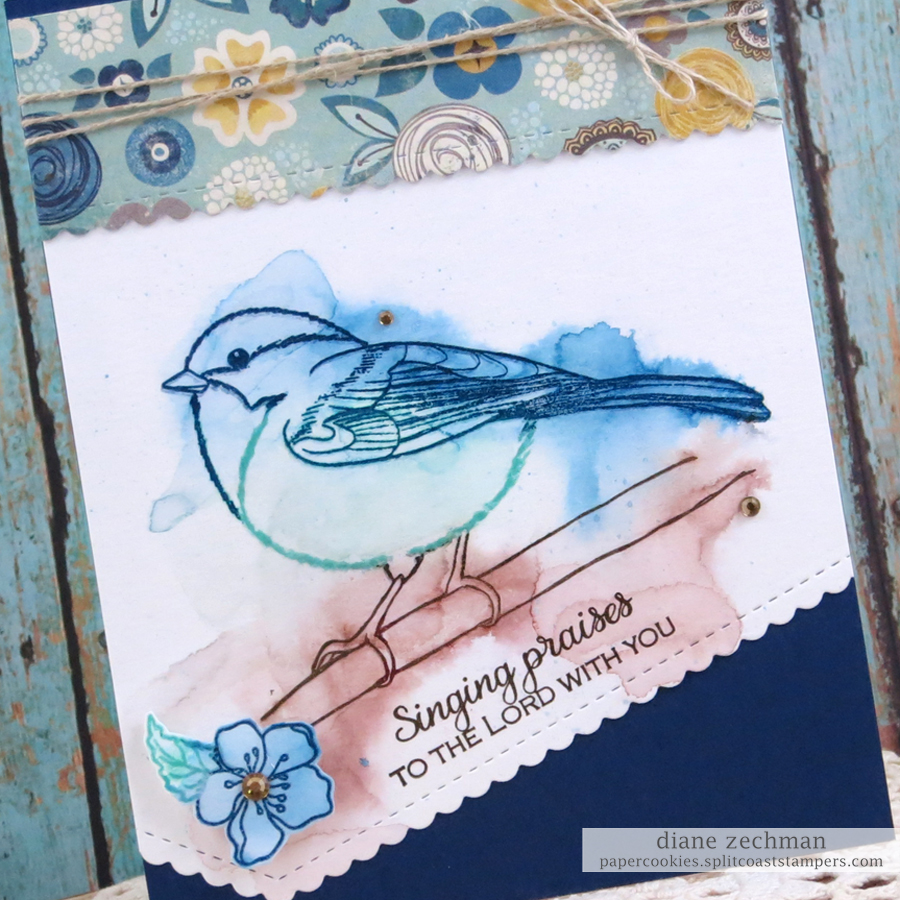
I lightly splattered some of the blue ink over the image with a Clear Wink of Stella pen and die cut a scalloped edge below the bird. Here I positioned and stamped the sentiment.

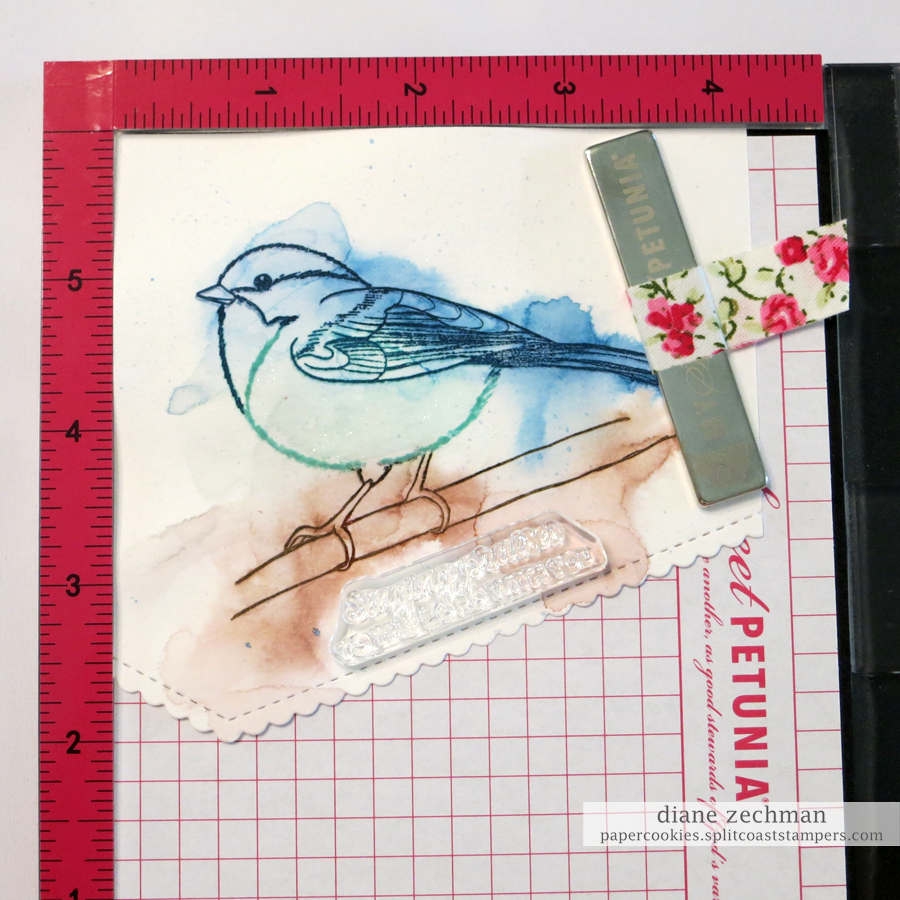
I repeated the same inking, stamping, and spritzing process with the flower image to add to my card as an accent.

I finished my card with a piece of pattern paper, some linen thread, and a few gold rhinestones to match the yellow in the paper.

I hope you try this fun technique! Now go visit Gayle for some more crafty inspiration with SNSS and the MISTI!

stamps- Sweet ‘n Sassy Singing Praises; paper- Northwoods watercolor paper, navy, MME-Hattie; ink- SU! Coastal Cabana, Dapper Denim, Early Espresso; accessories- MISTI, Clear Wink of Stella, rhinestones, Die-Namics Stitched Scalloped Basic Edges and Basic Edges 2, linen thread, foam dimensionals.