Category Archives: tutorials and templates

flamingo pocket letter

Hello! It’s the first day of Summer so I thought I’d share a summery project today. Last week I revisited the Pocket Letters. It’s been 3 1/2 years since I last created one so I agreed to do a swap.

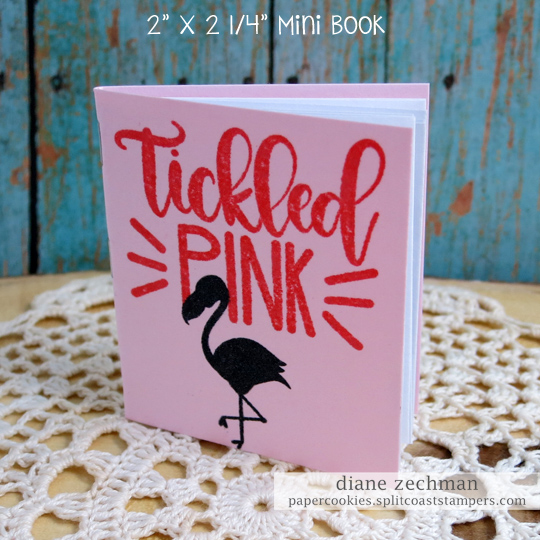
I used the Sweet ‘n Sassy Be a Flamingo and Life & Lemons stamp sets. If you aren’t familiar with pocket letters, it is basically a baseball card sleeve which is filled with 9 ATC size (2 1/2 x 3 1/2) creations. When done, it easily folds into thirds and slips into a business size envelope. Kind of like a pen pal letter made up of baseball sized cards.

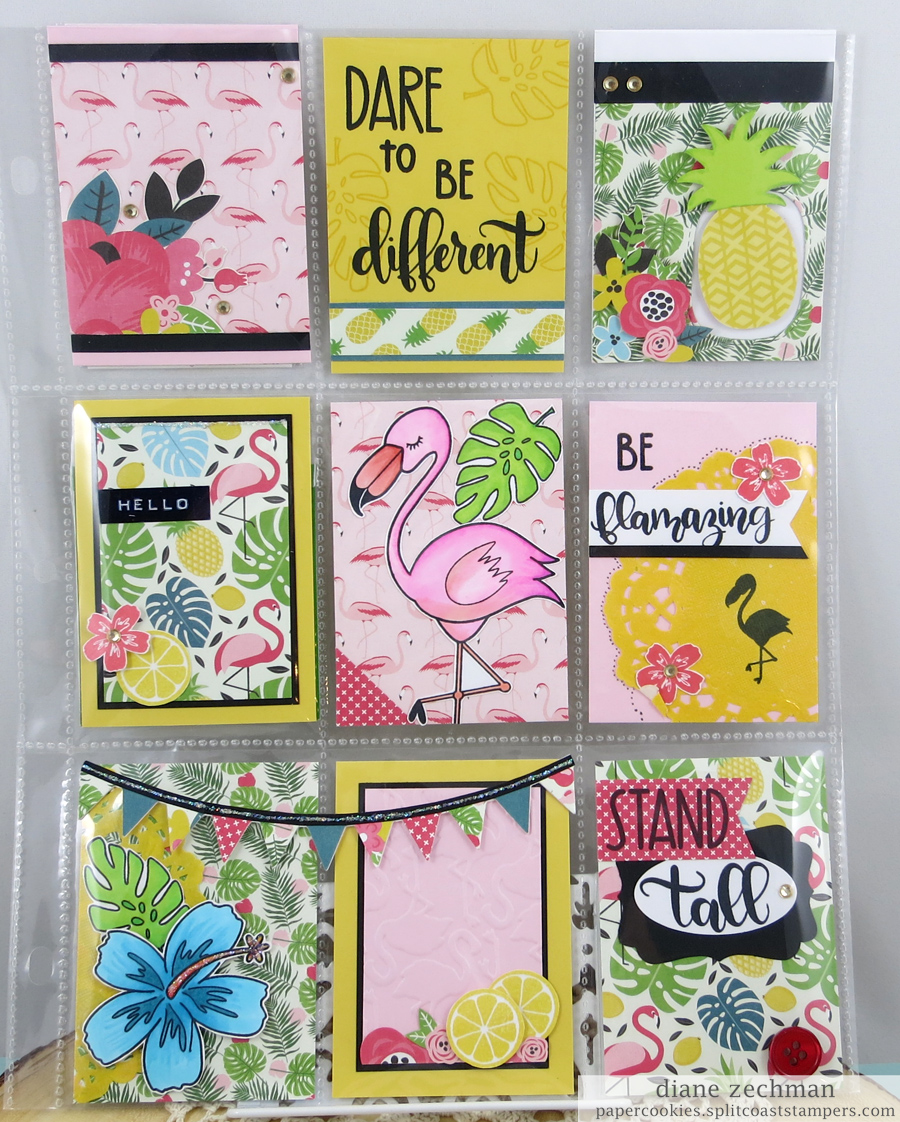
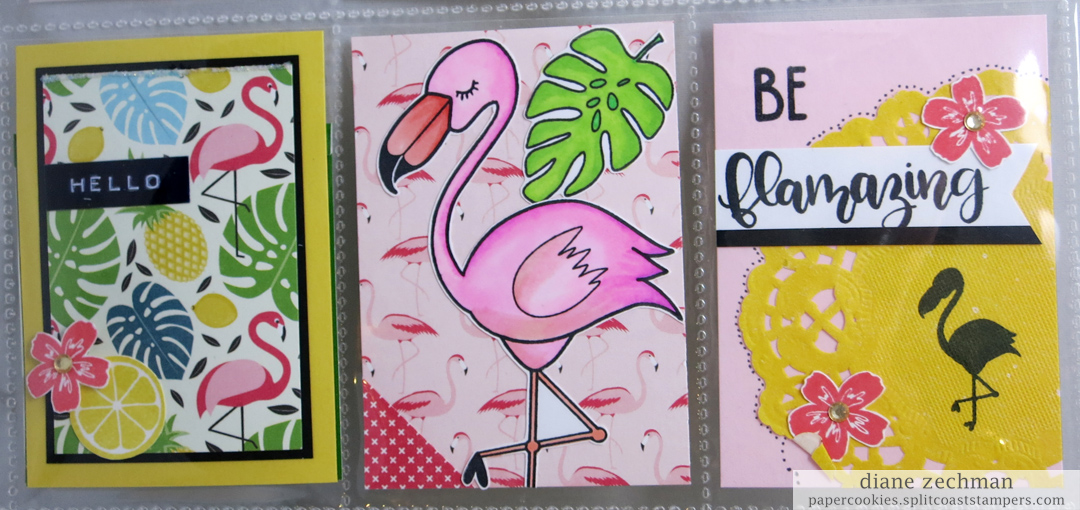
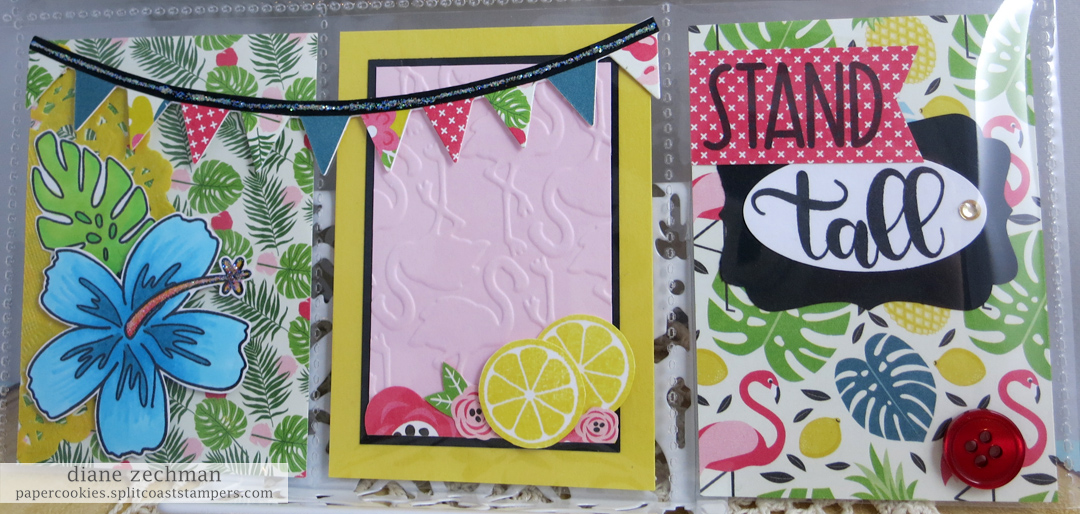
Here’s a few closer pics…

On the back I thought it would be fun to include a few summer recipes along with my notes to her. I also made a simple mini book that was tucked in the bottom left pocket. The arrows are from the Note This stamp set.

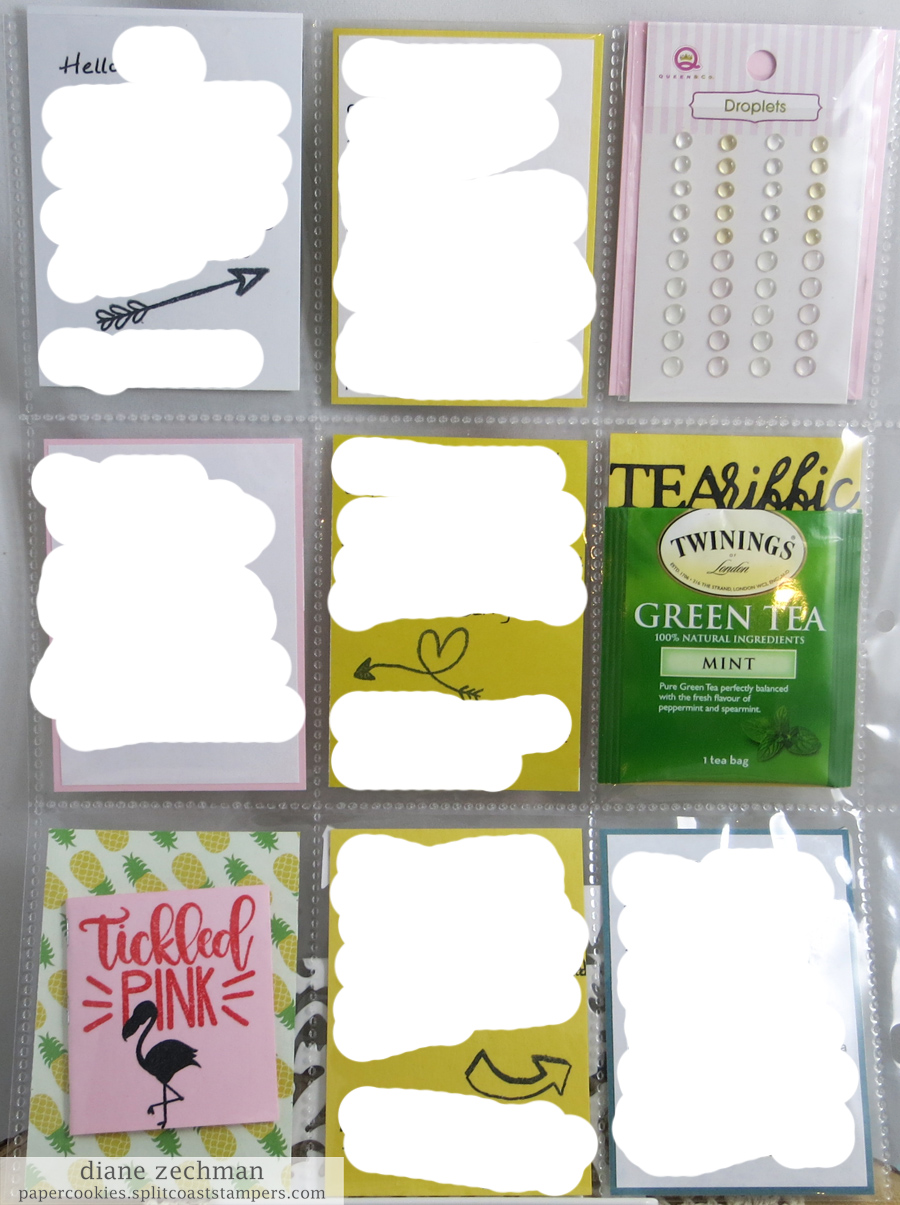
To make the little mini book, I just sort of winged it and quickly came up with my own measurements. I started with a 2 1/4 x 4 piece of cardstock for the cover and scored it @ 2. Then I cut 5 pieces of copy paper 2 1/8 x 3 7/8 and folded them in half. I layered them and trimmed the edge a bit, then inserted it in the cover and stapled it all together with a Tiny Attacher (mini stapler).

It’s fun to create something other than a card. These look so much cuter in person. I hope you try one!

Have a great day!

stamps- Sweet ‘n Sassy Be a Flamingo, Life & Lemons and Note This; paper- white, black, SU! Daffodil Delight and Pink Pirouette, Echo Park- Summer Fun; ink- Memento Tuxedo Black, SU! Flirty Flamingo and Daffodil Delight; accessories- Copics, foam dimensionals, The Paper Studio yellow doily, EK Success Pineapple punch, Dymo label maker, SU! Decorative Label and oval punch, Die-Namics Stitched Triple Peek-a-Boo Window & Banner Strip dies, Couture Creations Pretty in Pink embossing folder (flamingoes), Stickles, gemstones.

Ai on HSN

Hello! Long post today with lots of pics. I’m just popping in today to share some cards I made for Art Impressions’ big debut airing on HSN! Tune in now…or if you haven’t seen the show this morning, check out the website for the great bundles that are being offered!

I made 2 cards for each of the Circlet TryFolds in the bundle, the Cabin and the Lighthouse. First, I made an Acetate Tent Card with the Lighthouse set.

From the front, you can see through the image on the acetate panel to the images on the inside.

Here’s a photo with a side view to show how the card was put together. The acetate is adhered to the top and bottom flaps which were first die cut with some cloud borders. I started with 4 1/4″ x 10 1/4″ and scored @ 1 3/4, 7 1/4, 8 1/4 and 9 1/4. The circle images were adhered before the top of the acetate was attached. Note: I die cut and punched the circle sentiment from the back image and brought it to the front of the card!

The sentiment circle was popped up with diecut foam sheet.

I am a bit hooked on this style of card right now…so cute!

My second Lighthouse card was done in a traditional trifold style. I started with 4 3/4 x 11 and scored each end @ 3 5/8″. I love the dark pink and navy color combo!

The first fold opened…

…and the second fold opened, which reveals the image inside that you could peek through and see from the front.

The first Cabin card I made was similar to this Lighthouse card I made last year.

My blue card base is 5 1/2 x 6 1/2. The 6 1/2″ side is scored at 2 1/4. My white card insert is 5 1/4 x 8, scored @ 4″. The patterned paper layers are 2 x 5 1/4 (front), 3/4 x 5 1/4 (middle), and 3 3/4 x 5 (inside back).

This is another fun card design to use with the Tryfolds!

For my last card, I wanted to show how you can use the images to make a simple card without the trifold designs. Here I used just the inside image with the deer and layered it onto the card front.

Now go check out Bonnie and Kate in their HSN debut!

Have a great Tuesday and… happy stamping!

Lighthouse cards:

stamps- Art Impressions 4979- Lighthouse Circlet MTF; paper- white, SU! Night of Navy, Cumb Cake, Melon Mambo, The Paper Studio- The Pink Navy; ink- Memento Tuxedo Black; accessories- Art Impressions 5133- Flag Double Stitched Dies, Copics, Simon Says Stamp Stitched Circles, Scor-Pal, Scor-Tape, clear acetate, 2″ circle punch, Gina Marie In and Out Cut Stud Dot Circles and Sand Dollar, foam craft sheet, Impression Obsession dies- 189-C, 184-L, and 078-F,  Lawn Fawn Puffy Cloud Borders, Whimsy Stamps Stitched Cloud, Die-Namics Cloud Trio.

Cabin cards:

stamps- Art Impressions 4981- Cabin Circlet MTF; paper- white, black, SU! Marina Mist, Crumb Cake, Lemon Lime Twist, Lawn Fawn- Perfectly Plaid & Let’s Polka in the Meadow; ink- Memento Tuxedo Black; accessories- Art Impressions 4967- WC Fence Dies, 5134- Banner Double Stitched Dies, and 5133- Flag Double Stitched Dies, Copics, Die-Namics Cross Stitched Circles and Cloud Trio, Scor-Pal, enamel dots, C.C. Designs Grass Border, Memory Box Deer Trio, Whimsy Stamps Stitched Cloud, foam dimensionals.

Mer-mazing card and gift bag

Good morning! If you haven’t seen it yet, there’s a FUN new release at Sweet ‘n Sassy Stamps! Today I’m sharing two projects with the adorable Mer-mazing stamp set by SNSS’s newest illustrator, Jenn Nilsson.

First, I made an acetate tent card with the sweet mermaid and sea gull. I started with a 4 1/4 x 10 1/4 piece of cardstock and scored it @ 1 3/4, 7 1/4, 8 1/4, and 9 1/4. Mountain fold all scored lines except the 8 1/4 score which is Valley folded. I die cut some waves on the top & bottom sections of the front and then a piece of clear acetate was attached to them.

I added some blingy stickers to the acetate for bubbles, the center of the flower in her hair, and even placed one for a belly button. lol.

I love to decorate gift bags but don’t do it often enough! So I thought the little mermaid would be a cute way to dress up this plain chevron bag.

I gave her some fun hair color this time and popped her up on some banner die cuts. (I even made a small dent in the eyelets still in my stash!)

Have a great day!

stamps- Sweet ‘n Sassy Mer-mazing; paper- white, SU! Bermuda Bay and Coastal Cabana, Echo Park- Party Time; ink- Memento Tuxedo Black; accessories- Copics, foam dimensionals, Scor-Pal, Scor-Tape, clear acetate, Lawn Fawn Stitched Wave Borders, glitter stickers (Stampendous Dot Sparklers Gold and Starform Turquoise/Silver, gift bag, Art Impressions 5134- Banner Double Stitched Dies, Darice Mermaid Scales embossing Folder, eyelets, baker’s twine.

happy couple

Good morning! Today I am sharing two cards using some new Sweet ‘n Sassy stamps from this month’s release. Here I used Happy Couple, Marriage Scripture, and the lovely stamp of the month, Peony Cluster.

The layered strip on my first card is a piece of cardstock I found in my stash that I had done the melted crayon technique on almost 20 years ago. I really need to clean out my supplies! lol. Basically, I just placed some crayon shavings (metallic crayons used here) onto my cardstock, sandwiched it between two pieces of wax paper and ironed it. I can’t remember if I used regular or glossy cardstock on this piece…experiment! (I did find a quick video for this technique here).

On the inside, I used stamps from both of the wedding themed sets and kept it a classy black & white.

For my second card, I used the pretty peonies from this month’s free set to help create the background. They were stamped with Versamark ink to keep them “softer”. The cake was popped up with dimensionals.

Have a great day!

stamps- Sweet ‘n Sassy Happy Couple, Marriage Scripture, and Peony Cluster; paper- white, black, SU! Lavender Lace and Blushing Bride, scrap dp; ink- Memento Tuxedo Black, SU! Flirty Flamingo, Versamark; accessories- Copics, circle punches, rhinestones, ribbon, metallic crayons, Wink of Stella, foam dimensionals, pearls.

Lighthouse Circlet MTF

Hello friends and happy Monday!

Today I am on the Art Impressions blog with another card I made using one of the Ai Circlet MTF sets. Here I used the 4979- Lighthouse Circlet MTF set. Last month I shared 3 different ways that I used the new Circlets sets and here’s the last card design I made.

This one is sort-of a card inside of a card! From the front, once again you peek through the layers for a glimpse of the inside.

CHA Jan 2018 4a

The first circle has the fence image. My blue card base is 5 1/2 x 6 1/2. The 6 1/2″ side is scored at 2 1/4. I die cut an extra circle for the inside to give it a nice finish. When the front flap is opened, the lighthouse shows.

CHA Jan 2018 4b

My white card insert is 5 1/4 x 8, scored @ 4″. When this one is opened, you see the little boat.

My patterned paper layers are 2 x 5 1/4 (front), 3/4 x 5 1/4 (middle), and 3 3/4 x 5 (inside back).

CHA Jan 2018 4cHave a great Monday and… happy stamping!

Diane Signature Medium size

stamps- Art Impressions 4979- Lighthouse Circlet MTF; paper- white, SU! Pool Party, Echo Park Summer Dreams; ink- Memento Tuxedo Black; accessories- Copics, Die-Namics Cross Stitched Circles, Scor-Pal, enamel dot, Impression Obsession dies- 184-L and 189-C.

Cabin Circlet MTF

Hello friends and happy Tuesday! I am posting on Tuesday this week instead of Monday and today I have a masculine card to share using one of the new Ai Circlet MTF sets. Here I used the 4981- Cabin Circlet MTF set. I have already shared 2 ways that I used the new Circlets and here’s the third card I made. I’ll share one more style later!

CHA Jan 2018 1f

I wouldn’t normally make a circle shaped card for a masculine card, but by incorporating some masculine papers and cross-stitched dies, I think it works. First, I stamped and colored each image. The first two were not fully colored where the matching dies will cut them.

CHA Jan 2018 1a

Next, each image was die cut with circle dies and the inside of the first two were die cut with the dies included in the set. Then 3 blue layers were die cut. They are not attached yet here.

CHA Jan 2018 1b

Some patterned paper layers were added to the first two and then the circle images were adhered. The matching dies were laid back inside the images and held in place with low-tack tape. These were run through the machine again to cut a window through the first two blue layers.

CHA Jan 2018 1c

Now each layer is ready to be assembled. (I decided to add some paper scraps and die cut holes on that first one!)

CHA Jan 2018 1d

Using my Scor-Pal, I scored a half inch line at the top of the SECOND and THIRD circles. I didn’t want the top of my card to have score marks, for a nice finished look. Then I adhered the layers together using Scor-Tape on those top 1/2″ scored areas.

CHA Jan 2018 1e

I love how you can peek through from the top circle to the back one!

CHA Jan 2018 1f

This circle card opens sort-of like a book.

CHA Jan 2018 1g

Great masculine images!

CHA Jan 2018 1h

Have a great Tuesday and… happy stamping!

Diane Signature Medium size

stamps- Art Impressions 4981- Cabin Circlet MTF; paper- white, SU! Bermuda Bay, MME- Hello Gorgeous; ink- Memento Tuxedo Black; accessories- Copics, Large Circle Nestabilities, Die-Namics Cross Stitched Circles, Scor-Pal, Scor-Tape, enamel dot.

Cottage Circlet Set

Hello friends and happy Monday!

Today I am on the Art Impressions blog with a card using one of the new Ai Circlet MTF sets. Here I used the 4982- Cottage Circlet MTF set. Instead of using the new Circlet MTF sets to create fun trifold cards, I created 4 different card styles to give you extra ideas. Keep checking back to see the other 3 card styles I made…I’ll share another one on Thursday.

CHA Jan 2018 2a

For this card, I pulled out some circle dies and used them on each of my three layers. I diecut my images and also patterned papers to layer on the white diecut bases. The first two layers (the fence and cottage) also have a portion of the images cut out with matching dies that are included in the set. When layered, you can peek through each layer to the next image!

I used two Ai mini white brads to attach my circle layers together and placed them on opposite sides so you see each one when they are turned to open. Here’s the first, top layer, turned to open.

CHA Jan 2018 2b

When you also turn the second layer, you see all three.

CHA Jan 2018 2c

Here’s a few close ups.

CHA Jan 2018 2d

Such sweet images!

CHA Jan 2018 2e

Have a great Monday and… happy stamping!

Diane Signature Medium size

stamps- Art Impressions 4982- Cottage Circlet MTF; paper- white, Pebbles- Garden Party; ink- Memento Tuxedo Black; accessories- Copics, Small & Large Circle Nestabilities, Lg. Scalloped Circle Nestabilities, Die-Namics Cross Stitched Circles, Ai mini white brads, adhesive pearls.

one fish…two fish…

Hello friends and happy Monday!

Today I am on the Art Impressions blog with another card using the Ai Mouthfuls. I love this collection! Here I just used a few of the accessory images in the 4951 – Cat Mouthful Set to make a fun child’s birthday card.

one fish two fish 1 diane zechman

I typed the words and printed them onto cardstock. Then I stamped the images and colored them with Copics.

I don’t always stamp on the inside of my card but I felt this needed a printed sentiment to match. The party hat image was stamped above.

one fish two fish 2 diane zechman

I also added some Crystal Effects to the water in the fish bowls. Now they are nice and shiny!

one fish two fish 3 diane zechman

I saved the words so I could make some cards again in the future. If you would like to try one, here’s some printables for you!

One fish two fish pdf printable

One fish two fish inside pdf printable

Have a great Monday and… happy stamping!

Diane Signature Medium size

stamps- Art Impressions 4951 – Cat Mouthful Set; paper- white, SU! Real Red; ink- Memento Tuxedo Black; accessories- Copics, MISTI, Crystal Effects, Stickles.

wood slice ornaments

Hello friends and happy Monday!

Today I am on the Art Impressions blog with a Christmas project using two different Ai stamp sets… 4943 Singing Snowmen PopCard and 4809- Nativity MTF. The PopCards and Mini TryFolds images are SO fun to use as they were intended (creating interactive cards) but can also be used many other ways! Today I made some Birch Tag (wood slice) ornaments!

IMG_7144 copy

To begin, purchase some wood slices (or cut them yourself if you can!).  I purchased these Birch Tags at Michael’s and Hobby Lobby. I’ve also ordered some from Amazon which are a different type of wood and I haven’t used them yet. But I’m assuming I will have similar results.  The wood slices from Amazon are approx. 3/16″ in thickness compared to the M’s and H.L. ones which are 1/2″ thick.  My husband drilled holes in these for me but some come pre-drilled too.

Next you need to choose the Ai images you want to use. Remember that you can use just a portion of your image if it is too large.  The snowmen I used are from the new Singing Snowmen PopCard. For one, I stamped and masked the songbook before stamping the snowman.  Stazon ink works well but I used my Archival Black because that pad of mine seemed juicier at the moment and it also gave me the permanent ink that I needed for coloring.

I wanted to try the Inktense pencils on them and add water with a brush so the color would smooth out and wouldn’t just sit on top of the wood.  It might be easier to do some shading if you just use regular colored pencils such as Prismacolor.  It’s difficult to blend or shade this way but I do like the look. The wood soaks up the water so quick…you don’t need to worry too much about bleeding out of the lines as long as your pencil color stays within! I used a tiny #10 brush.

IMG_7138

Here are my finished ornaments. A sentiment was stamped on the back of the snowmen ones. Don’t forget to also sign and date!  I also added some “snowflake” dots with a white paint pen. To finish them, I added a small wood bead to the top of the twine (use a 9″ piece).

IMG_7146

I wanted the nativities to be more rustic, so I only spotlighted the star and manger by coloring with shades of brown.

Inktense colors- Beech Green, Cherry, Chilli Red, Carmine Pink (cheeks), Neutral Gray, Sienna Gold, Saddle Brown, Amber, Tan.

IMG_7148

Have a great Monday and… happy stamping!

Diane Signature Medium size

stamps- Art Impressions 4943 Singing Snowmen PopCard and 4809- Nativity ; ink- Stazon or Archival Black; accessories- wood slices (Artminds Birch Tags), Inktense pencils, #10 brush, Sharpie white paint pen (water based), Artminds wood beads, twine.

Old Bat wine tag

Hello friends and happy Monday!

Today I am on the Art Impressions blog with a project using one of my favorite Ai sets- 4784- Old Bat Set.  If you like cute Halloween images, this set is a must-have!  Here I used it to make a decorative gift tag on a bottle of wine for a friend.  (Did you also see Renee’s tag and wine cork pumpkin that she posted earlier?)

old bat wine tag 2 diane zechman

I am planning to surprise my friend who loves Halloween with this…she is always doing things for others so I think a little RAK is in order. 🙂

old bat wine tag 1 diane zechman

I started with a 2 1/4 x 7 3/4 piece of cardstock and scored it @ 2 1/4. The top corners were punched with a corner rounder after punching a 1 3/8″ hole in the center.  I colored her with Copics and popped her & the sentiment on foam dimensionals. I saved the circle that was punched from the top and used it to “spotlight” the glass in her hand.

old bat wine tag 3 diane zechman

I haven’t tried the wine yet, but I’ve heard it was good. At least it has a cute label!  lol.

old bat wine tag 4 diane zechman

Have a great Monday and… happy stamping!

Diane Signature Medium size

stamps- Art Impressions 4784- Old Bat Set; paper- white, SU! Lavendar Lace & Pumpkin Pie, K&Company scrap paper; ink- Memento Tuxedo Black, Versafine Black; accessories- Copics, rhinestones, 1 3/8″ circle punch, SU! Large Oval & Scallop Oval punches, foam dimensionals, corner rounder, clear Wink of Stella.